One of the most important and powerful tools in any recording studio arsenal is – without a doubt – the compressor. I recently wrote about studio compressors and which specific units were good for specific applications. However, I’ve been hearing a lot of budding engineers say that they don’t understand what all the different settings do or how they actually affect the source audio. Essentially these folks have been saying that they just fool with all the knobs/settings until they think everything sounds okay.
The number one rule for recording and mixing is “as long as it sounds good, it is good.” I completely agree with and abide by this rule. But it couldn’t hurt to at least know what everything does, right? That way one doesn’t have to fiddle around with settings they don’t understand and they can just get right to the proverbial meat and potatoes of it all.
So…what the heck are all these settings on my compressor?
The Basics
Compressor knobs and settings can range from wonderfully simple to other-worldly complex. Let’s start off by tackling the most common elements that can be found on your go-to plug-in or on your dope new rack piece.

Input Gain
Easy enough – this controls the amount of signal that is being sent into the compressor
Output or Make-Up Gain
This is the amount of signal that is being sent out of the compressor and back into the channel.
Threshold
This is one of the most important features to understand on a compressor. The threshold controls the point at which the compressor clamps down on a signal and starts compressing.
If the audio coming in is peaking at -6dB, averaging at -8dB, and the threshold is set at -4dB, the compressor will be doing nothing (however, if a compressor emulation from Universal Audio is being used, the audio will still get some coloration from the simulated circuitry). If we’re using that same example and the threshold is set at -7dB, the compressor will be just barely grabbing onto the peaks. If the threshold is again lowered to -9dB the peaks will be getting smashed along with the compressing of the entire average volume of the signal.
Ratio
One of the most elusive of all the settings that seem to trip people up is the ratio. If you’ve ever sat down and tinkered with this, chances are you’ve noticed that the lower the ratio, the less apparent the compression, while the higher the value, the more squashed the audio starts to sound. This is because the ratio adjusts the amount of compression happening once the source audio passes over the threshold.
So, let’s say we have our threshold set at -10db. That means that the compressor won’t function until the audio coming into it passes that decibel level. Let’s set the ratio to something standard like 3:1. This basically means that for every 3dB over the threshold that the audio goes, the compressor will only let 1dB pass through.
At first, that may seem like it makes no sense, but once we start to think about it, we can see it all coming together. A 1:1 ratio won’t do anything; 1dB goes in, 1dB comes out. 6dB go in, 6dB comes out.
As we start to adjust the ratio higher and higher, that’s when we really see the compressor start to work. If we set the ratio to 20:1, that means that when the audio is 20dB over the threshold that compressor is only going to allow 1dB to pass through. This is absolutely going to crush the audio signal.
Attack
Attack is the parameter that controls how fast the compressor latches onto the incoming audio signal. If the attack is at its shortest setting, the compressor will instantly latch onto the audio. If it is at a longer setting, the unit/plug-in will take a while to activate and start doing work.
Getting the feel of this one can be tricky. Dial in too fast of an attack and you’ll crush the transient. Too slow, and the audio will pass through without being compressed at all (in the case of percussive instruments) or the audio will be compressed in a weird spot and you’ll notice a sudden jolt in the compression which will sound odd/off (in the case of any sustainable instruments like guitar, synth/pads, vocals with long notes, etc.)
On certain compressors, such as the Neve 33609, the attack won’t be a parameter that you can dial in, but rather a switch that goes between “fast” and “slow.” The same rules apply to this as above, but depending on which compressor one is using, it could be worth a quick search to see what those options actually entail — though “fast” and “slow” should give any engineer an idea of what to expect in regard to the response time.

Release/Recovery
Ah, the yin to attack’s yang. This control, like the attack, is a self-explanatory one. With this control, one can dial in the speed at which the compressor releases its grip on the signal once it falls below the threshold. A short release time means that the compressor will ease up on the signal much more quickly, thereby retaining more of the original dynamic of the instrument. A longer release time means that once the signal falls below the threshold, the compressor will retain its hold for longer. A long release time can make the audio sound smoother — as opposed to a shorter time, which can be more jarring and abrupt.
Less Common Compressor Settings
Above, we reviewed the basics. If one is using the stock plugs from their preferred DAW, chances are these will be available. But, if anybody out there has any additional compressors in use from UAD, Slate, Waves, Fab Filter, etc. — then we’ll go ahead and shed some light on more specialty functions.
Knee
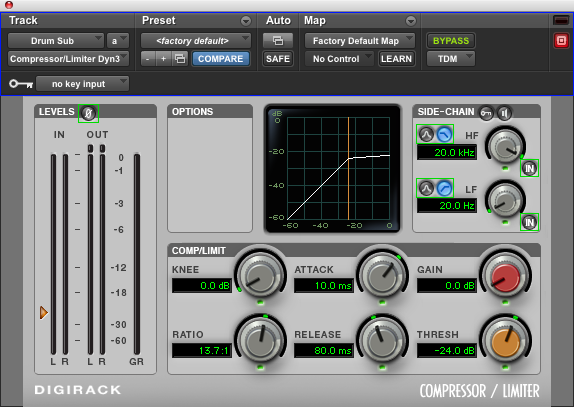
This is kind of a bizarre one. In my opinion, most compressors can do without this option, but it’s a good choice if one wants to have the most complete control over how a compressor reacts to an audio signal. The knee basically controls how the compression is handled once the threshold is crossed. Now, this is a distinct control over the attack. So, aside from the attack setting, the knee determines if the compression happens instantly or progressively over a bit of time.
I realize this seems like the same function as the attack, but it is not. It’s a tool to use in addition to the attack. Personally, the only time I’ve used a compressor that includes the knee setting is in Pro Tools with the DYN3 Compressor/Limiter by Avid. I don’t use this particular plug-in much — I usually opt for something else with a bit more sonic character — but when I have used it I’ve virtually all but ignored the knee. As an engineer, if you’re very into having the utmost control over every parameter, then this is something worth visiting. Otherwise, chances are that the compressor being used doesn’t even include this feature.
Sidechain Filter
Some info that may or may not be known is that low-end frequencies tend to have a higher amplitude (overall perceivable volume) in a mix than higher frequencies. Because of this, compressors can clamp down on a signal when an engineer isn’t expecting them to, due to nothing other than low-end content of the audio. In this instance, having a sidechain filter is a distinct benefit. These are usually sweepable knobs that allow the engineer to select a particular frequency from sub-bass to bass to low-midrange that the compressor will ignore.
Let’s say that we select 150Hz as the sidechain filter. That means this particular compressor is going to ignore any signal that is equal to or lesser than that particular frequency range. This is great for guitars and vocals and even keys/synths in some instances. So, using the aforementioned 150Hz, the compressor won’t clamp down on a signal unless it has frequency content of 150.000001Hz or higher.
Mix/Parallel/Comp Mix
This feature has been restricted to plug-in compressors until recently. If anybody has been looking at hardware compressors, Black Lion Audio has an 1176 clone based off of Chris Lord-Alge’s blue face 1176 which has a comp mix knob on it. This feature allows you to blend the amount of compression into the output signal.
In short, this means that if the knob is at 100% dry, there will be no audible compression. But as the dial is steadily turned up, the compression is blended into that signal. There are a multitude of reasons that this could be beneficial. For me personally, this has a great amount of appeal for mixing outside the box.
Achieving parallel compression in a mix can be as simple as dialing that in just a bit. Or, for tracking purposes, I could really smack the compressor with that signal and then dial the mix knob in with precision — this would allow me to retain a lot of the dynamics of the performance I’m capturing while getting some gnarly compression sprinkled in to give the instrument some thunder.
Others
There are so many compressors out there — both software and hardware versions – that I’m almost positive I’m leaving something out. But, like I’ve said before, a quick question into a search engine could bring up whatever information is needed to really master the compressor in question. Also, feel free to drop a comment below if you’re wanting some specific information on that same compressor.
To Wrap It Up
We all know that compression involves narrowing the dynamic range of an audio signal. Boosting quieter signals and attenuating louder signals is the name of the game here. If you didn’t know that already, don’t feel bad. This whole post is an educational piece to help folks become better engineers and to better understand the tools at their disposal.

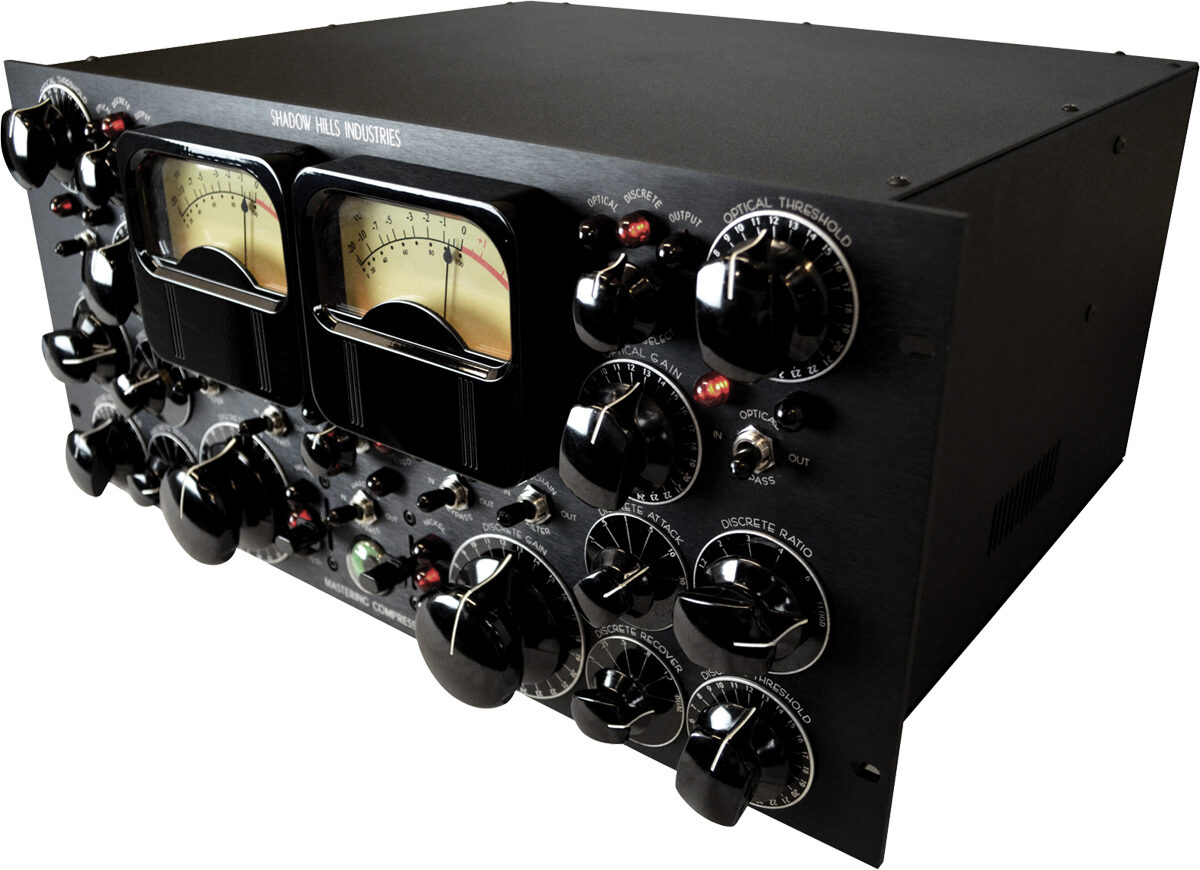
As a side note, not all of these settings will be found on every compressor. For example, the Teletronix/Urei/Universal Audio LA-2A (and multiple renditions of it) has only three simple parameters: output gain, peak reduction (basically the threshold), and a limit/compress switch (which adjusts the ratio). On the other end of that spectrum, the Shadow Hills Mastering Compressor (which Universal Audio makes a beautiful plugin rendition of) has a mind-boggling amount of control. There are the common controls we’ve discussed here, and others which switch the type of metal in the circuit that’s being used and a blend amount for using different levels of those circuits…just a crazy amount of stuff that can have an engineer sitting slack-jawed staring at their rack unit/plug-in for hours, not knowing where to start.

I hope this helps to clarify any issues you may be having with how to fully utilize your compressors. Anywho, thanks for reading and if you happen to have any questions or anything to add, feel free to leave a comment!
Top Photo Credit: John Tuggle, Wikimedia Commons


Leave a Reply