Welcome to Beat Connection, a series dedicated to promoting modern and vintage dance styles the only way we know how…by providing you a musical starting point to help you create that beat. In the majority of our recent posts, we’ve been taking you on a journey to what I’d dub “foundational beats.” These are standard rock, pop, funk, R&B, and dance beats that every producer should know the ins and outs of.
In previous posts, we looked at how to incorporate binaural recording techniques into production work. Then we took a side tour, going back to basics, discovering what are the best tools to even begin with. Today, we’re adding another brick to that side track: how to back up your analog vinyl collection in the digital world.
Humanize something free of error.
– Brian Eno and Peter Schmidt, From Oblique Strategies
On today’s Beat Connection, we’re going to explore how you can backup what is perhaps your most prized possession: your vinyl collection. If you’re a proud owner of a turntable, you may have run into an interesting conundrum: the album I own I can’t find streaming or downloadable anywhere. Congratulations, you’re the proud owner of something that merits to be archived digitally for reference. But how does one do so?
Prepping
We begin this archival journey, like any good historian, by taking stock of what we do have. Do we have a completely analog turntable? Does our turntable have any digital outputs, like USB? Do I own an external audio interface where I can plug the analog outputs of my turntable? Does my turntable have a built-in phono preamp? Like any choose-your-own adventure, what you begin with will dictate what comes next. Need a quick how-to on how turntables work? Check out this video by the Amoeba Music record store:
I own a digital USB turntable.
Live it up — you’ve struck digital gold. Proceed to the following section.
I own a completely analog turntable.
The majority of you will be blessed with a turntable by the likes of Rega, Technics, and so many more that were created before we even had the foggiest idea what PCM meant or that WAV files would exist. That mixed blessing allows you to have a turntable that has greater definition and mechanical accuracy than nearly any currently available consumer deck.
Two problems, though:
1. Phono audio outputs render them nearly impossible to play on contemporary stereo systems and audio interfaces.
2. RCA jacks, unfortunately, are going the way of the dodo, in contemporary digital recording interfaces.
We rectify this easily by procuring either a standalone preamp (like the ones you’ll find here) or by obtaining a DJ mixer (of which there are many,) and any would do, that has a built-in phono preamp, allowing you to bring the low-level audio signal into line level form. Afterward, it’s as simple as connecting balanced instrument cables to an external audio interface’s input and going to the next section of this guide.
Notes on turntable stabilizers:
If you’re into this, you can also invest in things like disc stabilizers that minimize unwanted exterior resonances from sneaking in. You’ll notice a running thread in a bit. You can also invest in things like cork slip mats. You can try to put your turntable on a level surface, away from the same surface used to by your speakers. By now, the thread is making sure that unwanted acoustic vibration doesn’t permeate through your turntable.
Advanced Turntable Care Tips:
Any turntable benefits from proper maintenance. Before you even play a record make sure of the following:
- On a belt-drive turntable, check that the belt located inside the platter is in good condition and properly lubricated. New belts are easy to find and install.
- On a direct-drive turntable, either utilize a stroboscope tool (well worth your investment) or use its built-in indicator to visually see that it’s spinning at the right RPMs. If anything seems way off, it might be time to get fixed/replace that motor or get a new turntable altogether.
- Always, always, make sure if you are connecting a pair of phono jacks to anything else to ground that turntable itself. Usually, you can — a phono preamp and a DJ mixer should have a ground specifically made for that connection. Don’t want to ground? Enjoy an annoying low-frequency hum in your recordings.
- Look at your cartridge and give a long, hard look at its stylus. Do you remember the last time you replaced both? Needles have a shelf life. Usually made out of a diamond or sapphire point, like anything in life, wear accrues naturally on needles due to the oils found in vinyl. The more worn they are, the less they’ll ride vinyl grooves properly. If you’ve bought a used turntable, replace that needle immediately — worn cartridges not only damage the grooves on your vinyl, they also sound terrible. You have no way to tell how long the previous owner left theirs on. Now, if you’ve had your cartridge for less than 5 years, and play around an hour a day, you still have another year left. 1000 hours of playtime is the suggested refresh time. As with almost anything, the more you pay, the better quality it is. Cartridges and styli get more accurate, up to a point. Make sure to find a price sweet spot and stay there.
- Clean your stylus! stylus cleaners are great investments. Periodically, dip your cartridge in one, and magically, watch that bit of lint, dirt, and other particle on it disappear. As with anything, the point of contact should always be the first thing to tackle, even as we move on to the source it touches.
Assessing
Perhaps the most important step involves the record itself. Take out the record and visually inspect the item. Before you even play it, hold it up to a light, and ask yourself: Do you notice any scratches or scuffs? Do you notice any fingerprints, dust, oil marks, or mold?
Now, hold it sideways. Do you notice any bends or warps? What we’re doing first is assessing the state or condition of the record itself. Before we go into the digital world, we have to be realistic with what we can accomplish. If you own a record that has seen better days or that is no longer pristine (probably because it’s been played to death!), no matter what we try to do on the next step, our effort can only take us so far.
We have to live with the quirks of analog records: you will hear hissing, clicks, and pops. Guesstimating the recorded quality of the vinyl will allow you to set your expectations. You can however do your best to maximize those nibbling bits. Before we even get to digital tools that will help us do our best to minimize such artifacts, we must do our own, physical part. Once again, Amoeba Music has an quick primer on how this works:
Notes On Record Condition:
Although we’d like to solely rely on things like mint condition, or good, etc. We need to realize that not all records are pressed equally. You’ll be surprised that even owning a pristine copy doesn’t mean that records will sound perfect the first time you hear them. If you really love a record, invest some time in figuring out under what conditions it was recorded and pressed. It goes without saying a pristine copy of Fleetwood Mac’s Tusk is going to sound a lot clearer than a pristine copy of a privately pressed masterpiece recorded on a lo-fi bedroom studio by some random muso from Sheboygan, Wisconsin.
Cleaning Your Record
Commercial record cleaning machines (RCM) exist. Brands like Nitty Gritty, Record Doctor, and Spin-Clean are some of the many that make either mechanical or manual contraptions where one places a record, inserts a “special” cleaning fluid, and the machine both applies the solution and then proceeds to clean it off, whisking away (or vacuuming off) dried-on debris, oils, and other surface gremlins.
It goes without saying that if you really value your collection, investing in such a system will prolong the life of your records. However, if you’re not quite ready to take the plunge, you can buy things like cleaning solutions and a vinyl brush to do that automatic labor yourself.
Most of the time, you’ll find yourself spritzing your record, taking care not to touch the surface, then letting the solution settle, followed by wiping off the residue with a bristle- or velvet-lined brush. In doing so, managing to both clean the record’s grooves and making the record anti-static/dust-repellant.
If you’re not ready to play that record you’re prepping to rip, invest in anti-static record sleeves that keep that record in nearly that exact condition, as you take it in and out of its gatefold.
A Note On “Cleanliness:”
A not-so-obvious way to avoid dust and particle bunnies on your records is to maintain a tidy home to begin with. If most of your record collection is out in the open, regular household vacuuming (over time) will help render constant record cleaning unnecessary. While dry environments work for storing records, they also contribute to more static buildup. If you’re super serious about record storage, invest in a good humidifier or dehumidifier (depending on your situation) that can keep your home at a steady humidity level. We can’t all live in pristine, clinically clean environments but cleanliness does help prolong the life of your records and improve their playability.
It goes without saying: never clean your records with abrasive liquid.
Ripping
Now, we’re ready to rip. With the most pristine version of your record in hand, we’re ready to take it to the recorder. What happens next?
First you make sure you have the appropriate settings in both your digital recording software and your audio interface to get the highest fidelity possible. Now is that rare time you have to set your audio interface (with a huge caveat: if it supports it) to record at a bit rate of 24-bit, or above, and to record at 96kHz and above, if possible. Here is where you should actually increase the playback latency or buffer size — another prime suspect to look at to avoid annoying data pops/clicks.
This sounds goofy, but now is the time to stop from doing things like your daily aerobics exercise, practicing indoor table tennis, or doing anything that would introduce unwanted vibrations to the noise floor of your turntable. Pretend you’re in a library and you’re doing your part to maintain the recording atmosphere free from your detritus.
What’s happening here, is that we’re maxing out the highest level of fidelity and dynamic range possible to record the “truest” version of the record we know and love. If you can’t hit the above points, experiment, and see what’s the highest resolution to which you can take your audio setup. As with anything, we can always remove and downsample later, but we can never increase fidelity, if it never existed. Audio-Technica provides a quick primer on how to connect your deck to your computer:
Important notes on managing computer power:
If we want to remain faithful to the task at hand, much like in any practice, we must remove all extraneous things that could detract and steal resources from the process. On a computer this means: now is the time to close down all other programs, shut down iTunes, and turn off all effects, extra tracks, and plug-ins running in the recording software. The scourge of digital artifacts usually arise from little things like pop-ups and background tasks momentarily taking computing power from the most important process: recording that record.
Record to Software
Before you hit record, make sure to adjust the signal so that it hovers at or near -6dB. You want to be able to give your audio room to rise. The closer you get to 0dB, the closer you get to distorting that same audio as it’s being processed through other audio, iTunes, and all sorts of EQ found in your stereo system or playback software/devices. Less is always more in this step.

Commit to Master File
Depending on your software, you should export all the recorded files to the highest resolution warranted for your recording. Usually, saving to a 24-bit, 96kHz resolution allows you to have a “master” recording that can be reused and recalled for future use.
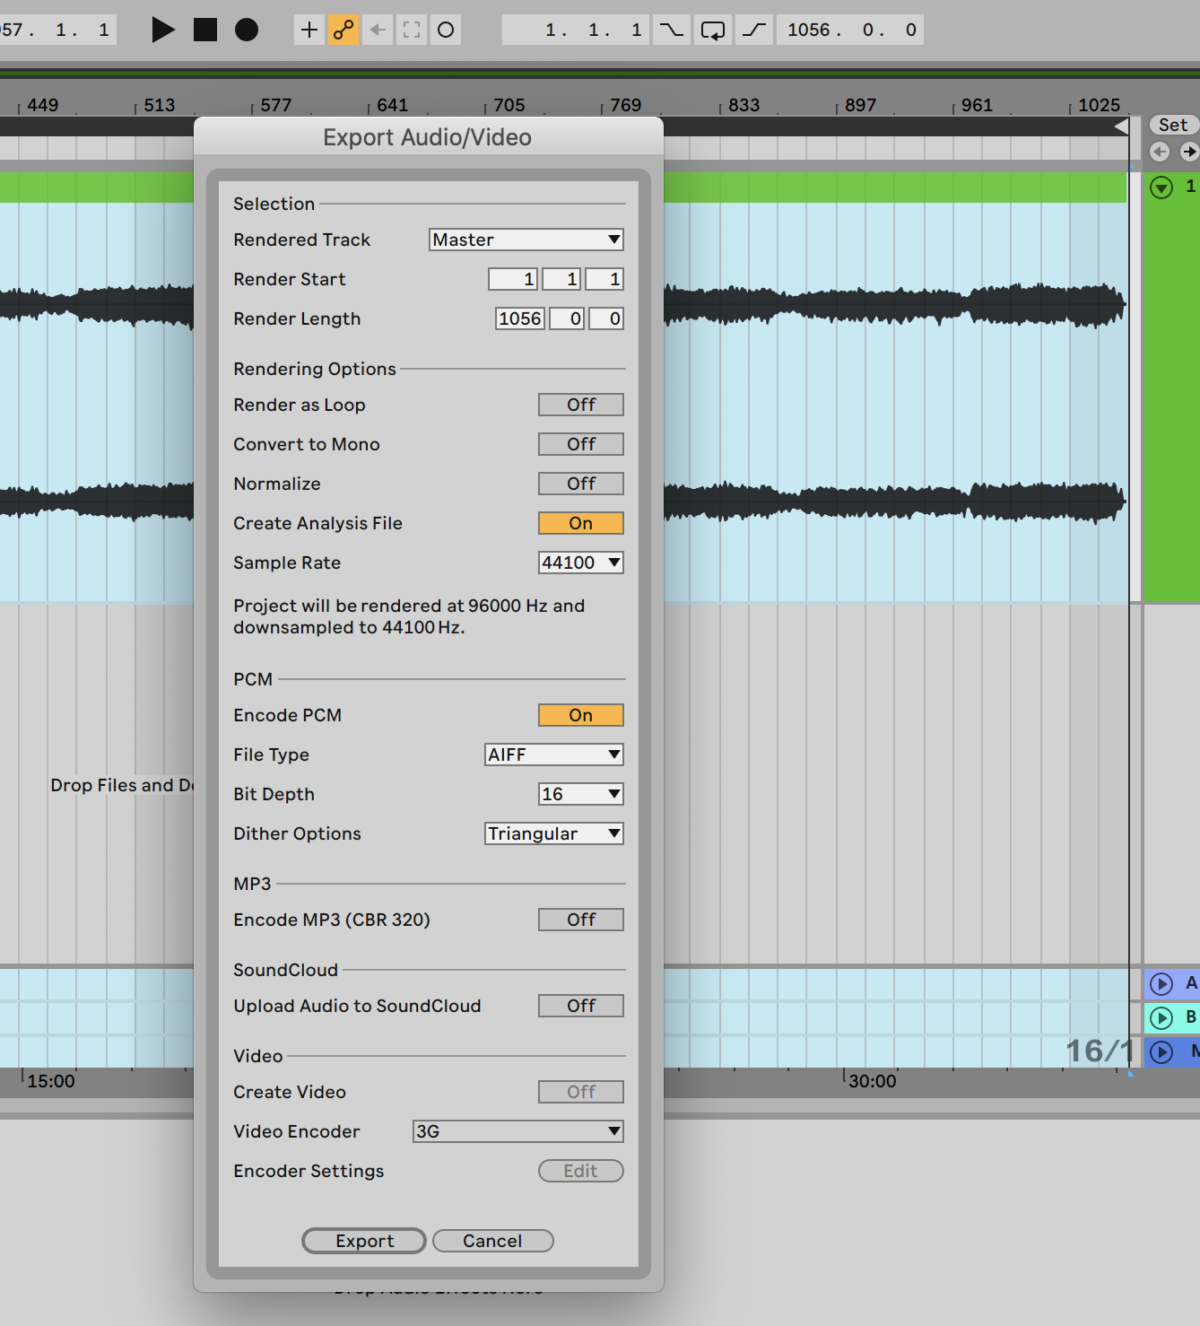
Make sure to export either to WAV (preferably) or AIFF file format. WAV is cross-compatible with Windows, Mac, and Linux machines. AIFF is Apple-specific, and entirely unnecessary for what we’re trying to accomplish. Both are uncompressed, full-resolution audio files.
Treating
Congratulations, we’ve gotten through the toughest parts. In theory, if you have a pristine, “virginal” first press copy of a factory sealed, shrink wrapped record, and the rest of your signal flow is in the right order, you can skip to the following step and begin normalizing, setting markers, and exporting audio to separate tracks. However, most of us aren’t so lucky. For the rest of us, there’s still work to do.
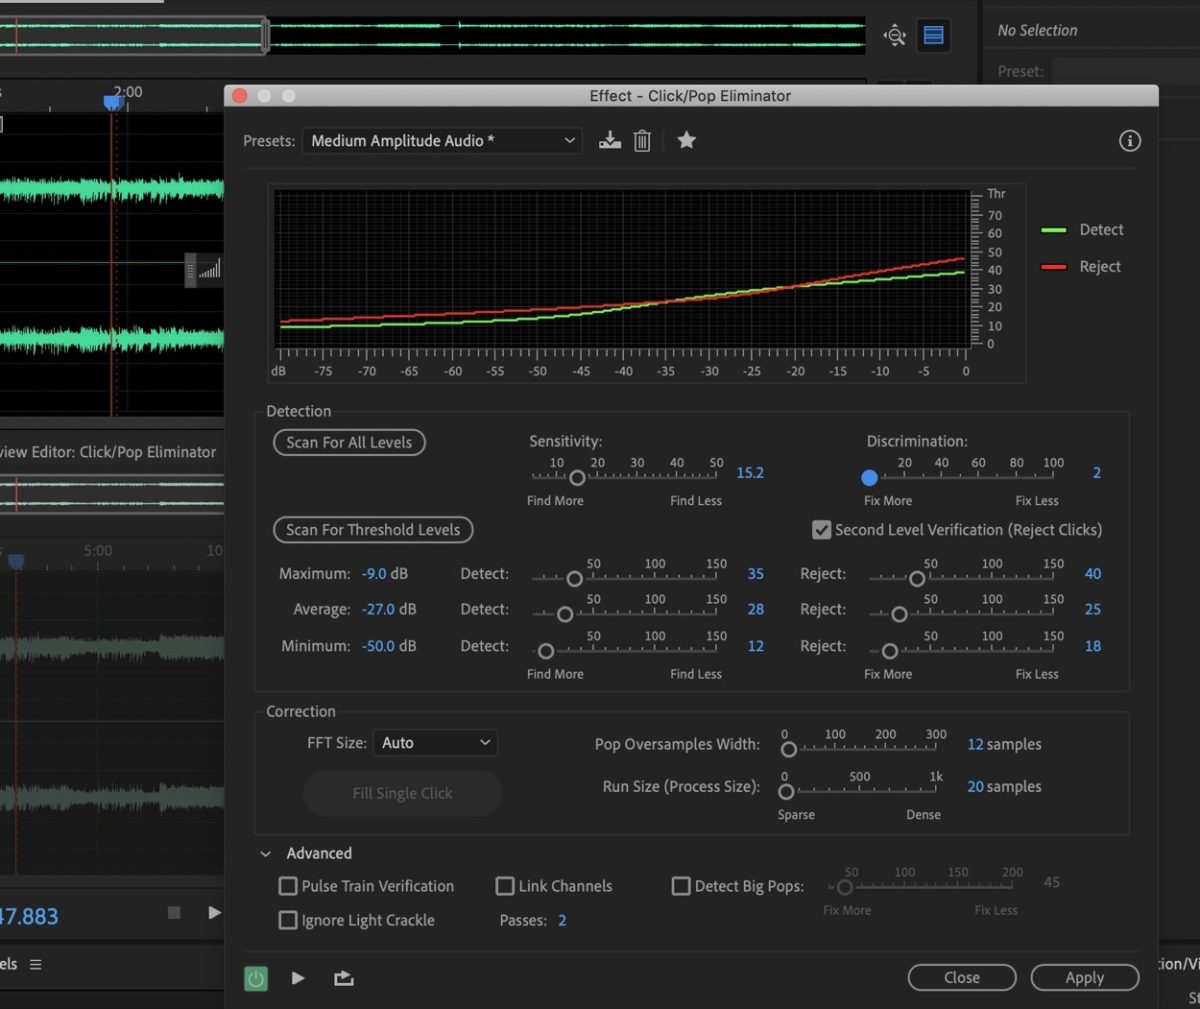
We always begin from a macro level. At this point, we need to tackle all those hisses, crackles, and pops. If you’ve forgotten to ground your equipment, or proceeded to do jumping jacks in your room as you were recording, go back to the back of the line (pay some attention in class) and start anew. Good pals, go forward, and let’s attempt to use software to remove some of time’s peskiest hangers on.
Removing Audible Snaps, Crackles, and Pops (Hisses Too!)
Here’s where you have to trust the minds behind audio restoration and mastering software. Paid software by iZotope, Adobe, or freeware like Audacity, include a couple of tools used to clean up and restore software to a cleaner, more listenable form.
What this software does is attempt to analyze the file algorithmically, to create a visual sonic spectrum. This work of magic/science is called FFT (Fast-Fourier-Transform) and is made up of all those volume peaks and valleys found in the raw WAV audio file.
The vast majority of us should reasonably rely on preset settings found in such tools like “Click/Pop Eliminator,” “Hiss Reduction,” and “DeHummer,” of which variants exists in nearly all the previous waveform software I recommended above. What’s important is to actually preview anything before applying the preset. If it doesn’t sound right to your ear, most likely something else has to be tweaked within the settings to make it either less sensitive or more. Once you hear an audible difference that still sounds as “true” to the original recording, then proceed to the following step.
For those that want to explore further how those functions work, the pros at iZotope have a pretty good explanation here:
Normalizing Audio
So, we’ve finally put all the leg work needed to make the recording sound as “clean” as possible. What’s next? Now we have to raise the volume of the recording so that it’s clearly audible when played in media players, but not so loud as to distort when played back.
Depending on the software, a normalization function would be the setting you choose. What normalization does is both raise the volume of the waveform by looking at its decibel peaks, and sets an upper dB limit which it can’t exceed.
This is important: you never want to normalize anything near 0dB. Since media players add equalization, boost audio frequencies, and generally, do all sorts of audio sweetening during playback, we don’t want to give it a file that’s nearly overfilling with volume.
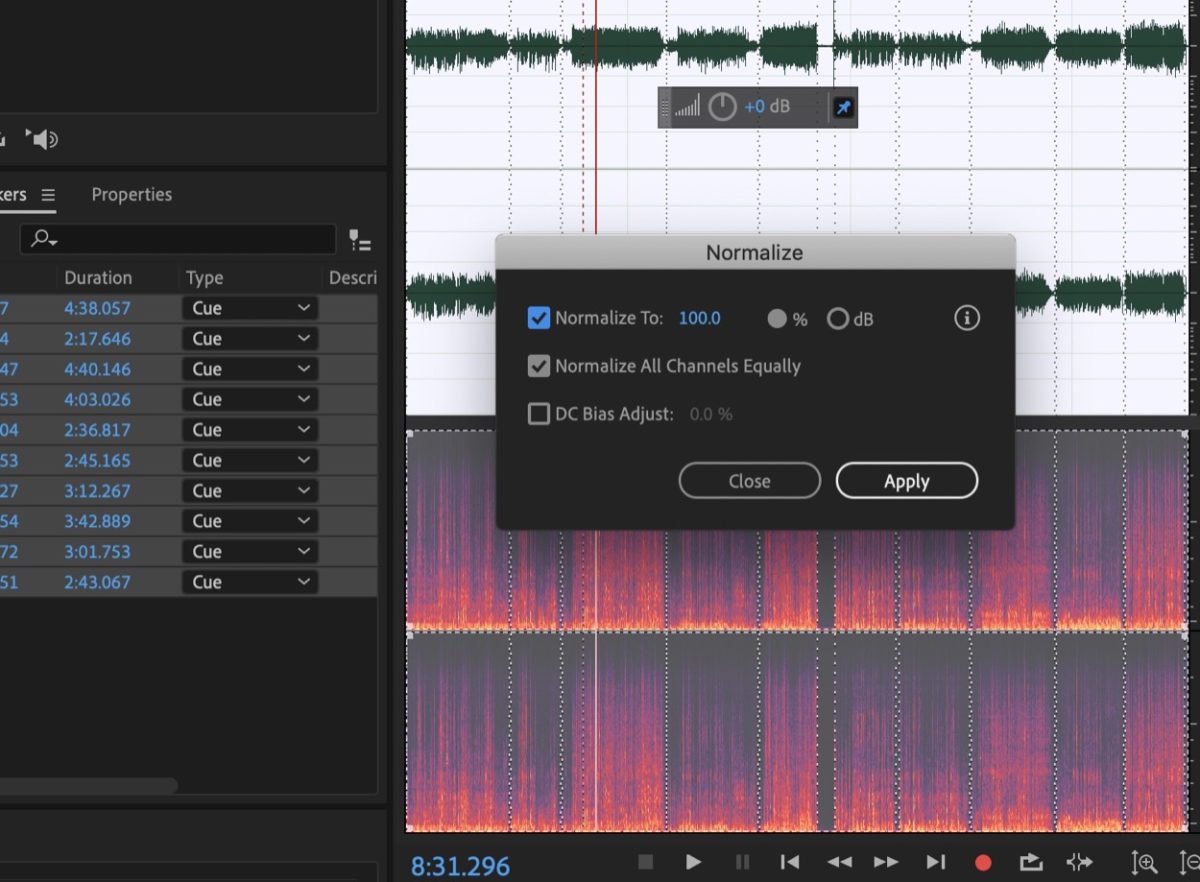
I normalize to -6dB, I’ve seen others do -0.5dB, now whether you want to join the Loudness Wars is up to you. I’ll remain neutral and err on the side of less being more.
Splitting Tracks and Exporting Audio
We’re rounding the corner now and getting to the point where we split up the recording into separate tracks. Usually, the way to do so is to use segment markers/locators (you’ll create one by pressing M in the audio editor) at the beginning and ending of each track.
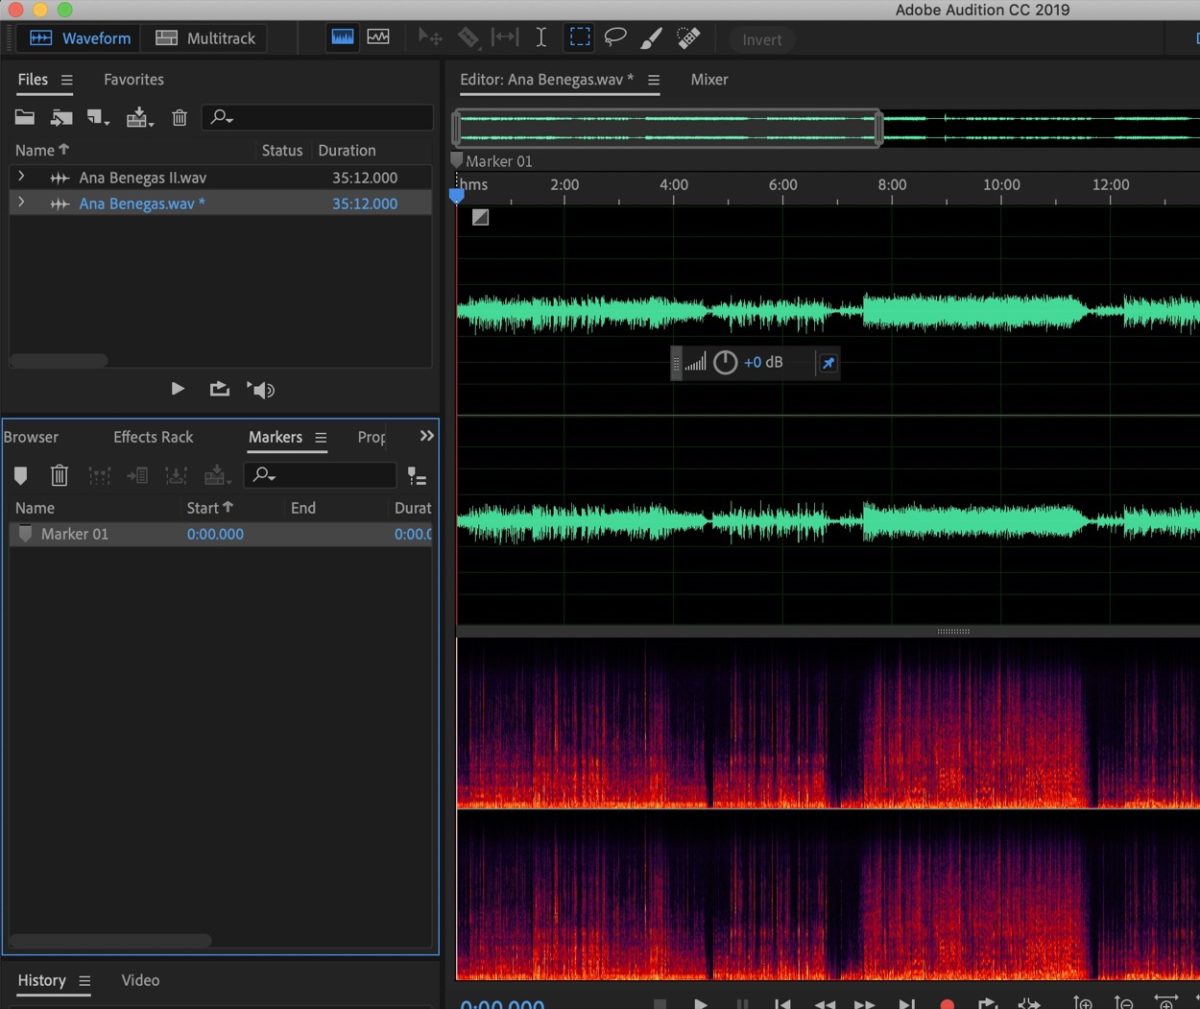
What are you looking for to start and end a track? This is simple: zoom in until you’re able to see the beginning of a track, or refer to the timestamps on the record sleeve or label itself. It’s up to you whether you want to place the marker 1 or 2 seconds before the track begins, or plan to do so exactly where each track begins. Ignore trying to delete silent pauses between tracks. As long as you set the start and endings, that silences get automatically ignored when we do the following step.
Exporting audio, thankfully, is one of the easiest steps to do. Exporting every marked segment as audio, should provide you on your selected audio editor software with an option as to how’d you like that to occur. Here’s where you’re given options to export to MP3, M4A, WAV, FLAC, and AAC (to name a few).
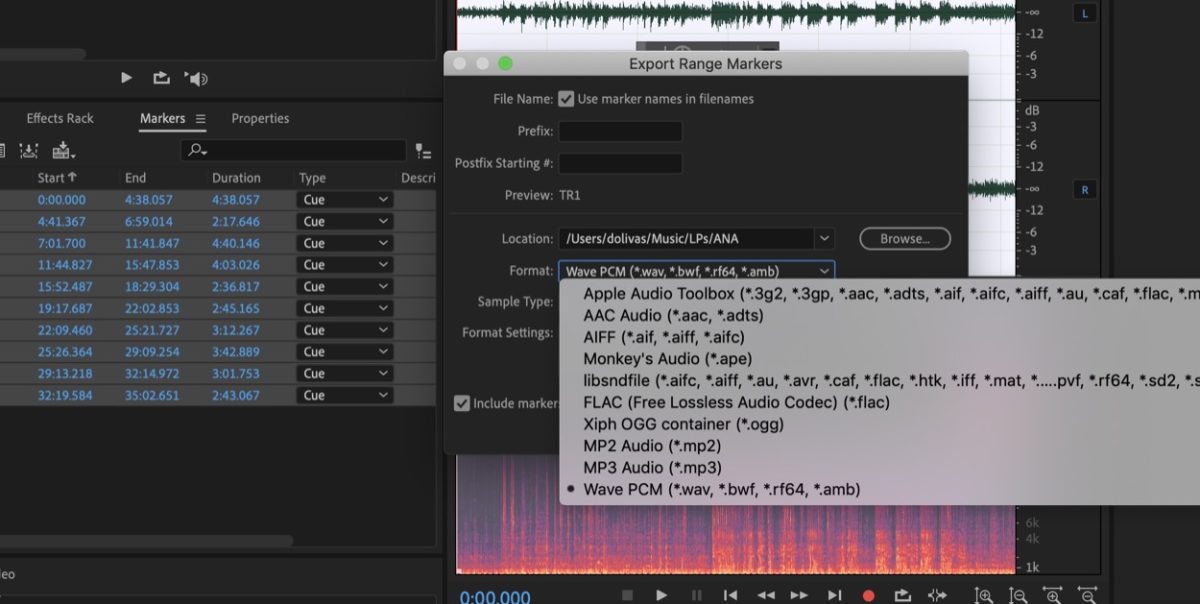
Personally, with the advent of huge, terabytes-sized storage drives, I’ve resolved to export all my audio to Apple Lossless files. Apple Lossless files are quite similar to FLAC files, in that they try to create an audio file that both compresses further (in size) the original WAV file, but does so in a way that retains the fidelity of the original — hence, why they’re called lossless.
Apple Lossless is my choice because it appears to be cross-compatible with almost any DJ and media software, on any computer operating system and the higher fidelity invites the dynamic sound I remember from the original file and analog record playback. If you’re strapped for storage, a high setting, VBR, MP3 (good) or M4A (better) file would suffice. In the case of lossy file formats, the original resolution will be downsampled to 16-bit, 44kHz, CD-quality audio.
Playing
We’ve finally reached the end. Just some minor things remain to have your vinyl backup archived. Simple things like tagging and importing your media should do it.
Tagging A Track
There’s no point in recording all these tracks if you can’t identify whom they belong to. Luckily, we now have many tools that can help you tag and add all that important information to your audio files.
My current favorite is the free, cross-platform metadata tagger, MusicBrainz Picard. What a metadata tagger does is add info like the name of the track, album, artist, year the song was released, and all sorts of other things like genre, album cover, and more.
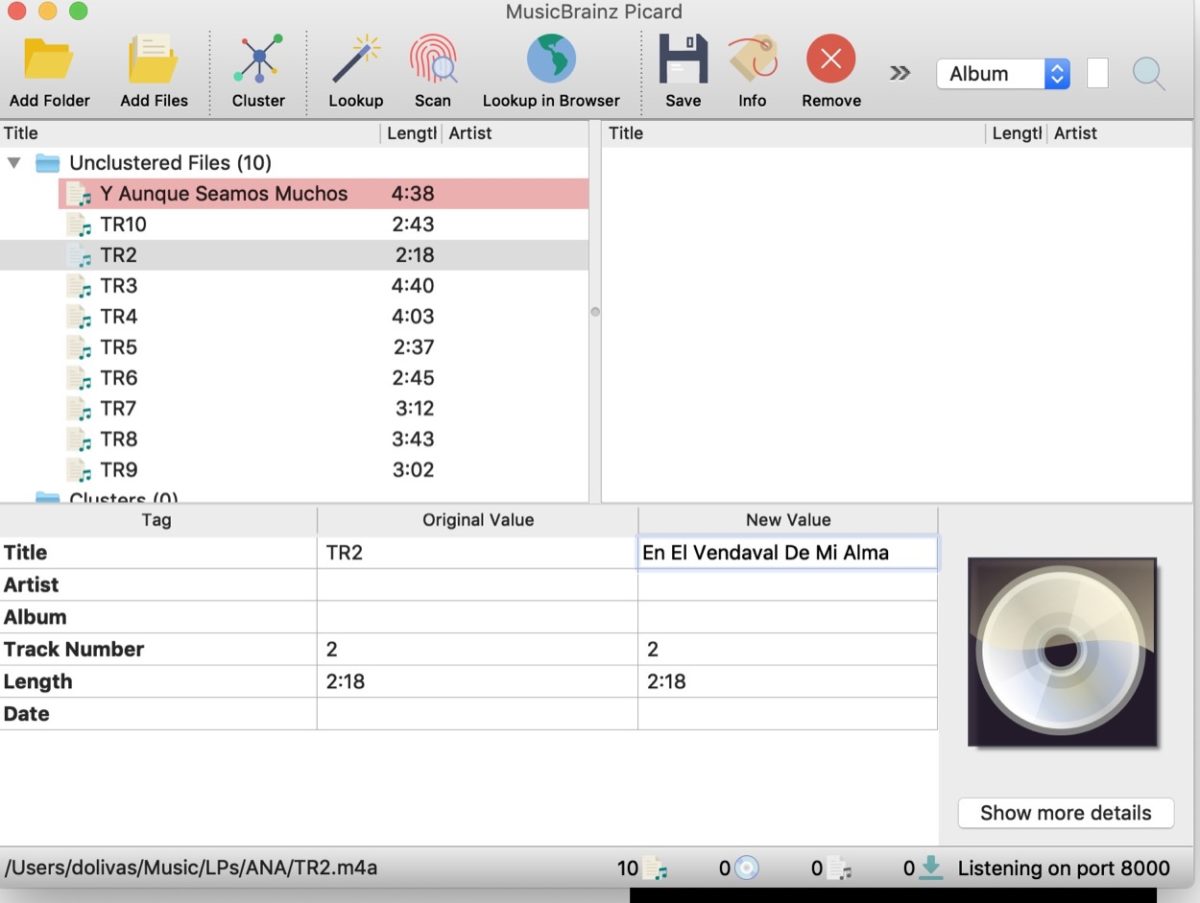
How it works: You simply open the program and drag-and-drop the files that are missing metadata tags into it. Once you do, you’re given the option to select all the tracks you want to either lookup or scan for metadata. Lookup will try to find all that data based on the track’s original file name or any existing metadata. Scan will actually use something called AcoustID which is basically an algorithm that scans for unique audio fingerprints in the file itself that match a submitted database of songs.
Most of the time, if you own something available on a major label once before, Scan should bring up all the info you need. Simply hit save if you agree with its findings. However, if you own rare vinyl, when you select any track, you’re given the ability to manually enter that information yourself.
Using record databases like Discogs and Allmusic, you should find most of that info you need. If you can’t, this is where you can look at your own record and fill in whatever you can, manually.

Once you import your songs into iTunes or foobar2000, whatever media player of your choice, you can put the finishing touch on your file by adding an album cover to those songs. If you can easily find the artwork online, in your browser, simply choose all the tracks and drag and drop the image file onto them. For those that have unique albums, you can take a photo of it and crop out the background. Google themselves have a neat app called Photoscan that automatically does this for you, as well.
What’s left? Sit back and enjoy your new digital backup!

