
They say the enemy of good art is the absence of limitations. We’ve heard this in the past, with artists like Tangerine Dream and Manuel Göttsching, who by necessity, used workarounds to real life technological limitations as ways to create their own brand of music. How? By taking simple techniques and applying it to the musical tools they had. The two tracks I created, one in homage and the other in a more contemporary manner, were guided by like-minded principles. To do the same.
What I’m attempting to capture in this post is how to get beyond some of the similar limits we might face and discover some unique workarounds to get to that sound. What’s the sound today? Its the sound of classic Berlin Electronic School of Music. For this task, my recording software of choice was Ableton Live, but I trust you’ll be able to translate the following ideas elsewhere. An Ableton Live template is provided at the end of this post to get you going.
(Musical) Building Blocks
Lets begin by disassembling some of the basic musical ideas heard in the Berlin School of Electronic Music. This is what I believe they are:
- Long, drawn out, spiraling melodies
- Trance-like, evolving sonic shifts
- Astral-sounding musical chord beds
- Steady, uncomplicated rhythm accompaniment
Trying to get at those musical concepts led me to create this instrument template. As always, if you don’t have the same instrument, do your best to find a similar or like-minded replacement. I tried to be as period “correct” as possible, but nothing should stop you from straying further in experimentation…
| Musical Role | Type | Instrument |
|---|---|---|
| Bass Melody | Software | Arturia Moog Modular V |
| String Harmony | Software | Arturia Solina V |
| Drum Rhythm | Software | Ableton Live Drum Rack – Drum Machines |
| Floating Lead | Software | Arturia ARP 2600 V |
| “Wild card” Trigger Instrument | Hardware | Novation MiniNova |
| Sequencer | Software | Ableton Live |
Recording Ephemera
- External audio recorded with Focusrite Scarlett 2i4 (24-bit, 44-kHz)
- M-Audio Axiom 49 and Arturia MiniLab Keyboard MIDI Controllers
- General settings: Tempo at 120 BPM with a Time Signature set at 4/4
Special (FX) Players
-
- Ableton Live – Beat Repeat
-
- Ableton Live – Ping Pong Delay
-
- Ableton Live – Reverb
Since these effects might be new to a few of you, let’s picture them in a different way than you’re used to. I’ll shamefully steal the imagery of Monkey FX’s nifty audio effects guide to explain what these effects do.
- Beat Repeat
- Ping-Pong Delay
- Reverb
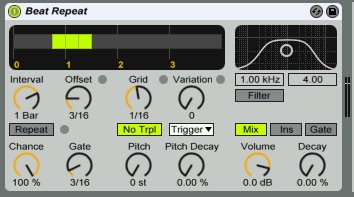
Ableton Live – Beat Repeat
Imagine we have trained monkeys who repeat everything we say or perform. Imagine we ask one monkey to help us out here. We ask the brightest monkey from the troop to do something different.
Rather than listen, and repeat back to us each interval or bar of music we play (via an Interval knob), we ask her to listen intently to the third beat of each measure (via an Offset control). When she hears the third beat in the series, she will repeat whatever note she hear exactly three times (or more depending on what we instruct her via the Gate knob) and then continue on, repeating everything else back as normal.
This monkey is so smart, that she can be instructed how many times she must land on that exact beat (via the Chance knob). However, for now, though, we’ll ask her to pretend she’s a robot and land on it exactly, without fail. Although she has other talents tied to her remarkable memory, for now that’s all we’ll ask from her.
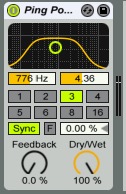
Ableton Live – Ping Pong Delay
Since our smartest monkey can’t do everything she’s asked one of her best friends to help us out with something else. She tells us that this monkey has a much shorter attention span than her. Unfortunately, for us, she doesn’t say how short. Ok, you start playing with her and that’s when you notice something.
Rather than wait one bar to hear what you play, she’ll try to copy you note for note, as you play. For today, that’s fine, this is something you can live with. She is pretty much in sync with you, so all’s well. However, as you sit next to her and get ready for your next performance another monkey appears. Its her twin brother…and he wants to play.
This brother of hers, although identically the same, has always tried to be cooler than his sister. Rather than sit next to you, he sits opposite her (something having to do with human cooties…). And rather than listen to you, he’d much rather ask his sister to tell him what we just played. In doing so, you hear a noticeable delay in his playing.
He is relentlessly accurate in annoyance. At first, like clockwork, you hear his guitar playing back to you what you played 1, 2, 3, 4, or more notes ago. Luckily for you, his sister is smart enough to know what to do to control exactly the interval of time he repeats this question. And for this session, he must wait three beats.
Although you hear him coming, back and forth, to the right (and sometimes scoothing to the left) of you, its in a way that’s useful. His sister has found a way to make him steady, and you know exactly when you’ll hear his repetitions. There are more things she can get him to do but for now that’s all we need from her.
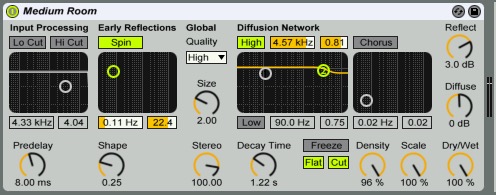
Ableton Live – Reverb
After a while, we’ve grown a bit tired of that little brother of hers. So, we imagine that there’s something he can do for us to make his time here feel a bit more appreciated.
We tell him to do what he was doing a moment ago, but take a microphone and his instrument a bit further, elsewhere. He is an inquisitive type, so anything from a cavern to a small bucket seems to be fine with him. Wherever he goes his microphone can pick up the reflections and waves of sounds that bounce back to hims as he repeats our playing.
Our imaginary place is huge, but we’re nice today, and send him to a medium-sized room, where his microphone can pick up a couple of sounds more pleasing to the ear.
Now imagine all of these symbolic monkeys mentioned above transforming into zeroes and ones, turning into pint-sized software versions of themselves. These will be the most important sound effects we’ll use to get our Berlin School sound.
Get the Tone:
- It all starts with a sound. The patch I modified from the Arturia Moog Modular V, was a patch named [LL_Bass Dark]. It’s this patch’s oscillating mixed [Sine] and [Sawtooth] sound that makes it easy to dial in a more subsonic, low-frequency tone. That’s what we’re aiming for. A tone that can open itself up to a bit of resonance. In the end, a tone that can pulse when it repeats itself.
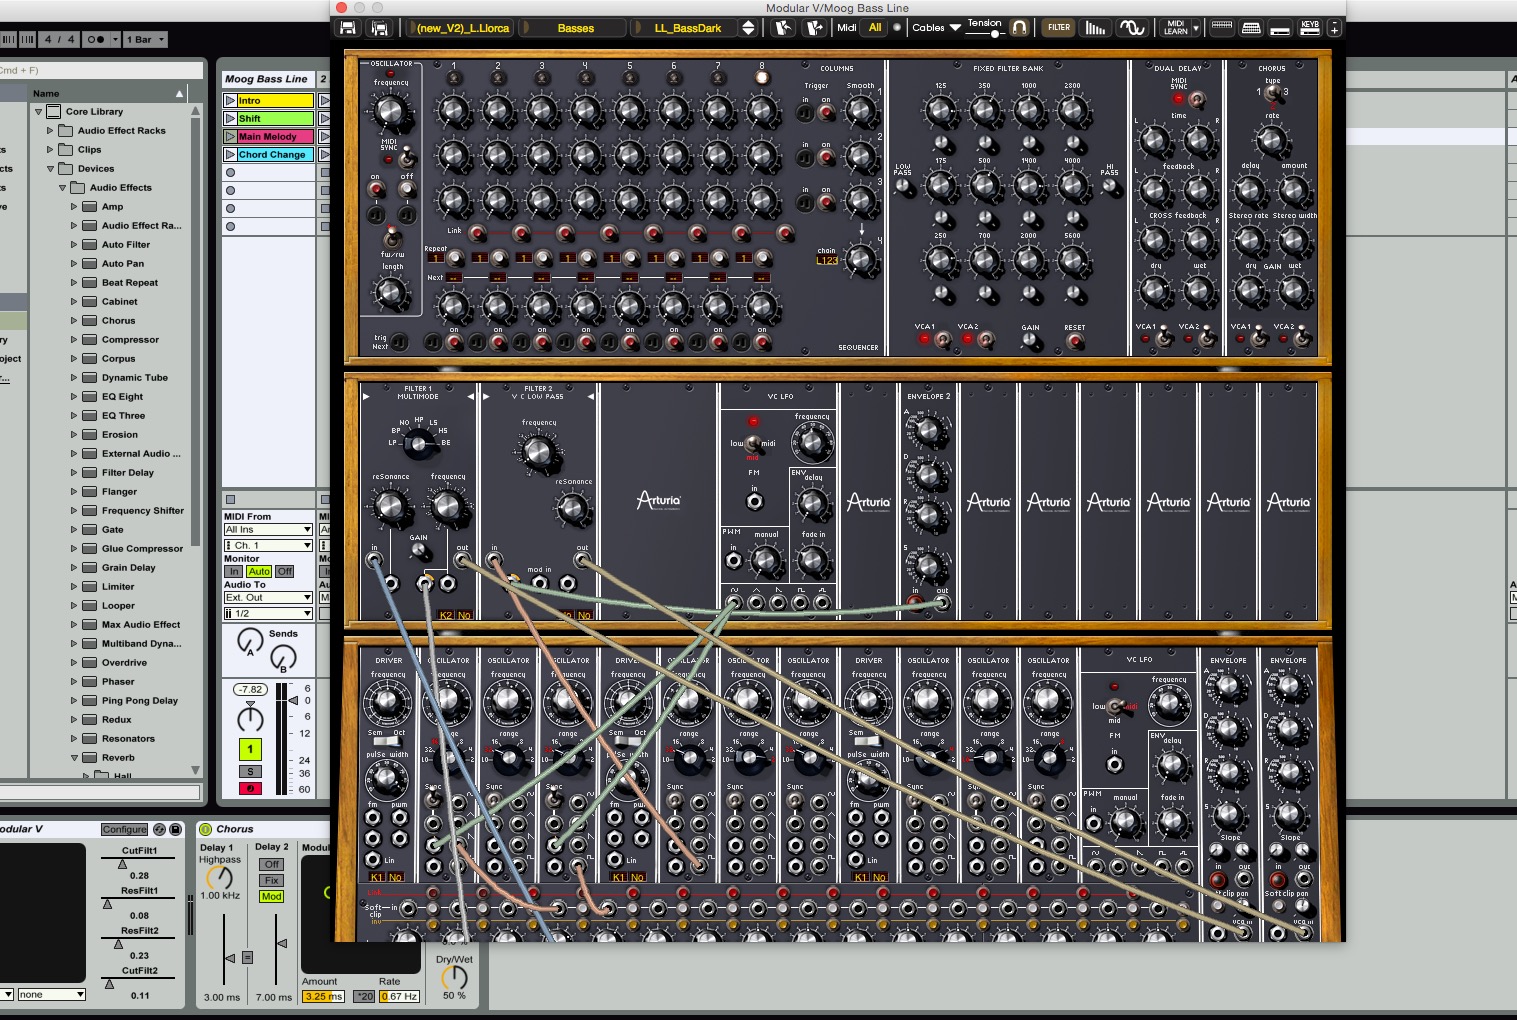
Arturia Moog Modular View
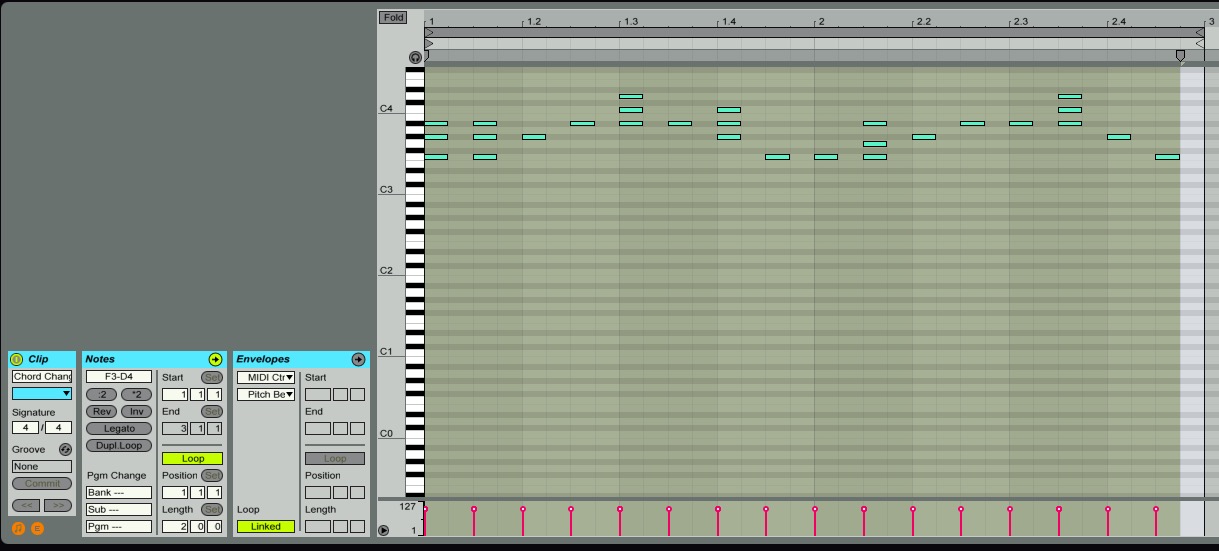
- Using your keyboard, or the pencil tool, create a 2-bar melody line with a simple, repeating arpeggiating, three-note eighth-note sequence. In this case, I keyed in C, D#, and F. What we’re looking to do differs from what a software or hardware-based arpeggiator can do. We need repeating 1st and 3rd notes, with a second note as a constant. Save this as a session clip, then copy and paste this same clip to another scene. This will be the main melody that will form the spine of the sound. The foundation of most Berlin School-style melody lines occur in the spaces between those eighth-notes. The sixteenth-notes will later be where the tone gets honed.
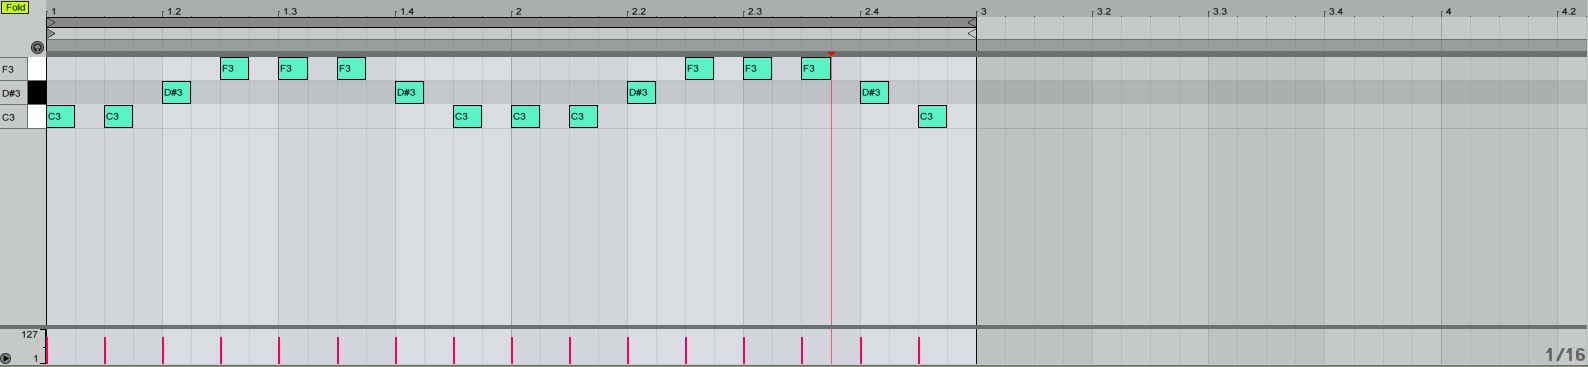
Main Bass Melody (C, D#, F)
- Next, we’re going to crop a descending riff from the main melody, pasted on that different scene…

Cropping Our Main Melody
and create this 1/2-bar clip.

Descending, Cropped Melody
with those two main clips, give or take a few chord changes, you’ll have the bulk necessary to create the rest of the song.

Moog Bassline Sends
- Arm two empty audio tracks and make them receive Audio From the bass line synthesizer. Pick one track, I chose the second, and have its second Sends B open up completely. What we’re aiming for is separation.
- Now that the bass melody is split into two, we’ll assign one Ableton effect to each return track. Return A will be assigned Reverb [Medium Room preset]. Return B will be assigned a Ping-Pong Delay.
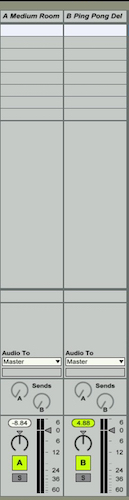
Track Returns
- Ignore Reverb for now. Our focus is that Ping-Pong Delay. Here are the settings we’ll use for it:
– Beat Division: 3
– Feedback: 0%
– Sync: On
– Dry/Wet: 100%
– Everything Else: Leave as is. In essence, what we’re doing is letting this delay fill out the odd-numbered beats between the 16th notes that are evenly filled. In this case we want each delayed note to hit immediately after every 3rd beat but without repeating itself more than once. It’s a nifty trick one that’s letting one of the armed audio tracks remain constant, without delay. So that when both spring into action, the affected track starts to revolve, phase in and out, sonically around the other. - Let’s take this even further and add some dynamism to this now revolving melody. On the second armed track, the one on full Sends, let’s copy and paste the Ping-Pong Delay we just added to the Returns B. This time, though, let’s just modify one setting:
– Beat Division: 1
– Feedback: 0%
– Sync: On
– Dry/Wet: 100%
– Everything Else: Leave as is
Now, now this is getting even more interesting. Can you hear the subtle change?
We just added a quick repetition after the first initial beat. What this does is in effect add some sort of accent or stress to that the original, almost mechanical melody. Now we have dynamics where we didn’t, before.
Echoes of Ashra’s “Night Dust” are starting to form in my head, and we’re starting to get closer to a classic Berlin School sound…but there is one more thing that still eludes us. It’s something uniquely theirs.
Of course there’s that cyclical, evolving sound we’re sorta getting at…but there’s something else. At the 2 minute mark, a series of notes seem to swiftly disengage from the main cycle and repeat themselves, in clear steps. Some say it sounds like the springs of a door stop springing but its something once heard you’ll never forget.
Conceivably, the way Tangerine Dream arrived at that sound was by using one modified sequencer module to feed multiple, distinct lines of tempo to their synthesizers. With one sequencer they were be able to activate a switch, pick a specific note, and instantly send out a dialed in amount of note repetitions, at a set speed. Out came back that very distinct percussive-like repetition well know now.
Of course, this is the stuff people spend oodles of money to try and replicate with modular hardware sequencers. However, for today, we’ll try to do so, at a much lesser expense.
- Let’s start with the elephant in the room. We’re not going to use a hardware sequencer to ratchet. What we will use will be an ingenious effect to get at that sound. Its the one Ableton calls Beat Repeat. Add it to the Master track.

Master Track
- In Beat Repeat enter these settings:
– Interval: 1 Bar
– Offset: 5/16
– Grid: 1/16
– No Trpl: On
– Variation: 0
– Variation Mode: Trigger
– Filter: Off
– Repeat: Off
– Chance: 100%
– Gate: 3/16
– Pitch: 0 st
– Pitch Decay: 0 %
– Output Mode: Mix
– Volume: 0 dB
– Decay: 0.00 %What we’re doing here are a couple of things. First we’re telling our virtual sequencer to listen in on every bar of sixteen notes. Then from that measure, it will repeat whatever it hears on the fifth beat, three times. We’ve selected the output as [Mix] so the notes that get repeated mix in with the rest of the sound already cycling through.In essence we’re creating a spiraling, evolving sound, that has gated moments of variation. It’s the sound that makes latter-day Tangerine Dream and a cluster of other clued-in Berlin practitioners different.Note: Some people would knock the Offset up to 6/16, turn on [Ins], and raise the Volume control higher, for a more pronounced, percussive repetition. However, I appreciate/prefer subtlety, and now I believe we’ve finally reached that special sound…
Take it From Here:
- I selected a period appropriate-ish drum machine. My choice was Ableton’s [Kit-C78 Classic] a Drum Rack from their Drum Machines collection. Chosen because of its similarity in sound to the classic Roland CR-78 drum machine. Note: I added some minor compression to the track.

Ableton Kit-C78 Classic Drums
- Rather than muck about with extravagant patterns, I kept it simple. We already have a great pattern to work with. Simply copy and paste the main melody line from the previous steps into a blank Drum track clip. The only thing that you will add (via the Pen Tool) are Hi-Hats on every beat in the measure and two strategically placed Kick hits. When you finish you should see something like this:
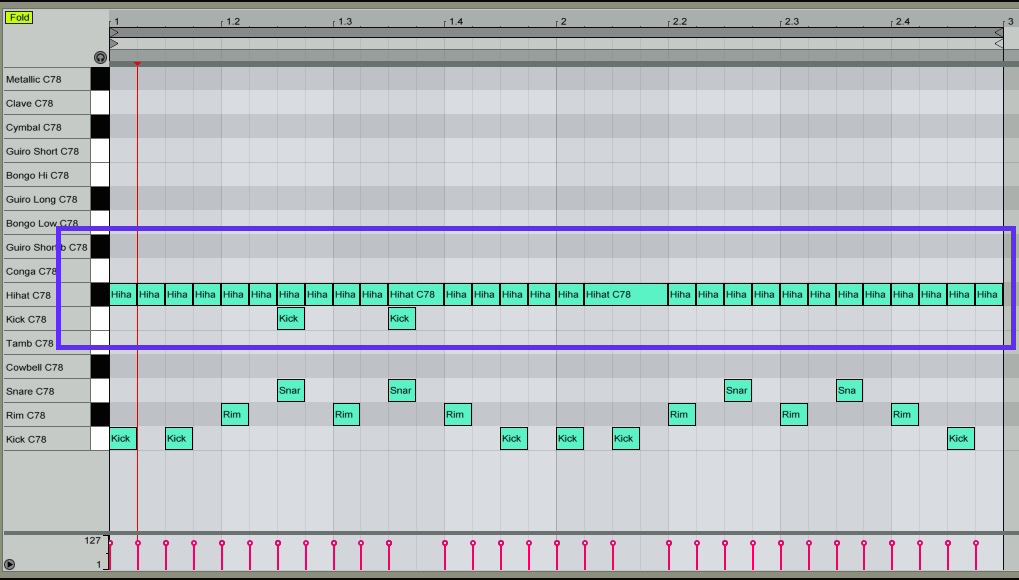
Click to enlarge.
Sounding something like this:
- Nice enough. Now, remember what I said about the Track Returns and Master Track effects giving you room to roam? Since all the tracks now share the same effects settings, you can hear something like a bit dry, turn into something like this:
- Now play it back with that original bass line.
And phew, now you have a baton and a goal line you can go off running towards.
-
- Arturia Solina V
-
- Arturia ARP 2600 V
-

- Novation MiniNova Synthesizer
- Solina V
- ARP 2600 V
- Novation MiniNova
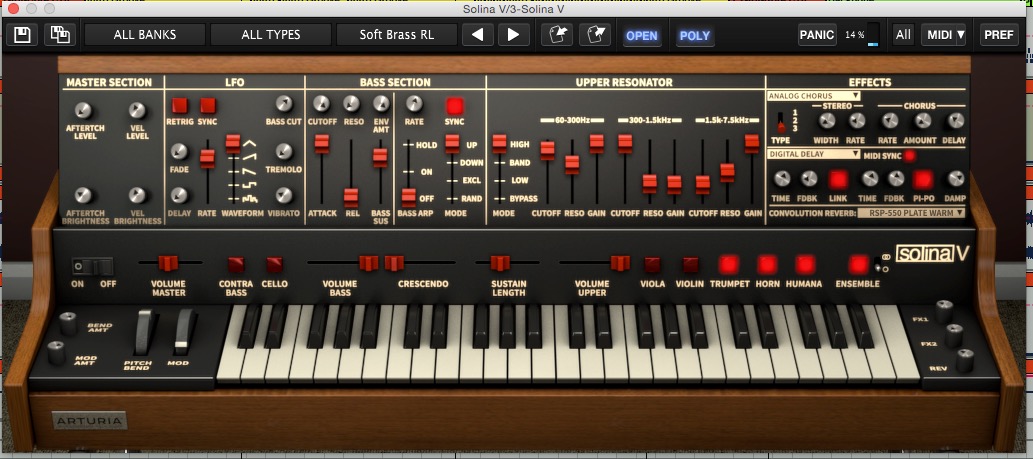
Arturia Solina V
Classic string machines are truly complementary instruments to any Berlin Electronic School-style bass line. I purposely limited the main spine of the song (the Moog Modular’s bass line) to a monophonic software instrument. Reason being, the Arturia’s Solina V allows me to add harmonic polyphonic sounds in a way that seems more appropriate than using it as a mere pad device.
The [Soft Brass] patch with some minor setting adjustments burrows, shines, and slinks when/where it ought to, at least for me. If we’re thinking about the mix holistically, this is who we’re making room for.
What’s important?
Again, variations on the main melody…
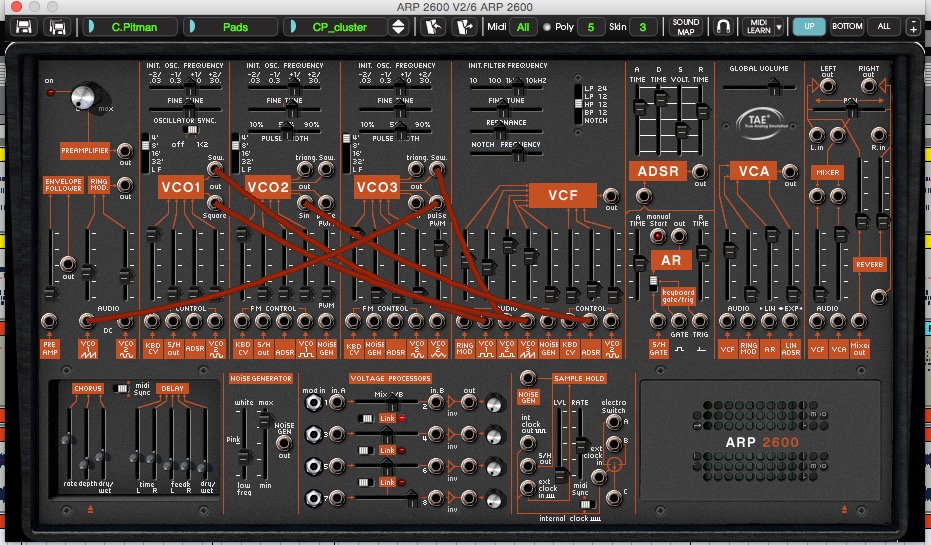
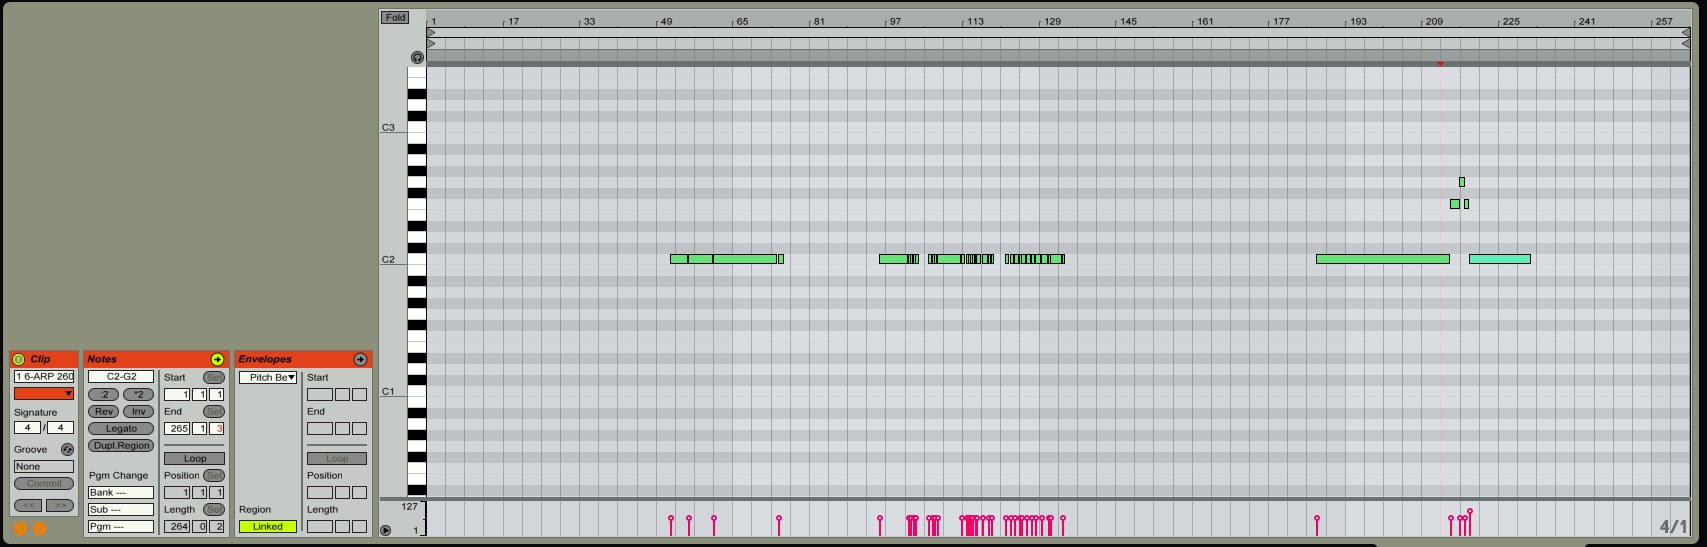
Arturia ARP 2600 V
The Arturia ARP 2600 V, on other days, would have taken the place of the Moog’s bass lines. Today, though, it’s playing the role of friendly foil, acting like an authoritative, slightly nasal reminder of an analog past. The [CP Cluster] patch is great for this.
What’s important?
Reinforcing the root note, of course…
Novation MiniNova Synthesizer
This is my own trickster sound. I forget which patch it was, but it was a variation on an electric piano [Something-Ballad]…don’t quote me on this though. My aim was to make its release extremely short, to the point of truncation. Sufficiently truncated, I ran it directly to the Scarlett and into Live’s External Audio Input.
This is what’s important.
Using its on-board Arpeggiator, I’d quickly note the root of a specific, notable passage from the main arrangement and overdub this arpeggiating sequence into the mix. Using the MiniNova’s arp pads I was able to turn off specific or random beats from the single note repeating eighth-note arpeggio sequence and in essence achieve a poor man’s Beat Repeat.
What I did isn’t something that you want to pepper the song with, but for embellishment, here and there, it works.

MiniNova Arpeggiator Section
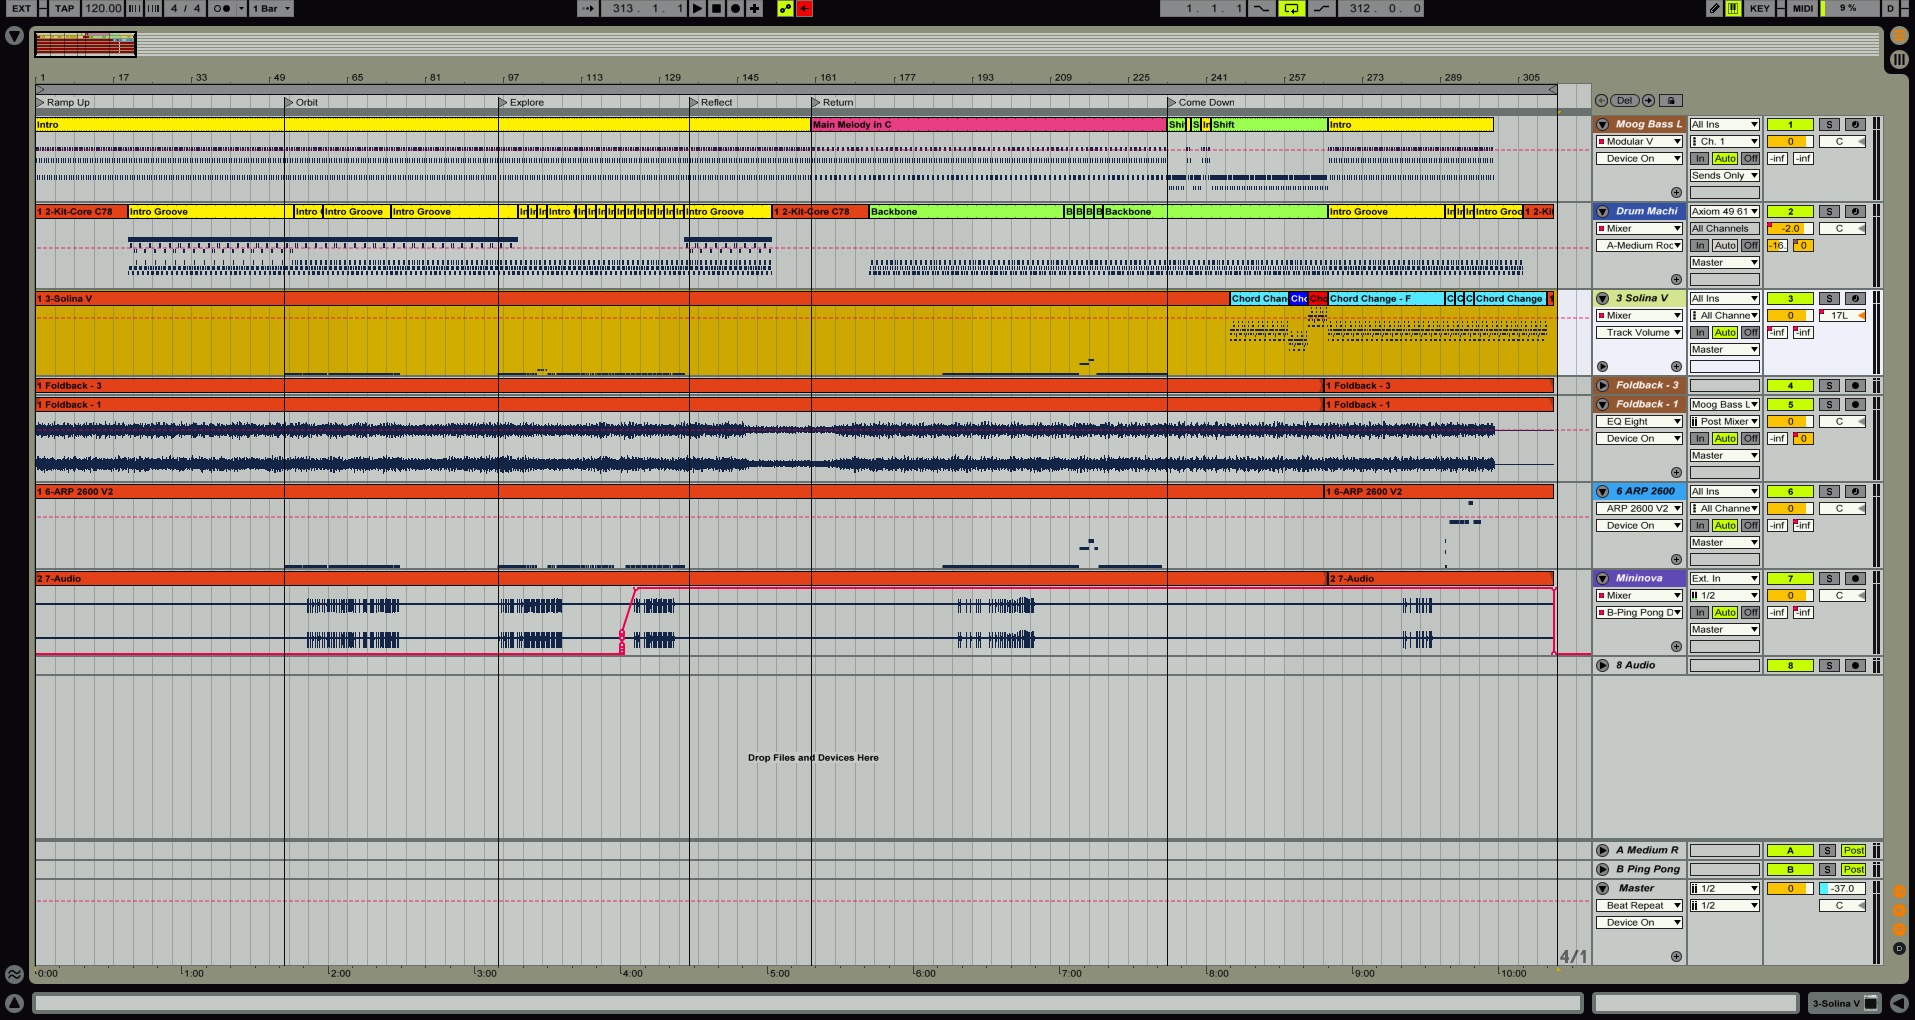
Freizeit Arrangement View
Some of the feelings projected by the performance of Berlin Electronic School-style music are directly tied to letting sequences and clips run freely. Here are some final thoughts:
- Remember our sequencer is a constant, its holding us steady so we have the freedom to modify and tweak settings, tones, and effects on the fly. Experiment, but remain aware.
- Forget copying and pasting clips on the arrangement, try to trigger them live as much as possible. You always want your listeners to sense and hear that you are in control.
- With this freedom, try to focus on shifting textures and dynamics. These are the things that make this style memorable.
- As involving some of those tones you get may be, aim for trance and not hypnotism.
+ Musical tools to enter modifications on the fly: USB or MIDI controllers that you can map faders, knobs, or pads to key virtual settings. Control + M, Ableton’s MIDI Map mode, should let you do this.
+ Musical tools to think about: Ableton Live (and most DAWs) record automation. Any knob you tweak in real time can always be retroactively modified (again freedom to go back and change things!). Get to know the Pencil tool and how it interacts with envelopes. The quickest way to rework sections in a long arrangement after the fact is to set Locators under the Arrangement view. Finding your way around your base track will allow you to overdub other ideas you couldn’t initially.

