
Touted by Rode as “crystal clear” and “incredibly stable”, the Wireless PRO dual-channel recording system is positioned as a fully featured and affordable solution for audio-for-video. But what is it like to use in a real-world situation? With an upcoming video shoot involving interviews and two live performances, I snagged two Wireless PRO systems with the hope that they would make the job easy and capture high quality audio.

What’s in the Rode Wireless Pro Box
Each system arrived in a box with two small, well-made zipper cases inside. Case 1 was the charging case which contained the two TX1 transmitters and single RX1 receiver. Case 2 held the Lavalier II mics and the accessories, including (deep breath!):
- MagClips
- a furry windscreen for each of the two transmitters (which fits over the built-in microphone)
- one more (extra) furry windscreen
- a pop filter for each of the two lavalier mics
- a furry windscreen for each lavalier mic
- mic clips
- a 3.5mm cable
- a USB-C to lightning cable
- a USB-C to USB-C cable
- a USB-C to USB-C SuperSpeed cable
- a lens cloth

One nice thing about having an all-in-one wireless + mics + accessories kit like this is you don’t have to buy pop filters and deadcat/furry windscreens separately and hope they fit — Rode has done the work for you.
Setup
Pairing the receiver and transmitters is dead simple using the buttons on each unit. After that you connect the receiver to your camera or recording device and start capturing audio, unless you plan on using the onboard recording that’s built into the transmitters, in which case you just start recording! For my purposes I used a Zoom F6 field recorder, splitting the 3.5mm output to two XLRs using an adapter.

See above for an image of the receiver. There’s an LCD screen, USB-C and TRRS connector ports, and navigation buttons. Each transmitter (below) includes LED indicator lights, connector ports, and a built-in mic.

The Rode Wireless PRO is designed for easy operation, and it really does deliver on that front. The LCD screen on the receiver displays everything you need to know about the status of the system, and makes it easy to see whether you’re getting good audio levels. Once you’re set up, simply connect it to your camera or external recorder and rest assured that if you lose wireless signal or get a too-loud source that causes clipping, the transmitters are recording on-board in 32-bit float audio — you’re covered!
App Control
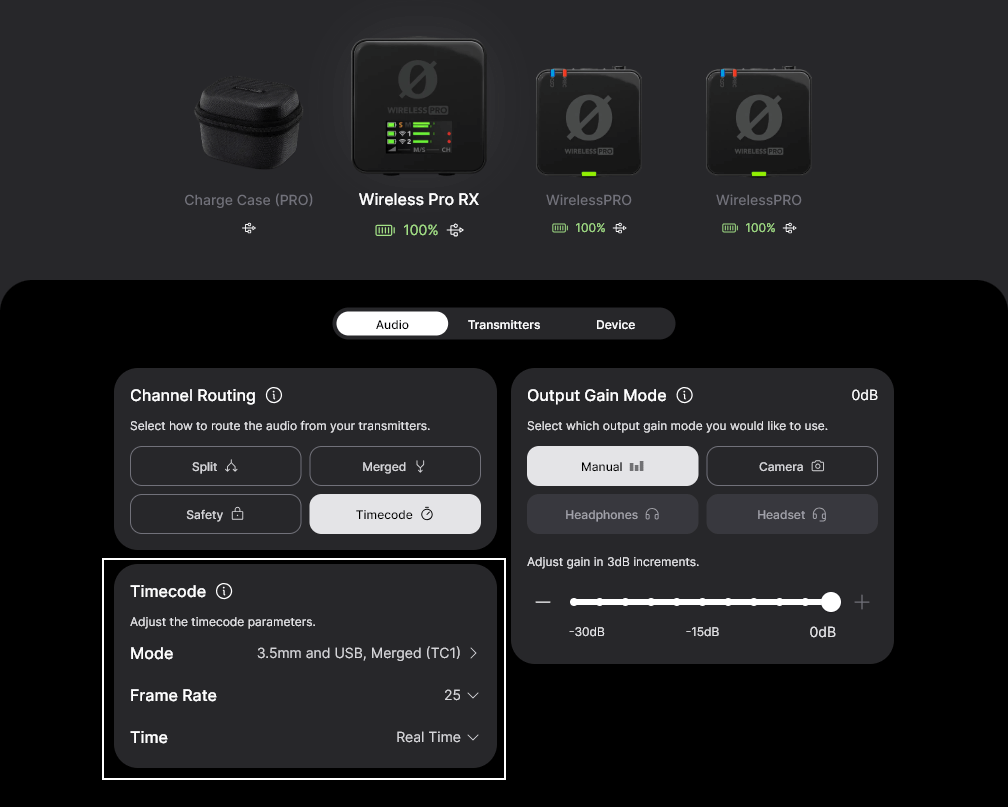
For more configuration options, you can install the RODE Central app, available for iOS, Android, and desktop. RODE Central lets you control output gain modes and channel routing, as well as camera presets, so you can have your settings ready to go for whichever camera you’re using. There are additional options like LED backlight dimming, and adjustable high-pass filters.
In Use
During the video shoot, I used the Wireless PRO system to record a grand piano, the audience and room sound of a small restaurant/venue, various interviewees (clipped to shirt), and the audience and ambient sound of a small outdoor performance. In each of these scenarios, the Lavalier II mic provided great sound quality and the wireless system performed admirably, with zero dropouts unless the interview subject took a break and walked several rooms away from the receiver, in which case the signal became a bit spotty. In my post-editing of the audio I have not noticed any interference or other signal problems, even when I was running two Wireless PRO systems at the same time (four transmitters and two receivers).

Recording Modes
The Wireless PRO can be set to record in Merged, Split, or Safety modes. Merged combines both outputs together for a mono signal in each channel (left and right), great for live use or when you’re only using one transmitter. Split mode puts one output in each channel, which is the mode you’ll want for a two-person interview or any other situation where you want to process each channel separately later. Safety mode merges both outputs into the left channel and records a separate merged output into the right channel which is at – 10dB, in case your audio gets too loud and clips.
On-board 32-bit recording is a great feature of the Wireless PRO, letting you record audio without any external recorder or camera. And of course you can also just use the on-board recording as a convenient backup, in case of clipping (overly loud source audio), bad wireless signal, or a failure with your recorder or camera. Just press the “Ø” button to start recording. Exporting the on-board recordings is pretty straightforward, you just connect the transmitter to your computer and download the files directly or through the RODE Central app.
Related: 32-Bit Float Recording: What It Is and How to Use It
32-bit float recording offers a vast dynamic range with an extremely low noise floor. Learn the science behind this incredible tech in this post! | Read »

Gain Modes and GainAssist
The Wireless PRO includes multiple gain modes so you can have the correct output gain for headphones and different cameras, or you can set the gain manually. There is also a “headset” option that lets you capture headset microphone audio.
GainAssist is a handy feature that auto-adjusts the gain to keep a consistent volume, with Auto and Dynamic modes, based on how much your source audio is fluctuating.
Final Thoughts
Overall the Rode Wireless PRO is a very user-friendly and stable system to use for recording critical audio for video. This system would also be great for plenty of non-video applications, and the on-board 32-bit recording lends extra peace of mind to any recording situation. I recommend it for any situation where you need to capture the audio correctly, the first time, with no room for error.


Leave a Reply