The EBow… one of the many wonders of the world, and of music! This unique tool allows guitar players to turn their picking hand into a “bow,” creating a feedback loop that can sustain your note for as long as you hold the EBow in place. As cool as this sounds though, it can be tricky to operate. In this post, we’re not only going to learn how to use the EBow, but also how to master its different playing techniques. But first, let’s find out where this mysterious and magical tool of sustain came from.
A Brief History
Greg Heet of Heet Sound created the EBow in the late ’60s. It started appearing in players’ hands and eventually made its way to the NAMM music equipment trade show around the early ‘70s. At that time, there was nothing like the EBow for guitar players. Eventually, that unique sound made its way to the artists and records that would make this tool a phenomenon.
One of the most recognizable placements for the EBow appeared in Blue Oyster Cult’s “Don’t Fear the Reaper.” During the transition between the breakdown and verse, the EBow creeps in with a sustained note that lasts for a whopping 30 seconds! This single sustained note serves as the glue between the two sections and is a great demonstration of the power of this tool. Take a listen below:
Take a listen to some other examples of EBow use below:
Foo Fighters – Subterranean
U2 – With or Without You
David Bowie – Heroes (Live)
Through time, the EBow has transcended styles and genres alike. And just like the artists who used this iconic tool, you too can make it a sound of your own! Let’s start by learning about its design and functionality.
Design and Functionality of the EBow
The design of the EBow can be tricky to grasp at first, but by following a few steps with practice, it can be fun and easy!
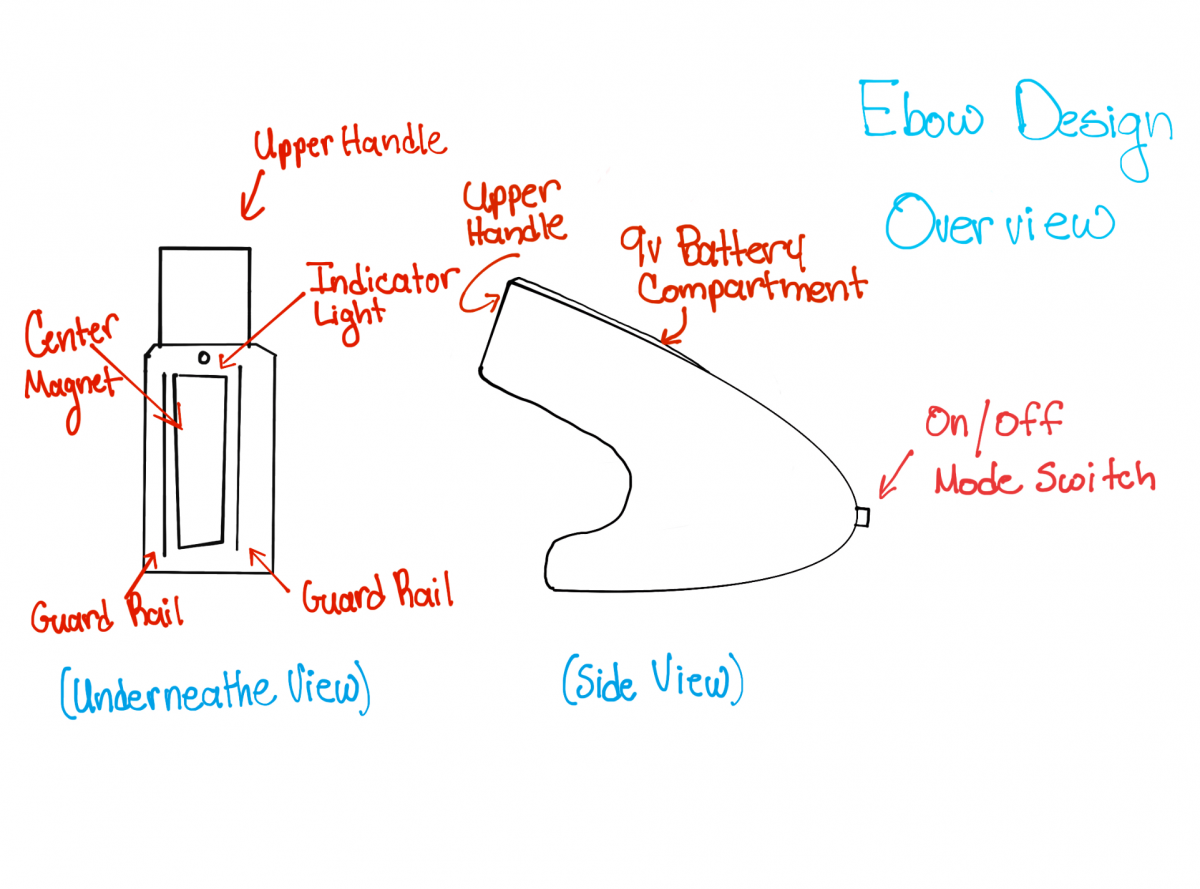
The handle on top is designed to have enough room for you to grasp the EBow between your fingers like a guitar pick. Below the handle, you have the mode switch. This switch turns the EBow on and switches between normal and overtone mode, which we will go over a little bit later in this post. Beyond the switch on the underside of the EBow lie the magnet and guard rails.
The magnet is what creates the feedback loop and sustained note, or the EBow sound.
The guard rails serve two purposes. If you’re playing on a single string, the guard rails will help you keep the magnet centered so you can create the proper sustain. If you hit the string on the guard rail, the note will quickly decay. Alternatively, if you glide the rail over to another string, you can go from string to string rather than being confined to one.

Learning To Use and Master the EBow
Now that we’ve gone over the design and functionality, let’s learn how to use the EBow! First, we’ll start with how to properly place it on the guitar.
Remember, the EBow is supposed to replace the pick in your picking hand, so it’s important to think of it as one. Personally, I like to hold it between my index finger and thumb, the same way you would hold a regular pick.

Now that you know how to hold it properly, you’re going to want to choose a string to place it on. Starting with one string will allow you to get used to the feeling and sound of the EBow. As was mentioned earlier, there’s a magnet on the underside between the guard rails. So, your goal is to keep the string directly under the magnet and between the rails.
Now this is where things get a bit tricky. If you place the EBow too hard on the string, or too far away, the sound will dull. You’ll want to place the EBow just barely above the string so that the magnet can vibrate the note into a feedback loop. The guard rails will push the surrounding strings down slightly so as to avoid any dulling.
What To Listen For
The good thing about the EBow is that it’s easy to know if you’re getting the right or wrong sound. It’s a rather intense feedback loop, so either you’re getting sound from it or you’re not. There isn’t much gray area with this, so what exactly should we listen for?
When the magnet is placed appropriately above the string, the feedback loop, or “guitar synthesis”, will come through steadily and very strong. If it isn’t placed properly, you’ll hear the string hit the guard rail and/or the magnet if you have the string too close. Check out the videos below for examples:
The Two EBow Modes
The EBow operates with two different modes. The switch on the back can be pushed to the right or to the left to be turned on. When pushed to the left, you get the normal mode. This sustains the note on your string, creating a feedback loop, as described earlier. This is the sound we have come to know and love over the years!
However, when pushing the switch to the left, you get “Overtone mode”. Now, the basic function is the same: it vibrates the string creating an “endless” feedback loop. When this is activated, you only hear the overtones of the note you are playing. This creates a much sweeter, more ethereal tone. Overtone mode can really make things interesting! Check out the differences between the two modes below:
Master and Expand Your Skills!
Now that you’ve learned the basics, let’s go over some playing techniques! The vast majority of the time you play the EBow, you’ll likely be using one string with legato playing. This is just the easiest way to operate it. There are other ways to use it, but we’ll start with this technique because it’s the most common.
Check out the two videos above to see how legato playing can be implemented with the EBow!
Crossing the Strings
In the design overview section, we discussed that the guard rails underneath the EBow serve two functions — to keep the magnet centered, or to allow you to transition between strings. Technically speaking, you can go from string to string without having to lift the EBow. However, this technique is less common and is trickier to do. Remember, the guard rails are technically supposed to stop you from bumping other strings. So how do we make this work?
You can play multi-string lines, or you can arpeggiate. In my opinion, arp’ing with the EBow is easier because it’s a bit more intentional than a line that you might improvise. Most improvised lines or solos you hear on the EBow are going to be on a single string. So, let’s start by arp’ing a C major chord in open position.
To go from C to E, or from the A string to the D string, you’ll first want to get the feedback loop going, and then glide the EBow to the next string, with the guard rails going smoothly over the string. You’re likely going to get some plinking to start, but with practice you should be able to smooth out the sound. The key is to get the guard rail over the string in a smooth, gliding motion. Take a listen below:
Conclusion
The EBow is a unique tool in every aspect, from its signature sound to its learning curve. It’s not something you’ll use all of the time, but when you do, it’s going to create a truly out-of-this-world sound. By following the steps outlined in the post, in addition to practice and dedication, you too can master this tool. It’s worth it to be able to add the EBow sound to your arsenal. Give it a try!


Leave a Reply