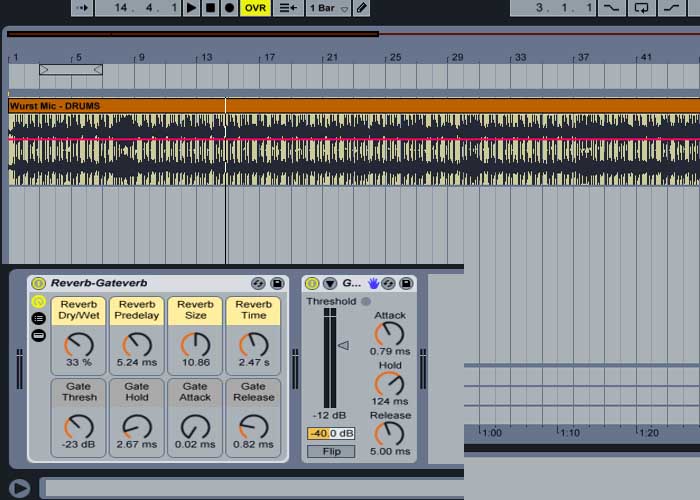
A drum track can make or break a song, or even a record as a whole, so it’s of huge importance to nail the recording process of drums, and — in a perfect world — accomplish the tricky feat of adding character to your tracks. This is where the “Wurst” drum mic method comes in. Popularized by engineer/producer Moses Schneider, (Pixies, Nick Cave) the “Wurst” method takes a single microphone placement and transforms a drum kit’s personality in the mixing stage of recording.
The general idea is that, in addition to your close-miked kick, snare and toms, overhead mics and ambient/room mics, you add another cardioid dynamic mic at the kit’s “sweet spot,” (more on that below). This mic picks up the sound of your kit with a unique sonic footprint, which you can then blend in to your liking.
Microphone Choice and Placement
The “Wurst” method is highly dependent on placement and microphone choice. Obvious choices are dynamic instrument microphones such as the Shure SM57 or the Electro-Voice RE20. Both of these microphones allow for a wide range of frequencies to be captured from the drum kit and can handle the decibel load of loud percussion without any distortion. It is important to keep in mind that these choices are subjective and the best results will always come from experimenting with many options and selecting the hardware that works best with the mix and overall sound you are going for on the song or record.
When attempting placement for the “Wurst” method on a standard 4- or 5-piece drum kit, always take phase into account and eliminate it if necessary. This can be done by measuring distance between overheads, spot mics (toms, snare, etc) and any other microphones that could capture other aspects of the drum kit apart from the “Wurst” microphone. These can create a type of microphone “bleed” that thins out a drum sound and is not favorable in most settings. Typical placement of the “Wurst” microphone will be mounted on a boom stand shot out over top of the bass drum — this allows for easy placement and operation while tracking. Place the “Wurst” mic 2-5 inches directly above the drum and pointed in the direction of the snare. Schneider sometimes refers to this setup as “knee placement” because of the mic’s proximity to the drummer’s knee on the kick pedal.
Mixing and Adding Effects
Once drum tracking has concluded and the mixing process has begun, it’s time to listen to the recorded tracks and figure out where this additional track will fit into the mix, and how it can elevate a dry, boring drum track to the next level, filling it with character and its own identity using effects.
Again, this is an important time to note that each session and song is different. Using a producer’s mindset, try to find the best locations in a song to bring the drums out of the mix with the “Wurst” track. This can be done with anything from simple gain adjustments in mixing to adding distortion and noise gates to bring out kick tone and cymbal decay.
For example, adding a plate reverb to the “Wurst” track and kicking up the gain slightly will add ambiance and a bit of low end to the drum track that couldn’t have been captured without this mic placement. This is especially useful when diversifying sections of a song, such as a chorus, verse and bridge. This method also comes in handy with live drums on a hip-hop or reggae track when delay and a nice noise gate are added. This process clinically selects which tails are produced by the delay and when added to a full drum mix can give “sparkly” high end to snare and cymbal and low-end “thump” to a kick track.
For nearly all recording methods it’s best to try a wide variety of gear, mic placements and mixing strategies when working on a project. The “Wurst” method is one of many small tools that can add up to a great mix when attempting the tricky process of tracking drums and it has worked wonders on a myriad of great tracks over the years.


Leave a Reply