 With the recent release of Avid Pro Tools 12 and Pro Tools First, a crop of new users are picking up this industry-standard DAW software. As any longtime PT user can tell you, Pro Tools has a seemingly endless list of keyboard shortcuts to help you find your way around the software quickly. Some are listed in the menus — like Command+Shift+N for creating new tracks — but there are also a great many Pro Tools shortcuts you won’t find listed in the menus. These shortcuts aren’t really “secret” at all — seasoned Pro Tools editors have been using them for years — but if you’re new to the game, these keyboard shortcuts will help you turn Slow Tools back into Pro Tools.
Keyboard Focus mode, aka “that AZ button”
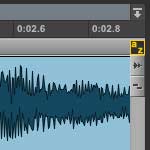 Attention Pro Tools noobs: the first thing you need to know about is Keyboard Focus mode. This turns your entire QWERTY keyboard into a bank of one-press keyboard shortcuts that don’t require modifier keys (like Shift, Command, Control or Option).
To use Pro Tools’ one-key shortcuts, you’ll need to turn on Keyboard Focus mode by clicking the “AZ button” in the upper right corner of the Edit window.
If the AZ button is yellow, Keyboard Focus is on. If it’s gray, Keyboard Focus is off.
Using the Function keys for Pro Tools shortcuts
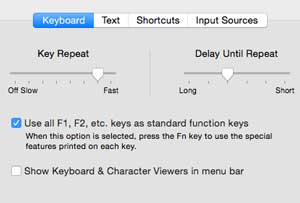
Using Pro Tools on a Mac? Go to System Preferences > Keyboard to enable F1, F2, etc as standard function keys.
If you’re on a Mac, and you want to use the Function keys at the top of your QWERTY keyboard as Pro Tools shortcuts, you’ll need to set your System Preferences accordingly. In System Preferences > Keyboard, enable “Use all F1, F2, etc. keys as standard function keys.”
Another tip for Mac users: Command+Space is the default shortcut for Spotlight search, but it’s also a shortcut for Record in Pro Tools. To use Command+Space for Record, you’ll need to go to System Preferences > Spotlight and disable it as the Spotlight search keyboard shortcut. (Sorry, Apple — Pro Tools was using Command+Space for “roll tape” before Spotlight was invented.)
Shortcut #1: Toggle Between Edit Modes
The four Pro Tools edit modes — Shuffle, Slip, Spot, and Grid — are often among the first things new PT users learn. For some projects — like editing voiceover — you’ll need to switch between modes a lot. Instead of clicking the buttons for each mode, use the first four Function keys to quickly toggle between edit modes:
F1: Shuffle mode
F2: Slip mode
F3: Spot mode
F4: Grid mode/Relative Grid mode
As any Pro Tools editor knows, Shuffle mode can be hazardous to your session when used unknowingly. Afraid you’ll accidentally hit Shuffle instead of Slip with this easy shortcut? Just press Command+F1 to toggle Shuffle Lock. Now you won’t be able to enter Shuffle mode until you hit Command+F1 again.
Shortcut #2: Tap Tempo with the “T” Key
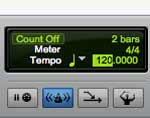
Let’s say you want to record to a metronome click. Sure, you can enter a BPM in the Pro Tools transport, but if you don’t know an exact BPM, you can use the Tap Tempo function to determine a tempo by tapping it on your QWERTY keyboard.
Open the Transport window and make sure you’re in Manual Tempo mode — not Conductor mode. If the Conductor mode button is blue, click it to turn it gray.
With Keyboard Focus OFF, highlight the tempo BPM (default 120) in the Transport window, and tap away at the T key. You’ll see your tempo update in real time.
You can use Tap Tempo with Pro Tools either stopped, or in playback — so it’s useful for matching the tempo on any piece of audio you might be working with.
Shortcut #3: Zooming in and out
These Pro Tools zoom shortcuts will really help you fly around the Edit window’s timeline. They’re great for speeding up editing tasks, like cleaning up the beginnings and ends of clips.
With Keyboard Focus ON:
R: Horizontal Zoom Out
T: Horizontal Zoom
Q: Zoom to Start of Clip
W: Zoom to End of Clip
E: Zoom edit selection (highlighted area) to Edit window width
Shortcut #4: Nudge clips forward or backward
The Nudge shortcuts are seriously useful anytime you’re editing audio. Set the Nudge value as large or small as you like — from 1 sample to a full musical bar — and use Nudge to get clips exactly where you want them:
With Keyboard Focus ON:
, (comma): Nudge earlier (left) on the timeline
. (period): Nudge later (right) on the timeline
Shortcut #5: Timeline Insertion Follows Playback
With Keyboard Focus ON:
N: Toggle Insertion Follows Playback on/off
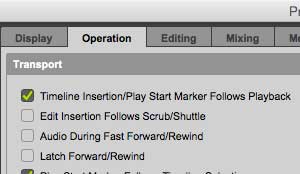
Just hit the “N” key to enable/disable Insertion Follows Playback, without having to use your mouse.
In your Pro Tools Preferences window, you’ll see a checkbox in the Operation pane for “Insertion Follows Playback,” or the perhaps equally cryptic “Timeline Insertion/Play Start Marker Follows Playback.” What does this even mean?
Well, enabling “Insertion Follows Playback” means that when you stop playback or recording, the cursor (aka insertion point, aka play start marker) will stay at the spot on the timeline where you stopped. The cursor will continue from that point forward when you hit Play or Record. In other words, Pro Tools will behave like a tape machine.
Enable “Insertion Follows Playback” if you’re recording a series of takes linearly, one after the other, on a new stretch of tape — er, timeline. This is useful if you want to record several full-band takes one after the other, with no overdubs or playbacks. If you’re recording a live show, this is a must.
If you need to play back the same section of timeline over and over — which is most of the time when you’re overdubbing, mixing or editing — you’ll want to disable Insertion Follows Playback. This way, when you stop playback, the cursor goes back to the point you started playing from. The N key lets you enable/disable Insertion Follow Playback without even having to click your mouse.
These are just a few of the Pro Tools shortcuts we’ve found the most useful on those long, grueling editing sessions.
Main image credit: Faruk Ates






Leave a Reply