Looking to spice up your guitar playing with a new skill? No matter what style of guitar you play, fingerpicking is a great tool to add to your arsenal. In this blog post, we’ll help get you going on your fingerpicking journey by walking you through the fundamental techniques, including a layout of the PIMA notation system, proper finger and hand placement, and a handful of easy patterns to get you started!
What is Fingerpicking?
Fingerpicking is a style that utilizes your fingers to perform the act of picking rather than the traditional flat pick. It differs from traditional picking in that it’s based on repetitve, yet intricate patterns. This allows you to outline and embellish chords in ways that aren’t common or easily accessible with traditional picking.
Fingerpicking Technique: Getting The Right Sound
What is the “right” fingerpicking sound? It has less to do with achieving a particular tone, and more to do with how clear and full each fingerpicked note sounds. When done correctly, a fingerpicked note should have all of the richness of a note played with a regular pick, but with a softer attack and texture. The first step to achieving this sound is with proper hand and finger placement as well as proper picking attack.
Get Started: Finger and Hand Placement – In addition to ensuring a full and rich fingerpicking sound, proper finger and hand placement also promotes a comfortable playing experience that will allow you to play longer and with more consistency. Let’s start with hand placement:
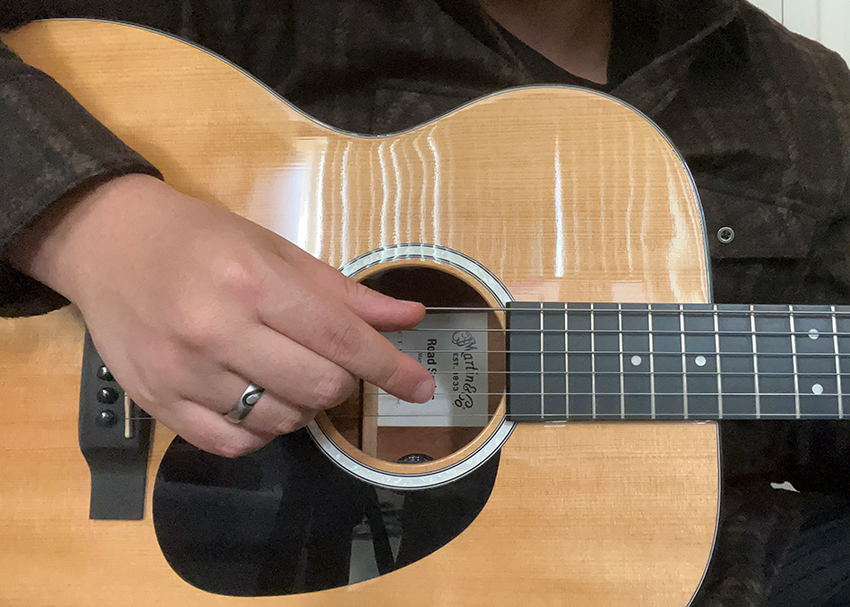
Just as you would with traditional picking, rest your forearm across the lower part of the guitar body in a way that positions your picking hand above the center of the sound-hole. The bottom of your palm should hover just above the strings with your fingers held in a claw-like shape above the center of the sound-hole. If accessing the strings from this position feels comfortable and easy, then you’re doing it right!
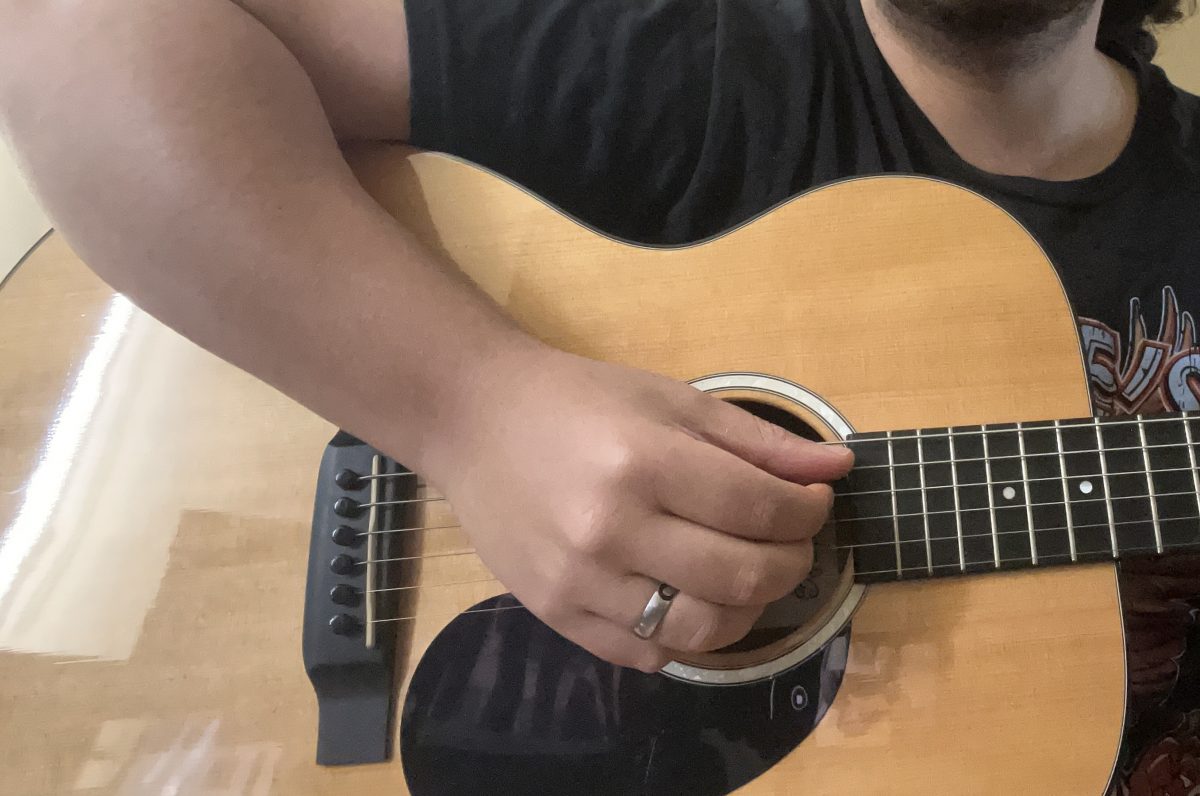
From here, you can begin to place your fingers against the strings. Your thumb should be placed above the string, while your index, middle, and ring fingers should sit below them:

Proper Attack
When it comes to actually plucking the string, focus the point of attack on the tip of your fingers. To do this, place the tip of your finger against the string and avoid letting your nail make contact. From here, use the tip of your thumb to pluck downward, while using the tips of your index, ring, and middle fingers to pluck upward.
Doing this for the first time will likely feel very awkward and unnatural — but don’t worry, it’s completely normal. To get your fingers accustomed to picking notes, try picking the open strings one-at-a-time with each finger. Pluck the E string with your thumb, the A string with your index, the D string with your middle, and the G string with your ring finger. From there, repeat the process, going backwards until it feels smooth and natural.
Understanding PIMA
One of the first things you’re likely to learn when you start playing guitar are the letter names of each string. Fingerpicking also has a similar lettering system known as PIMA:
P – Thumb
I – Index
M – Middle
A – Ring
PIMA is a notation system designed to illustrate how to properly play any given fingerpicking pattern by telling you which finger plays which string. It’s commonly found in sheet music for fingerstyle songs and occasionally in guitar tabulature as well — but for this post, we’ll be using it to show you how to play some basic patterns you can get started with.
Let’s Get Fingerpicking!
Once you feel comfortable with the fundamentals outlined in the previous sections, then you’ll be ready to start fingerpicking! In this section, we’ll show you a selection of basic fingerpicking patterns used in a wide variety of songs utilizing the basics you’ve learned so far.
#1 – The Linear Pattern
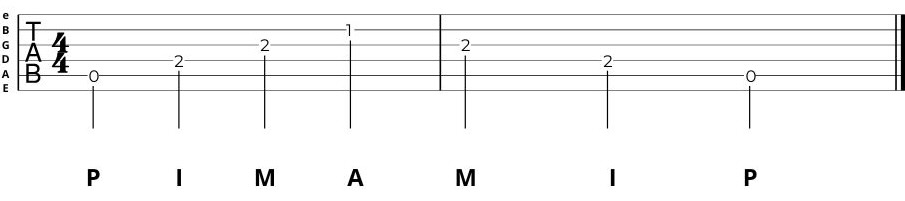
This is a great first pattern to start with, as it mirrors the open string exercise outlined in the “proper attack” section. The main difference being that this pattern utilizes chords rather than just the open strings. With this method, you’ll outline the chord in a linear fashion using the order P-I-M-A.
We’ll use an A minor chord to illustrate this example:
Thumb (P) – Plays the open A string
Index (I) – Plays the D string 2nd fret
Middle (M) – Plays the G string 2nd fret
Ring (A) – Plays the B string 1st fret
Follow this pattern by playing one string at a time illustrated by the notation below:
Here’s what it should sound like:
Once you feel comfortable, try it with a song! We recommend testing this pattern with “Babe I’m Gonna Leave You” by Led Zeppelin
#2: Travis Picking
Travis picking is one of the most popular fingerpicking techniques owing to its simple approach and intricate sound. A departure from the linear technique, Travis picking features alternating movement between bass and melody notes. There are a number of different variations of this method, but the common feature found in each of them includes the weaving bass notes with upper chord tones. Let’s explore a few of those variants.
We’ll use a C Major chord to illustrate each example:
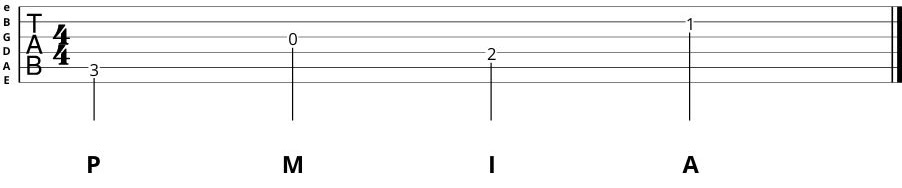
1st Variation
Thumb (P) – Plays the A string 3rd fret
Ring (A) – Plays the B string 1st fret
Index (I) – Plays the D string 2nd fret
Middle (M) – Plays the open G string

Here’s what it should sound like:
2nd Variation
This is a slight variation of method one
Thumb (P) – Plays the A string 3rd fret
Middle (M) – Plays the open G string
Index (I) – Plays the D string 2nd fret
Ring (A) – Plays the B string 1st fret
Once you feel comfortable with this pattern, try it with “Landslide” by Fleetwood Mac
3rd Variation (This method begins with the bass note and the highest note of the chord being played together with the rest of the pattern following after)
Thumb (P) and Ring (A) – Play the A string 3rd fret and B string 1st fret simultaneously
Index (I) – Plays the D string 2nd fret
Middle (M) – Plays the open G string
Thumb (P) – Plays the A string 3rd fret
Ring (A) – Plays the B string 1st fret

Once you feel comfortable, try this pattern with “Dust In The Wind” by Kansas or “Just Breathe” by Pearl Jam:
#3 – Chordal Fingerpicking
While the first two methods we’ve explored focus on playing one note per string, the chordal fingerpicking method has you using your fingers to play some or all of the notes of a chord together. Think of it like strumming, but rather than using a pick to strum down on a chord, your using your fingers to pluck multiple notes at once. This technique can be used in two ways: to alternate between the bass note and the upper chord tones, or to play the entire chord at once. Let’s explore some examples:
We’ll use an E major chord to illustrate these examples
Method One – All notes played together in one instance:
Thumb (P) – Plays the open E string
Index (I) – Plays the A string 2nd fret
Middle (M) – Plays the D string 2nd fret
Ring (A) – Plays the G string 1st fret

Method Two – Bass note played first, followed by the upper three chord tones played together
Thumb (P) – Plays the open E string
Index (I) – Plays the A string 2nd fret
Middle (M) – Plays the D string 2nd fret
Ring (A) – Plays the G string 1st fret

Songs that use variations of these patterns:
Conclusion
Congratulations on making it to the end of the lesson! By following the steps outlined in the post, you’ll be well on your way to becoming an advanced fingerpicking player. The patterns outlined in this lesson are used in many popular songs from a wide variety of genres, so I encourage you to use these techniques to explore them. Looking to spice up your own songs? Try one of the techniques you learned in this post to give some fresh alternatives to your musical ideas. Whether you’re learning new songs or writing your own, a little bit of practice with these techniques each day goes a long way!


Leave a Reply