
So, you’ve managed to record the perfect guitar take, but now you’re playing back the mix and and there’s something just a tad off. Maybe the guitars don’t seem quite big enough, or maybe they just aren’t as punchy as what you were looking for.
Well, fear not my friends! I’m here to give you a few tips on how you can beef up those guitars and really bring your mixes to the next level. Throughout both the tracking and mixing stages, there are multiple techniques you can utilize to really buff up those guitars. From mic choice and placement, to parallel processing and EQ treatment, we’ll go over several options and hopefully you’ll be able to take this info back to your studio and put it to good use.
Tracking
Recently, I had the distinct pleasure of recording a Chicago-based band called Action/Adventure. These folks are a modern sounding pop-punk group, so when it came to guitars I knew I needed to capture a huge-sounding, in-your-face guitar tone that could cut through the mix and get their fans hyped up.
Microphone Selection
So, the first decision (obviously) would need to be microphone selection. I’m a huge fan of using multiple mics on an instrument – if you haven’t done this before, I definitely recommend it. Multiple microphones give you the ability to capture completely different (maybe/hopefully even complementary) tones and then later blend them together to create a stunning sound. My first choice was the ‘ol standby – the Shure SM57. This cardioid-pattern dynamic microphone is a classic for just about all instruments. It has a fairly flat frequency response in the mid-range frequencies (meaning no matter what instrument this microphone is on it will pick up a fairly natural sound without altering the tone too much), but with low end roll-off below about 175 Hz (so there will be no flubby bass frequency content that may muddy up the tone) and a slight boost in the 10 kHz range (which can add to the “sparkle” of an instrument and help make it sound more defined). Another thing worth noting is its frequency response: 40 Hz to 15 kHz. Human hearing doesn’t go above 20 kHz (so, the 57 has a gap at the top end of the frequency spectrum) and doesn’t go below 20 Hz (which means this mic bottoms out just shy of how low we hear, but that fact coupled with the roll-off starting around 175 Hz makes it pretty weak for those frequencies, which is actually a good thing for recording guitars).
For a second guitar microphone, I knew I needed something that would add a little more girth to the mid-frequency spectrum and round out in the areas in which the SM57 lacked. I first considered a ribbon microphone, which usually provides a darker sound that would complement the SM57. However, ribbon microphones are fairly smooth sounding so I’d lose that bite and snarl which I was trying to achieve for this particular band. So, I turned to a microphone that I’m absolutely in love with and I think has endless applications — the Sennheiser MD441. The sound and tonal qualities of the MD441 are hard for me to describe. The best way to say it is basically an SM57 on steroids. It’s a super-cardioid pattern dynamic microphone and Sennheiser boasts that it’s the “most accurate and versatile dynamic mic available” — and if you’ve ever used it, I think you’d be hard pressed to make an argument against that statement. With a frequency response of 30 Hz to 20 kHz, low-end roll-off that starts around 60 Hz, and a slight boost around 3 kHz, this mic is definitely what I was looking for. The boost in the high-mid range can add exactly that “bite” I was looking for. For the genre, the attack in the guitar lives in this range. And with that roll-off in the bass frequencies, I can extend the frequencies that I’m tracking that aren’t getting much treatment from the SM57.
Microphone Placement
Personally, I have a go-to mic setup on guitar cabs (I mean, there’s a little leeway when I’m working with different genres, but usually I do the same technique or a slight variation). I start with the MD441, which is a fairly large microphone, and put it off-axis on one of the speakers – about 45 degrees left and down of the speaker cone taking care to leaving about two finger widths between the mic and the grillcloth on the cab.
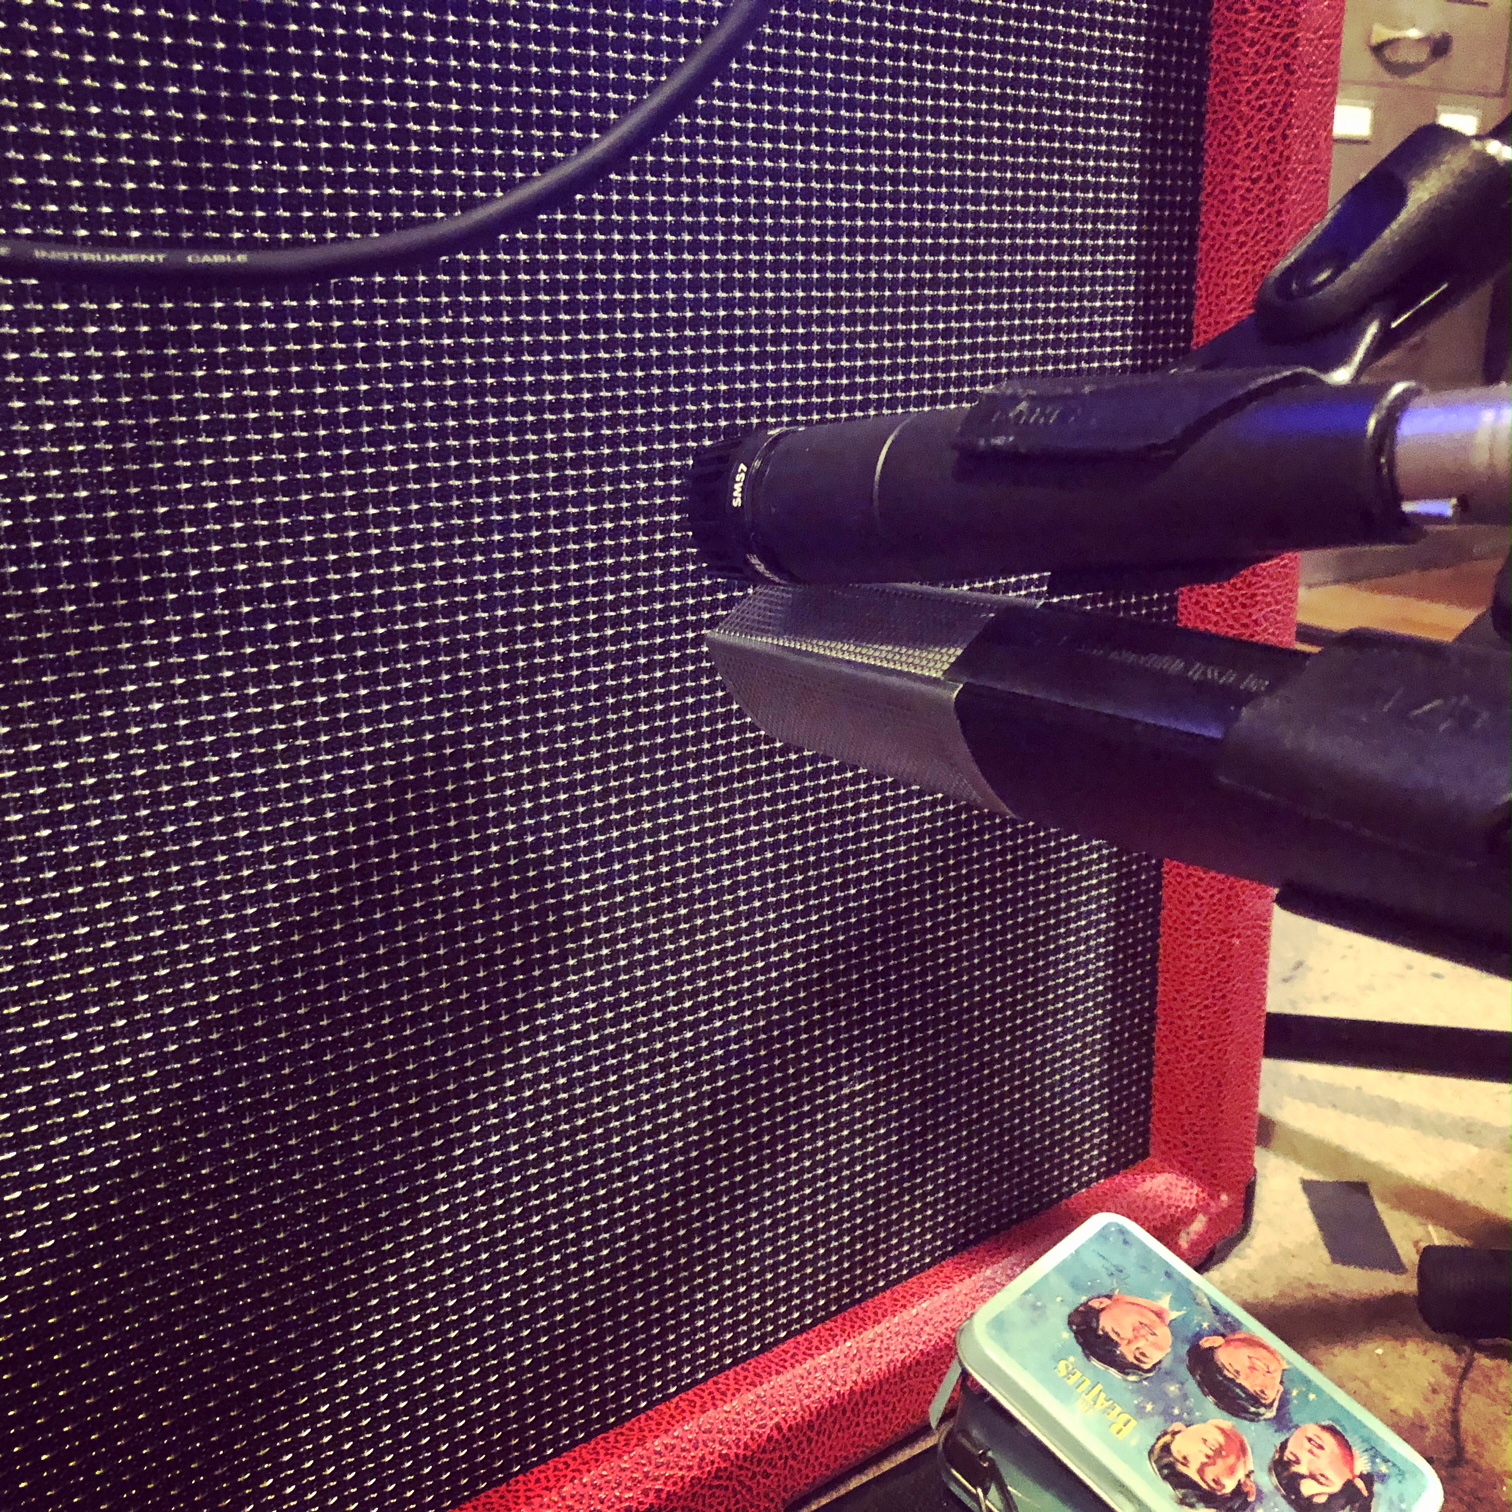
Placement of the SM57 and MD441 on guitar cabinet
Next, I get the SM57 into position. As you can see in the picture, the 57 is directly above the 441. This keeps the mic the same distance from the center of the cone, but just slightly above. When using two microphones on the same source, it’s important to make sure the diaphragms line up together. If they’re off from one another, this can cause phase issues which will make the guitar sound weaker and generally kinda funky (in a bad way, not funky in a Parliament Funkadelic or Vulfpeck sort of way).
This positioning isn’t a must for all guitars, but it’s what I was looking for with this particular recording. Where the mic is placed in relation to the center of the speaker cone makes a massive difference in the tone. The closer a mic is to the center, more treble and less bass is captured. As the mic moves further away and toward the edge of the speaker, more bass is captured with less and less treble. Knowing what happens with mic positioning can really help to sculpt your idea of a perfect guitar tone during tracking. Like I’ve said previously, I wanted something very powerful emphasizing low-mid frequencies, and present where the high-mid and high frequencies play a big roll in this. If I were to be working with a band in a completely different genre, I might choose to push the mic farther toward the outside of the cone, thus being able to get a more round/smooth tone. Depending on what type of project you’re working on, I’d definitely recommend playing around with mic placement and trying a few different techniques to see what works for you and the band.
Mixing
Ok, so we’ve successfully tracked the guitars with two microphones and now there are two separate channels of the same take with different microphones, both with slightly different tones. The two tracks have been blended together to emphasize their strong points. It sounds great, right? Right. But, could it sound better? Definitely!
So now we turn to a few simple steps during the mix process to really make this instrument shine. After we’re done with this, all that’ll be left will be to mix the guitars into the song as a whole and the track will be ready to roll!
EQ & Compression
I’ve worked with some truly amazing engineers in the past who say that if a mix engineer has to EQ anything then the recording engineer has done their job wrong. Well, that may be true to a degree, but that’s a super old-school approach and in this modern digital age dropping an EQ on a track requires virtually no work.
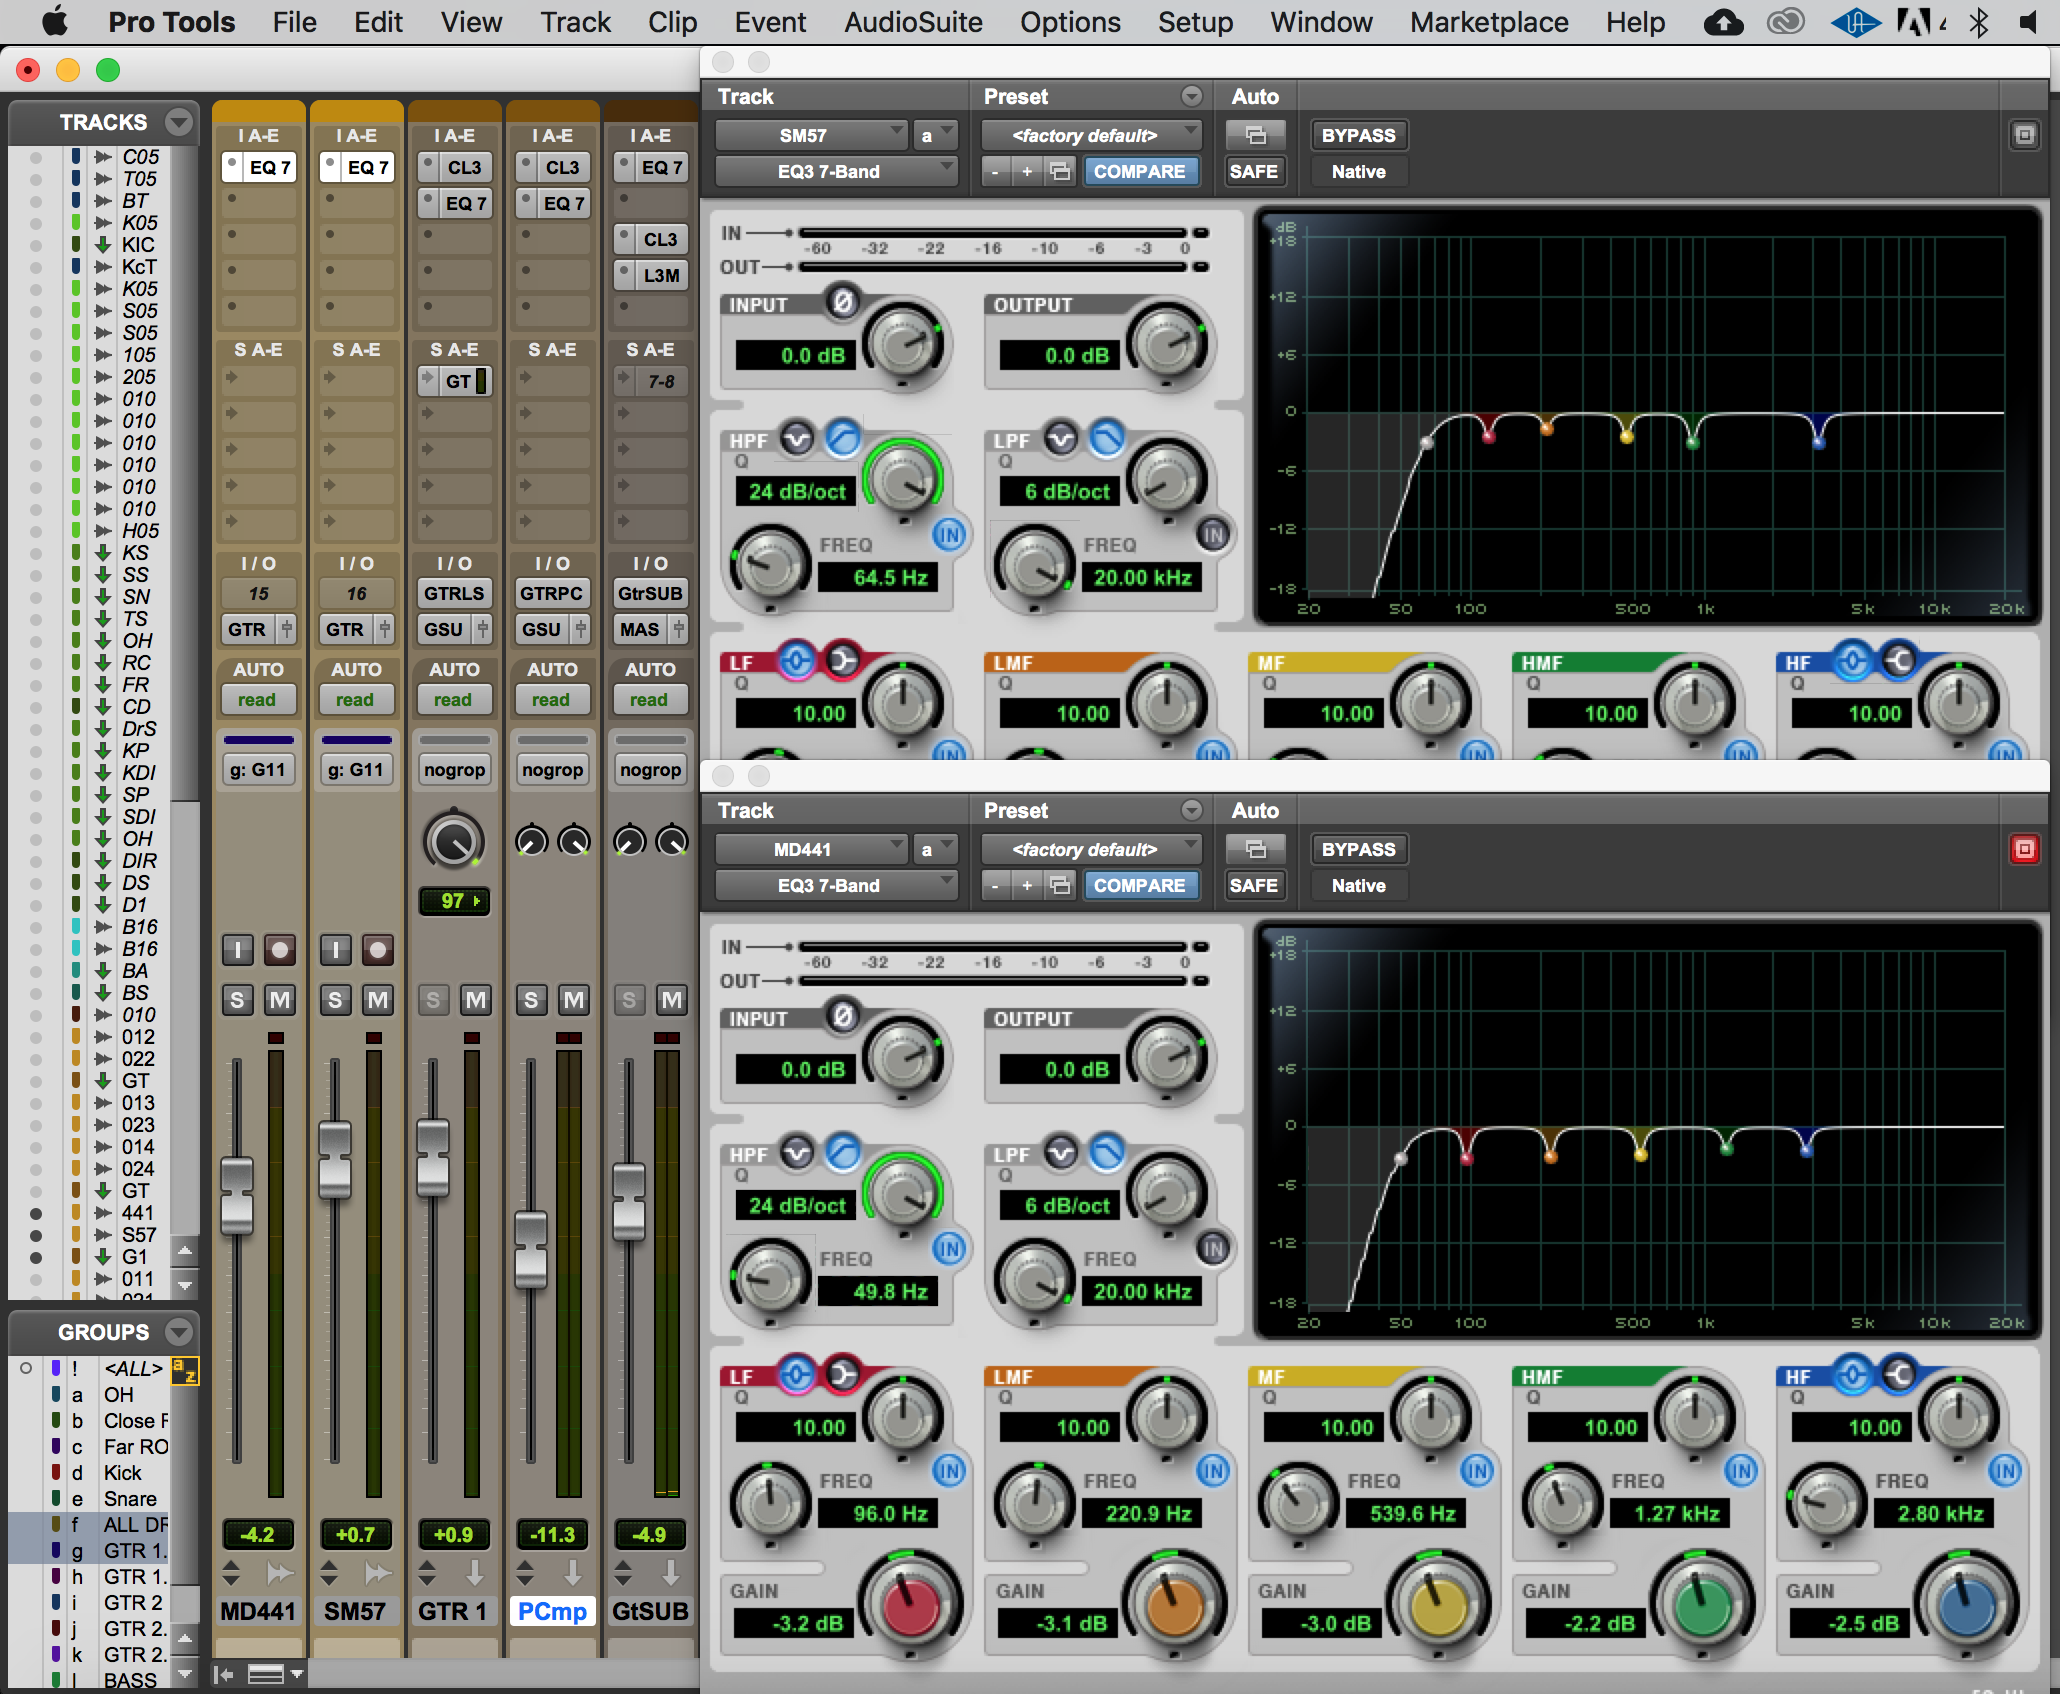
Here, I’ve put some very basic 7-band EQs by Avid (these come stock with Pro Tools, but any ‘ol EQ will work) on the guitar tracks. I’ve isolated some blown out frequencies and done a bit of minor subtractive EQ-ing to get the wonkiness out of the tone through the midrange and pulled out a bit of extra harsh high-end frequencies to smooth everything out. Also, adding a high-pass filter to get rid of any unwanted resonant bass frequencies is also a good idea — this will prevent the guitars from competing sonically with aspects of the bass and the drums (also, if all your instruments have the same low-end content then it’s going to make a big muddy chunk down there which will make your recording sound less defined). By subtractive EQ-ing I mean pulling frequency bands out, but not all the way. If you pull a frequency out all the way you could lose some important musical harmonics and make an instrument sound a bit too dead. The key here is to subtract just a little here and there, making sure to maintain the integrity of the original tone.
This is done on both of the guitar tracks and I have those tracks bussed to subgroup I’m calling “Guitar 1.” On the subgroup I’ve added a compressor. Which compressor should you use? Well, that’s a matter of taste, but I’m using a plug-in of what is arguably the most popular guitar compressor of all time – the LA-3A.
Why the LA-3A? This particular compressor reacts differently to transients based on their level. So, the attack of the compression is faster on louder transients, while it reacts more slowly to softer transients (one could almost describe it as a hybrid of the 1176 and the LA-2A). Another reason the LA-3A is fantastic for guitars is the colorization it gives to low-mid frequencies. If you’re wanting to beef up the tone of a guitar (which is, after all, what this whole post is about) then bolstering and/or giving a bit of oomph to the those particular frequencies is going to seriously increase its body.
The key is to not over-compress. My advice is to drop the compressor on the track, monitor the compression level, and then adjust its input level or threshold (depending on which compressor you’re using) until the VU needle is just barely moving. This will give you a light amount of compression to where you’re just leveling out the instrument. Compression like this isn’t used for effect (that’d be parallel compression and we’ll get to that in a minute), but rather out of necessity to keep transients in check and the overall guitar amplitude around the same level without destroying the dynamics of the performance.
Parallel Compression
One of the most important tools that a mix engineer can utilize is parallel processing. This is when an instrument track (or tracks as we’re doing here) is bussed to a separate aux track with some sort of EQ or compression or any other imaginable plugin dropped in and then blended to gain a desired effect.
Here, I’m using parallel compression to emphasize the punchiness of the guitars. On the actual guitar tracks themselves the compression is light, just a touch. On the parallel track, I’m going all in and really crushing the guitar signal with the compressor. Again, I’m going with the LA-3A and applying it very aggressively. Since this is separate from the guitar sub group, it isn’t doing anything to the signal that I’ve already fine-tuned. Instead, I’m free to pull the volume of the PComp track all the way down and then pull the fader back up slowly until I get a good blend of the two to really fill out the overall guitar with a more aggressive, fatter, and overall bigger tone.
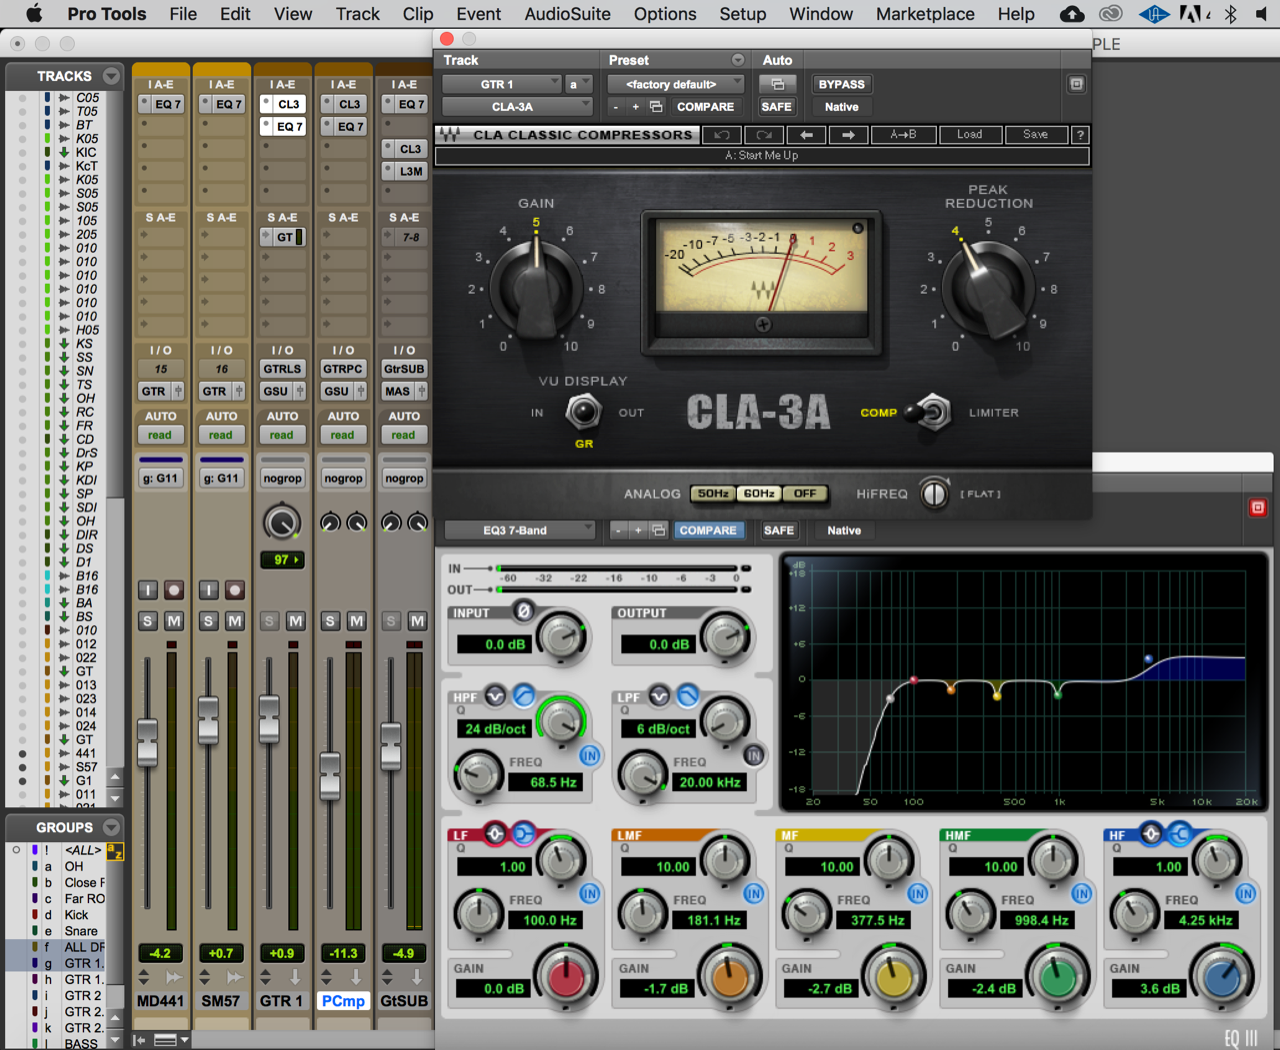
Keep in mind that when you compress a signal, you’re in effect squashing it – that means that the equalization is going to get squashed as well, meaning you’ll potentially end up with some blown out frequencies. So, if you want to try and smooth or clean up this track out as much as possible, drop an EQ after the compressor and lightly pull out any harsh or blown-out resonant frequencies.
Ready to Mix
At this point, you’ve got all the key elements going in your session: EQ, compression, parallel compression, and that’s all going to your guitar sub group. If you’ve made it this far and managed to navigate all my adjectives (bite, growl, punch, girth, smooth, round) then you’re ready to blend it all to taste and put it to work in the mix!
Once again, you don’t have to follow all of this step-for-step in your own session, but if you’ve never utilized these particular techniques I strongly urge you to try these out and use this info as a template — I think you’ll be pleasantly surprised with the results.
Happy recording, folks!


Leave a Reply