Welcome to Beat Connection, a series dedicated to promoting modern and vintage dance styles the only way we know how…by providing you a musical starting point to help you create that beat. In our previous post, we took an in-depth look at one of Ableton Live’s most important beat production tools: Sampler. Today, we explore another tool, one that appears far simpler but does so much more: Ableton’s Simpler. Our goal: to give you the knowledge to understand how this important beat-making tool works. Stay tuned for the next post in the series, when we put all of this together with an introduction to Ableton’s Drum Rack.
Once the search is in progress, something will be found
- Brian Eno, from Oblique Strategies
In our prior post we dove into how Ableton Sampler allows you to playback and manipulate samples in a way that encompasses the flagship samplers of the past. Sampler gave you the granular ability to create whole zones of sample triggers, manipulate via synthesis each sample’s voice, and to create a sample instrument you can recall for future sessions. If anything mimics those huge music workstations you’ve seen in music stores it’s Sampler.
Simpler is very different. Simpler allows you to treat just one sample as a source from which to branch out in many different ways.
Understanding Ableton’s Simpler
Nothing could be so simple as Ableton’s Simpler. Simpler is a sampler instrument that allows you to drop any audio file (wav, mp3, m4a, etc.) into its view and instantly start to play it back up or down in pitch, depending on the key you’re pressing with hardly any pitch artifacts – assuming you have [warp] switched on, which it should be by default anytime you drag in a sample. So simple to use, it’s exactly what anyone who vaguely has a notion of a sampler assumes a sampler does. Divided into three tabs – Classic, 1-Shot, and Slice – each tab gives you a different flavor of sample manipulation and playback. The devil is in the details, though. Let’s look at how each pane in its view treats the sample source.
Classic Mode
Classic view is the most straightforward Simpler playback mode. By default, this mode is engaged whenever you drop in a sample. Strike a note and Sampler will play that sample (for however long you’re holding the key down), transposing up or down in pitch whatever is in that sample. If you’ve ever seen Stevie Wonder’s classic “Jammin’ On the One” segment from The Cosby Show, you know exactly what Classic does:
For quick-and-dirty sample playback, Classic mode is what you’re after. All three modes share the same controls below the waveform display. Shared controls for Filter, LFO, Transpose, and Volume allow you to sculpt the tone of the sample before it even begins playing. Toggling open the Sample Editor triangle lets you see more granular control of those same functions which lets you view the Pitch Envelope, a setting that allows you to control what pitch the original sample begins in, how much volume change it responds to at different velocities, and things like Glide between key presses. Those are the very granular controls you have shared among all three when you toggle open the sample editor. What differs Classic from other modes is a few settings that allow you to work with your sample differently in its own pane view.
Check out each sample below to view how we can transform this audio recording from the video above with each Simpler playback mode.
In Classic mode, hitting C3 (the middle piano key) lets you play the sample at its original speed. Hitting any other key makes it go up or down in pitch. Classic mode also lets you hold down many keys at once to play the sample polyphonically, in case you want to create a harmonic sound. [LOOP] lets you turn on or off whether the sample loops to the beginning every time you hold down a key for longer than the sample’s allotted length. [SNAP] allows Ableton to find a zero-crossing bit in the sample’s waveform to begin and end the loop, this makes it so that there’s little to no audible click when the sample gets repeated.
Functions that appear in Classic’s waveform view like Start and Length let you adjust the sample’s start and end point. Fade lets you decide how quickly the sample gets to its full volume every time it’s triggered – an especially important setting to adjust when samples are looping with an audible click (one present due to lack of silent passages). Warp controls let you adjust how much time-stretching reaction the sampler has every time it is triggered. Unique to Classic view are controls for ADSR that allow you control the volume of the sample over time.
Uses for Classic mode: To play whole samples polyphonically, melodically, and harmonically. Classic sampler functionality.
1-Shot Mode
1-Shot playback mode let’s you play a sample monophonically. This mode is perfect for single hits or sounds like drum samples. Samples can either function as a [TRIGGER], playing through the sample entirely, once every time they’re triggered via key press or note on/off request or they can function in [GATE] mode, only playing as long in duration as a key is held down (or the corresponding length of a note entered in a piano roll sequence).
Uses for 1-Shot mode: To play samples or hits monophonically, rhythmically, and quickly. Classic drum machine playback functionality.
Slice Mode
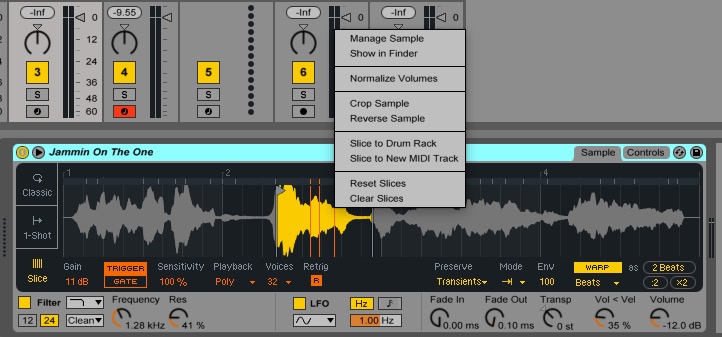
Slice playback mode is one seriously powerful tool. Slice lets you slice your sample into parts. Imagine you have a five second sample that has a crisp hi-hat heard in the first second of the sample, then a pumping kick in the second, and a snappy snare in the third, etc. In previous sample modes you would have to zero in exactly to each part of the sample you want to use, to actually playback that part, if (for example) you wanted use just the hi-hat bit of that sample. In order to use the kick or snare, you’d have to create multiple instances of the same sample, and repeat the same process. Slice bypasses all this multiple-instance rigamarole by allowing you to dedicate certain sections of the sample to playback when you hit a certain note within the same sampler instrument.
There are two ways to create slices. When you load a sample, you can adjust a control labelled Sensitivity to pick up all the aural transients in the waveform. Simpler then uses these transients as slice points. A good rule of thumb is: the lower the sensitivity, the longer your slices are. Ideally, you want as few slices as possible in order to keep segments distinct and delineated. The other way to pick the slices is to use your mouse to zoom in and double-click on the waveform itself. Doing so allows you to create the slices you want to use. If slices exist that aren’t up to your liking, a simple double-click on that slice marker will remove them. You can extend this thinking beyond mere percussion sounds. Imagine slicing vocals, melodic or harmonic bits of music. You quite literally have a new way to instantly remix a track at your disposal – simply by slicing it into bits you can rearrange at will.
What’s fascinating about Slice mode is that when you have your slices lined up, and chosen, you can right-click the waveform and transform those slices instantly into a new Drum Rack instrument. Once you select this option, the slices in your original sample are treated as separate drum machine/sampler hits, opening your world to much more creative audio sequencing. That’s where I’ll leave you today and where we’ll pick up the next installment of Beat Connection.
Uses for Slice mode: To play parts of samples polyphonically, melodically, and rhythmically. New school, MPC-like sample-slicing functionality.
The following track shows you what’s possible to do with just one sample. Download the Ableton Live session below to play with the sample and concepts yourself.


Leave a Reply