
As any recording engineer will tell you, setting proper gain levels has always been key to capturing audio accurately — but 32-bit floating-point recording, commonly known as 32-bit float, is here to make setting levels a thing of the past. 32-bit float as an audio capture format — now widely accessible via affordable gear like the TASCAM DR-10L Pro and TASCAM Portacapture X6 portable recorders, Rode Wireless Pro lavalier microphone system, and Zoom F3 field recorder — gives recordists an enormous amount of headroom, making it impossible to clip or distort your audio. Because you can adjust gain in post, you no longer have to worry about setting levels at the recording stage.
Bit depth and dynamic range
If you’re used to recording audio on a 24-bit (or 16-bit) digital medium — or on analog tape, for that matter — you likely know the drill of dialing in that gain knob just right. Set your gain levels too high, and you’ll end up with harsh clipping distortion. Set your gain too low, and you’ll end up adding unwanted hiss and noise when you bring up the level in postproduction. Like a severely overexposed or underexposed photograph, a too-hot or too-quiet recording loses detail that can never be recovered. (And while you may be able to work magic with audio restoration software, you’re far better off saving yourself time and trouble by recording a clear, clean, loud-but-not-too-loud signal in the first place.)
The dynamic range of your recording system is the difference, measured in decibels (dB), between the loudest and the quietest sounds that the system can handle. Think of it as the difference between the noise floor, and the highest signal peak that the system can properly represent. If you’re used to working within a relatively narrow dynamic range, you’re likely an old hand at using dynamics processors like compressors, limiters, and gates to wrangle your signal into the not-too-loud, not-too-quiet “Goldilocks zone” even before you hit tape. Those are useful skills. But generally speaking, the higher the dynamic range of your recording system, the better.
In digital recording, the higher the bit depth, the more data is captured in each sample to more accurately re-create a sound. Higher bit depth allows for a greater dynamic range. Consider that the humble 16-bit WAV file format offers a dynamic range of 96.3 dB, from -96.3 dBFS up to 0 dBFS, where 0 dB Full Scale is the highest undistorted signal level possible (anything louder than that is getting clipped). Increasing the bit depth by 50%, you get a 24-bit WAV file — the industry-standard recording format for decades — which affords you a 50% increase in dynamic range: 144.5 dB (from -144.5 dBFS up to 0 dBFS). The tradeoff is that it takes up 50% more space on your hard drive.
32-bit floating-point vs. 24-bit fixed-point
When you do the math, it’s easy to see why 32-bit float files are superior as a capture format. With 32-bit float, for a 33% increase in file size over the old 24-bit standard, you get far, far more than 33% greater dynamic range. 32-bit float files are fundamentally different because they store data with a kind of “scientific notation” that uses decimal points and exponents. (For example, a number like 197,000,000 could be expressed as 1.97 x 10^8.) Because 32-bit float files use this clever, space-saving format, they can describe much, much larger (and much, much smaller) values within each 32-bit word, covering a dynamic range of 1528 dB. Where 24-bit fixed-point files top out at 0 dBFS, 32-bit float files represent values from -758 dBFS up to +770 dBFS. That’s just an absurdly wide range — far beyond what we’ll ever need to capture the loudest possible sounds.
Why would you ever need dynamic range this vast? Well, as TASCAM says in their 32-bit float explainer, “The real benefit of 32-bit float recording actually has to do with its lower noise floor…After you’ve recorded audio in 32-bit float format, any quiet sections of your recording can be increased in volume in your DAW or NLE software without adding any noticeable noise. And loud sections that would have clipped a 24-bit or 16-bit recorder can be reduced in level, without any digital distortion or clipping. Thanks to 32-bit float recording, you were able to set up and record without ever worrying about signal levels, and you did not need to scrap any audio due to noise or clipping afterwards.”
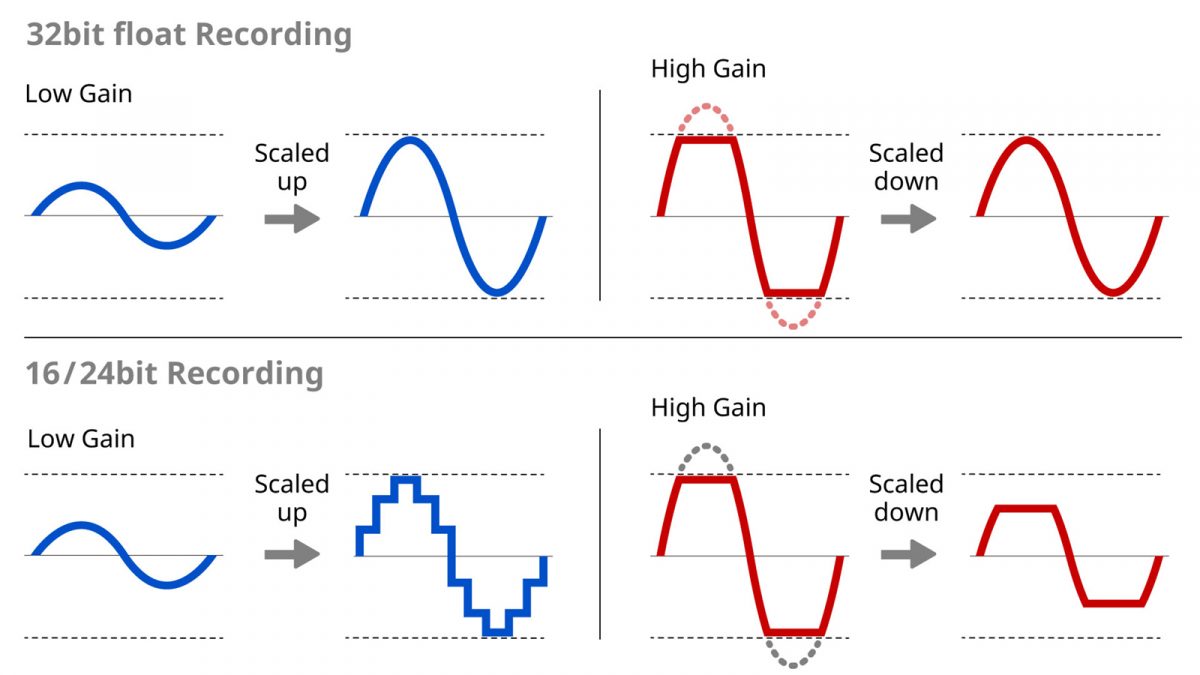
As TASCAM illustrates, when you’re using 16-bit or 24-bit, a very quiet, low-gain recording (illustrated in blue) becomes noisy when it’s scaled up in a DAW. But if you’re using 32-bit float, your recording can be scaled up without adding any perceivable noise floor. (For a visual analogy, think of it like being able to zoom way, way in on an image without it starting to look grainy or pixelated, because the image is so high-resolution to begin with.)
Similarly, when you’re using 16-bit or 24-bit, a very loud, high-gain recording (illustrated in red) will clip and distort once it exceeds 0 dBFS, and that missing part of the waveform can never be recovered. But if you’re using 32-bit float, the recording won’t clip because there’s a vast amount of headroom (+770 dB, to be exact) built into the recording format. All you have to do is turn down the volume in your DAW to recover the “missing” part of the waveform.
Using 32-bit float recording in the real world
In the real world, you may encounter situations where setting the right gain levels on your 24-bit recording device can be challenging. Perhaps you’re shooting a documentary where your subject could scream or whisper at any moment, or you’ve been tasked with capturing a live, one-take-only performance of any instrument or voice that’s capable of going from very soft to very loud sounds. Maybe you’re out recording “wild sound” of a very dynamic source — like a car that idles quietly but revs up very loudly. Maybe you’re recording actors in a scene that progresses from a quiet conversation to a shouting match. Or perhaps you’re just alone in your bedroom noodling on your guitar, you get an idea, and you want to be able to hit record without stopping your “flow” to set a level.
In all these situations, 32-bit float recording is your safety net, since signal levels in excess of 0 dBFS will not clip and distort. And 32-bit float recording can save a take if you set your input gain way, way too low.
It’s no exaggeration to say that 32-bit floating-point recording changes the game for audio capture. In their explainer video, Rode describes how the format makes the gain knob obsolete — allowing you to dial in gain in postproduction in your DAW, instead of at the capture stage:
The 32-bit float workflow
When you first import 32-bit float files into your DAW, they may appear to be clipped. Fear not! Modern pro DAW software can handle 32-bit float files, but since the software is “expecting” files that top out at 0 dBFS instead of the crazy-high headroom on a 32-bit file, the audio may display like it’s clipping. You can scale the gain down to a usable level in the software. When you turn it down, you’ll see and hear that your audio isn’t clipped at all.
Remember, 32-bit float is a capture format, not a delivery format. If you’re responsible for recording audio files and passing them off to a video editor, consider that their video editing software may not be able to handle 32-bit files. If you’re delivering your files to a collaborator, consider that you may need to convert to 24-bit (after making any gain adjustments). Sound Devices illustrates the process in their 3-minute video:

