What the heck is a fiddle?
Recording violin (aka the fiddle) is something that I feel was a lot more prevalent throughout mainstream music history than it is now. While “fiddle” can mean a few different instruments – the lyre, hardanger, viola/kontra, the cello (aka the “big fiddle”) — it’s most commonly associated in modern days with the violin.
Even when played on the classical violin, fiddle music stands apart from classical in that it typically references a type of dance music. Considering we have all sorts of EDM and rap/hip-hop out there that are way more popular to dance to in modern times; bluegrass, country, and upbeat blues are still considered styles of danceable music. Can you imagine boogying down to Bach’s Chaccone? Didn’t think so.
The violin is by and large left off of popular recordings these days; unless it’s featured as part of a greater orchestral piece. For electric instruments, there’s a fairly decent rule about mic placement, and the same goes for acoustic guitars and basses. But, what if you’re trying to record a bluegrass or folk band that prominently features a violin/fiddle? What then? How does one even begin to mic that up?
Well, luckily, I’ve got some experience with folk, bluegrass, and country recording. So, hopefully I can shed a little bit of light on the subject to help bring these projects into focus for you!
Microphone selection and placement
In an age of hi-fi recordings, where does a band fit in that has its roots in the music of yesteryear? Well, I suppose that all depends on what the band wants. That pristine Nashville sound definitely has its place in the modern country sound which often times includes a violinist. Although, if a band is going for a more 60’s vibe, then the ultra-sleek modern production value of all those amazing sleek Tennessee engineers is a little lost on them.
For those amazingly saturated analog recordings from popular American folk and bluegrass artists such as The Stanley Brothers, Flatt & Scruggs, classic Bela Fleck, or even rock like The Allman Brothers, we’d have to turn to popular microphones from days of yore.
Enter the ribbon microphone. The ribbon mic is a classic, but not inherently inexpensive, type of microphone that harkens back to the days of classic recordings. I like to think of these microphones much in the way Obi-Wan Kenobi describes lightsabers: “an elegant weapon for a more civilized age.” These microphones are more sensitive due to their thin ribbon material that captures the soundwaves and they tend to have a darker, (and some might consider) more “natural” sound.
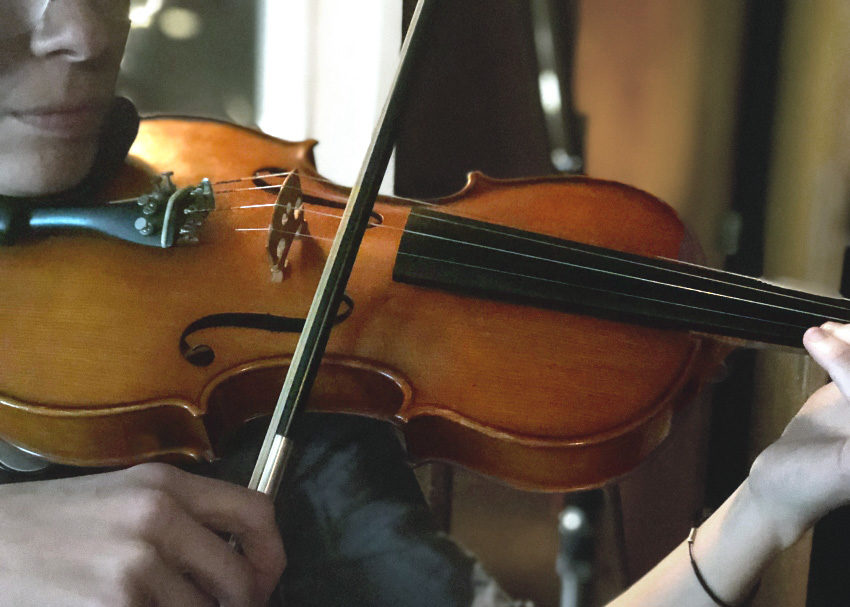
That makes ribbon mics absolutely perfect for capturing the soul-stirring performance of a master player (regardless of whether the fiddler is on the roof or in the isolation booth). A very typical mic position for fiddle (even when we’re tracking a violin in an orchestral arrangement) is an over-the-shoulder approach. Also, by keeping a bit of distance between the mic and the instrument, you can snag some sweet room tone for a bigger, more natural sound, as well as keeping the microphone out of the way from being hit by the bow. Check out this picture and you’ll see what I’m talking about.
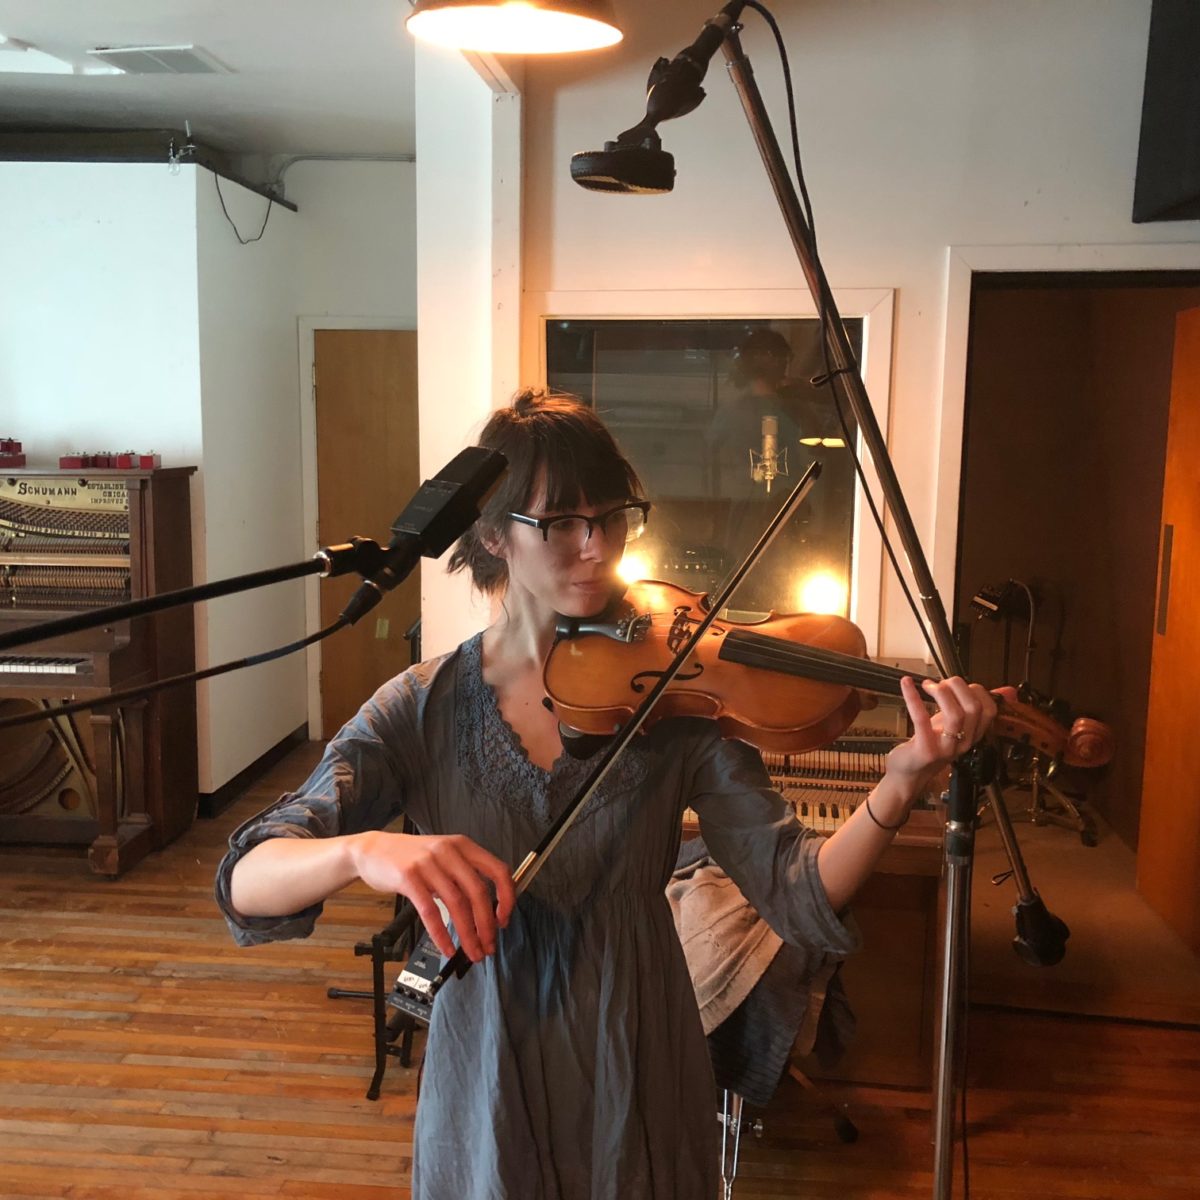
Now, there’s nothing wrong with a single microphone being used here, but if you can spare an extra one, we might as well throw a second mic on this. If you’ve read my other posts, you know that I’m a huge fan of multiple mics to capture a source and then blending the two together while mixing. A perfect complement to the dark, moody tone of a ribbon mic is the high-end airiness of a condenser microphone. Whether it be tube or not, a condenser blended in during the mixing stage can add the right amount of presence and open-ended air to the tone of a ribbon mic. As you can see above, I’ve positioned a gold-faced AKG 414 condenser to face the tilt of the fiddle and angled it slightly to avoid the drawback on the bow from smacking it head on.
Fix it in post — or don’t, just take care of it now!
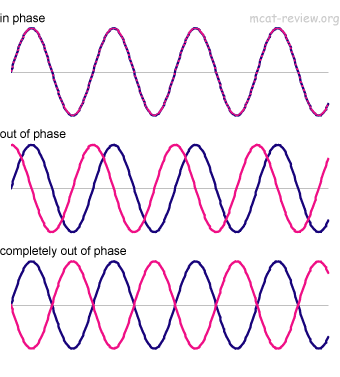
Be aware of phase issues! I’ll assume you aren’t 100% familiar with phasing, but if you are, just skip on down to the next heading. Phasing issues are caused when you use two or more different microphones and they’re different distances from the instrument. When this happens, your waveforms will look like this:
At best, this can cause a bit of funky tonal issues. At its worst, it can cancel out the sound source all together and then that beautiful performance you’ve just captured won’t even be audible to the listener!
If you don’t correct the issue during tracking, it isn’t the end of the world. If you’re using outboard gear, just flip the phase on your mic pre if it’s off. Another fix for this is to adjust the distance of the microphones so that they’re as close to equidistant from the source as you can get them. It’s always preferable to correct as much as possible during the recording session, but this particular problem can be fixed during mixing by dropping an EQ plugin ( some compression plugins also have a phase flip button) on the track and hitting the phase invert button (also known as invert polarity), which looks like this.

Fitting the Fiddle in the Mix
So, you have drums, bass, guitars, vocals, and whatever else you’ve tracked for this soon-to-be hit song. But what’s the best way to fit the fiddle in there? Let’s dive in and I’ll show you what I did for Chicago-based alt-country/folk/Americana band Honey Cellar.
A Touch of EQ
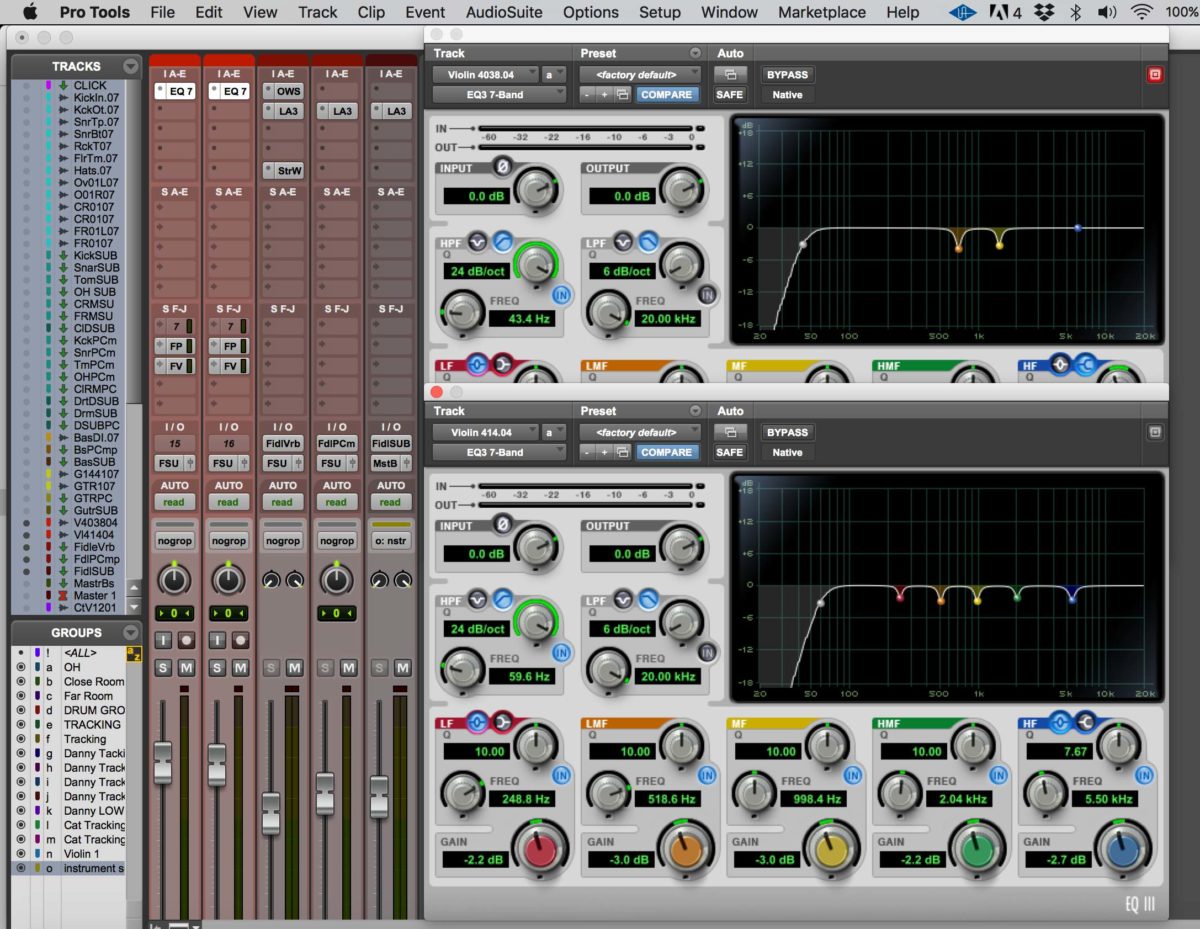
For equalization, I went a little light and used the standard Avid 7-band EQ. The Coles 4038 ribbon mic was so full and well-rounded that I didn’t do much to it. As you can see, I put a high-pass filter on to nix out any low rumble that might interfere and muddy up the mix. I also very lightly pulled out a few annoying frequencies in the midrange bandwidth.
For the AKG 414, I did a bit more. Once again, the EQ-ing is very light here. I really love the tone of the violin/fiddle on this track so I didn’t want to do too much, just focus on preserving the natural sound of the instrument. The bulk of the violin’s frequency content lives in the midrange with not much going on in the lower frequencies. So, I used subtractive EQ to pull out a few “wonky” frequencies in the mids between 248Hz and 2kHz and a hissy sounding spot up a little higher around 5kHz.
Compression
Lucy (the violinist) is a very dynamic player and utilizes her range of playing to emphasize the various parts of songs. That being said, I really didn’t want to overcompress and smash the life out of her performance. To that end — aside from using a bit of compression while tracking — I didn’t use a compressor on the actual tracks themselves. Instead, I put an LA-3A on the violin sub group and set the parameters during the loudest part of the song.
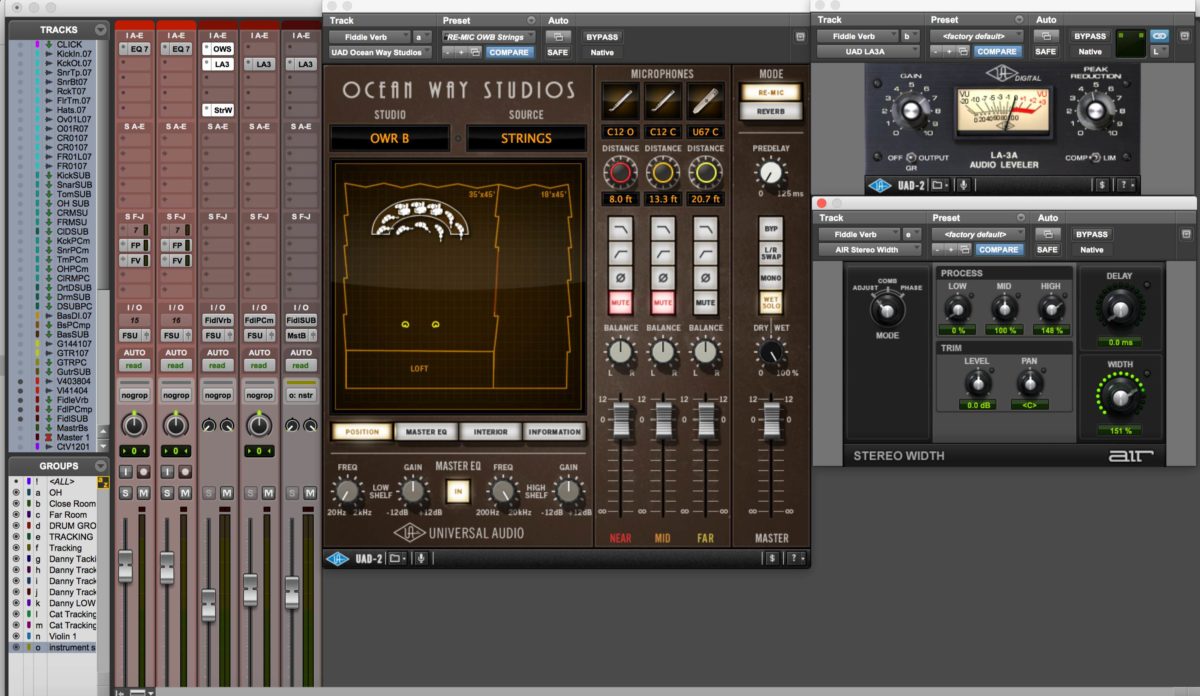
When Lucy really starts wailing I want the needle of the compressor to dip ever-so-slightly. I have the input set at 12 o’clock and the peak reduction barely doing anything at all, just giving a light level smoothing at the performance peak. As you can see by the image, I’ve also set up a send on both the violin tracks to go to a parallel compression aux track (which is in turn fed to the sub group). On this track I was a bit more heavy handed with the compression. I’m still not smashing it, per se, but I increased the gain of the signal feeding into the LA-3A on this track and increased the peak reduction to get more compression.
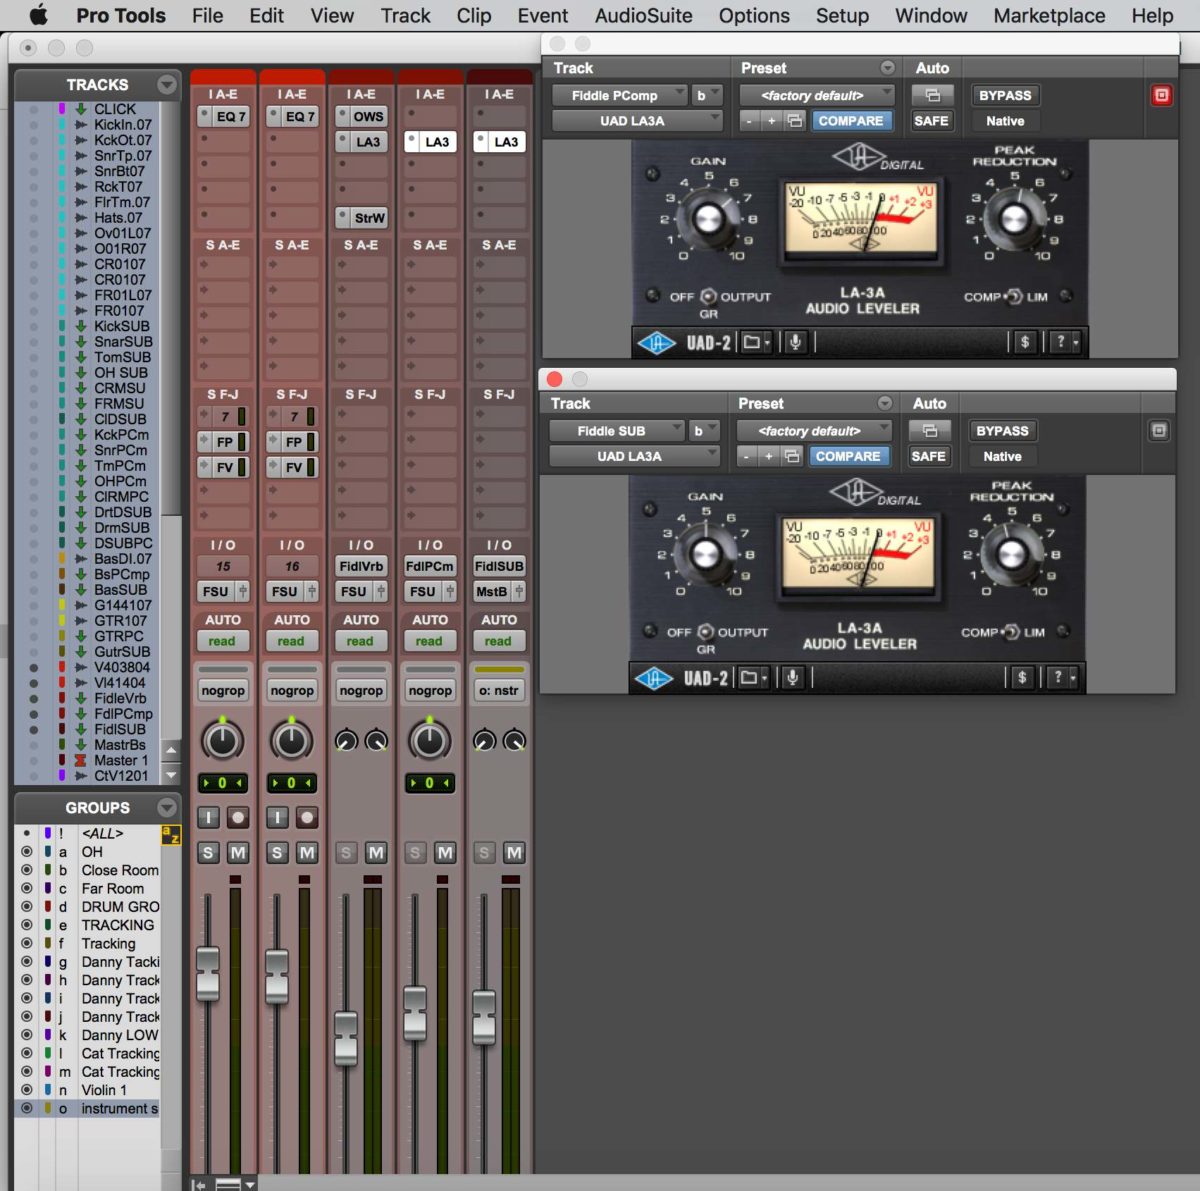
I still don’t want to destroy the dynamics of the playing, so the PComp (parallel compression) track is brought up in the mix just enough to add a little extra body and oomph to the overall track.
Time Based Effects
Ah, good ‘ol reverb. Like I mentioned previously, the distance I used with the mic technique helped to add a bit of room tone to the performance we captured. But once mixing started, the room tone was a little less prominent. I really want this recording to sound as natural as possible, so instead of going with some larger-than-life, lush sounding reverb I used the Universal Audio Ocean Way Studios reverb plugin on an aux track that’s been designated solely for reverb purposes. Ocean Way was known for their absurdly amazing sounding rooms, so I figured I’d just enhance the room tone with this particular plug-in. You’ll notice there are a few plugins in the chain after the reverb.
One is yet another LA-3A (I’m already using that on this instrument, so I’ll continue to do so for the sake of continuity) which I’m using to level out the peaks of the reverb. After that is a stock plugin from Avid called Air Stereo Width. Stereo-field enhancement plugins could have a whole post of their own, but I’ll digress and just do a quick rundown.
This plugin uses phasing techniques (in a good way) to alter how wide or narrow we perceive the source audio as being. Since we don’t have much in the way of low-end frequency content on this instrument, I’ve pulled the low to 0% (meaning that all the lows are focused in the center of the mix, rather than the sides) and adjusted the highs to be very, very wide. This makes the room/reverb feel bigger by make those particular frequencies seem pushed out farther to the left and right channels, giving the verb a grandiose vibe.
Again, this reverb-only aux track has the output set to feed directly into the Fiddle/Violin Sub and then the level has been raised to taste. After putting these last two aux tracks into your subgroup, you may want to go back and revisit the input gain and peak reduction on your main compressor just to make sure you’re not hitting it too hard.
Of course, you don’t have to use a strictly room-style reverb on your own tracks — that’s just what I’ve elected to do in this situation. Do whatever you want! Do you think the fiddle should sound like it’s in a massive church? Go for it! Maybe you’re feeling frisky and think that adding some crazy spring verb makes it sound awesome – yeah, more power to you and your creativity, make that verb drip if you want! Regardless of what type of reverb you’re using, all these techniques here apply and will help make your tracks sound amazing.
And There It Is…
These are all the basic suggestions I have for you on tracking and mixing a violin for your session. Of course, all the plugins I’ve mentioned are my particular preferences, but don’t let that stop you from doing your own experimenting or working with tools that you already know and love. Here’s a little snippet of the Honey Cellar track we’ve been talking about. We’re still finishing up the record, so there aren’t any vocals on this. But, give it a listen and hear what all these techniques have done and how they’re helping to craft a great track.
Have you tracked/mixed violin in the past? Are you doing it right this moment? What techniques are using? What are your go-to plugins and hardware for this instrument? If you’re experimenting with a violin recording feel free to drop a link in the comments; I’d love to check it out!
The main rule of audio engineering is this: if it sounds good, it is good. Aside from a few dos and don’ts that are in place to keep phasing issues at bay (which could literally destroy an otherwise awesome recording), pretty much anything goes in this realm. All the greatest records were made by experimenting — so have at it friends!

