
Welcome back to the next installment of Building a Guitar! At this point in the build I’ve already discussed tips on choosing the right body and neck, proper hardware best suited for your needs, and given a tutorial on adding a custom neck finish. The last step to completing the body of the guitar is in your pickups. Rather than going into an exhaustive explanation on how different pickups sound, I instead decided that a pictorial detailing how to actually solder and install the pickups that you have chosen would be more beneficial.
As an added bonus, I’ll be installing custom Tele single-coil pickups with a walk-through on how to modify the circuit to have a 4-way pickup selector option instead of the stock 3-way Tele pickup switch. My control plate is also in a reverse orientation with the volume and tone knobs in the front and the selector in the back, which in my opinion allows easier access to the knobs and lets me do pedal-steel type volume swells while playing a la Roy Buchanan. Let’s start with the basics:
Supplies
- Pickups of your choice
- Soldering iron
- Solder
- Electrical Wire (if not included with your pickups)
- Backup Electrical Wire
- Copper Shielding
- Wiring Schematic
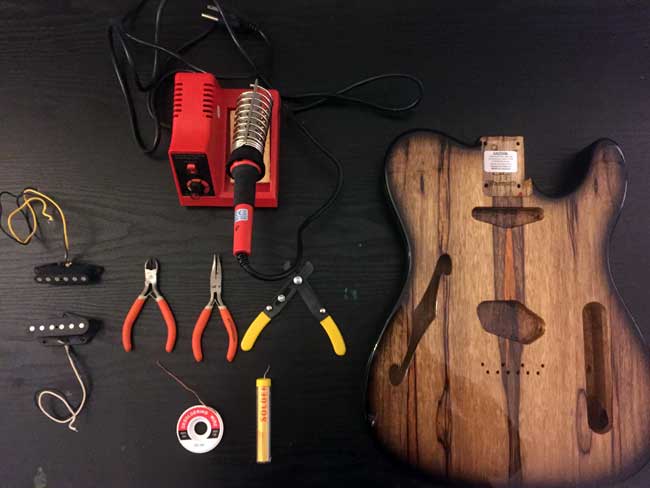
Basic supplies
Pickup Wiring
For starters, grab your pickups you will be using for the build and any other documentation or wiring schematics you may have (if any) on proper installation. These are your best friends, but if you don’t have any instructions, you can usually figure out proper installation with a little investigative work on your pickups. For my build, I used a typical Telecaster pickup set: single-coil bridge and single-coil neck pickup. The only unusual changes to the guitar were a reverse-style control plate and an added pickup selector option. This makes it a 4-way switch instead of the usual 3, so the pickup settings are as follows:
Position #1: bridge pickup alone
Position #2: both pickups in parallel
Position #3: neck pickup alone
Position #4: both pickups in series
Now, I know what you’re probably thinking: what the heck does parallel and series wiring mean? And what tonal changes do they make to the guitar? These are great questions. Let me briefly explain without getting too technical.

Series/Parallel wiring schematic
Parallel Wiring is where the hot positive connection of each pickup is wired separately out to the output jack. This creates the shortest signal path for each pickup to the jack, so the tone is brightest due to little signal loss or interference. Series wiring is a little different. You wire the hot connection from one pickup, to the ground of the other pickup, and then connect that pickup’s hot wire to the output jack. Essentially, you are connecting one pickup directly to the second, and then sending this compounded signal directly to the output jack. This action compounds the signal and increases your guitar’s output volume quite a bit. The extra wire length the signal travels through affects the signal by dampening some of the higher frequencies though, so the tone will be a little darker and more full on top of being louder. This is an option I really wanted in case I needed to perform other styles like jazz, or if I wanted a big output boost for a solo break, etc.
Installation
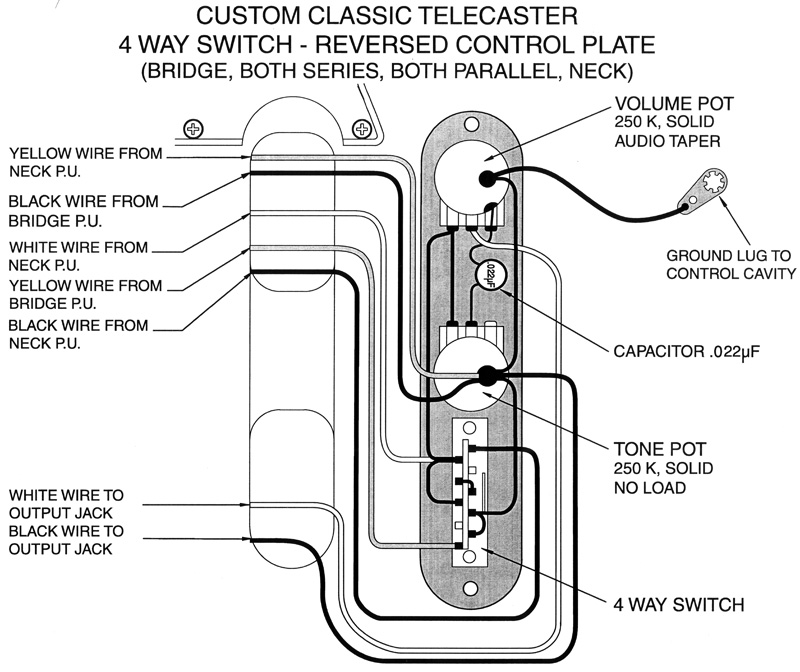
4-Way wiring schematic
So now that you’re a bit more informed on wiring options/upgrades, you can follow any schematic for wiring your guitar properly. I had the extra step of mirroring every wiring point to accommodate my reversed control plate, but that wasn’t too terribly difficult to accomplish. Just have the schematic visible at all times while working and refer back to it numerous times before finalizing the connections.
Get your solder station ready to go. You’ll want to have the solder gun heat up for at least a few minutes before getting ready. There are multiple cheap and affordable small solder units you can purchase online if you don’t have a basic setup. I’d recommend referring to a few online tutorials about proper solder technique before you begin too.
Most pickups will come with either two small springs for each pickup, or translucent tubes used for the pickup mounting. Using these, mount your pickups to the guitar’s pickguard (if you have one), or to the guitar’s bridge if it is a direct-mount like in my case. Make sure your wires are cleanly organized. Once in, feed your wires through the small routs leading to your control cavity. I had trouble on my Telecaster (most do), so I tied a thin guitar string to the ends of the wire leads and pulled them through that way. Find your ground connection wires that will be wired to the volume pot, and install them. Connect all ground wires together on the pot.
Tip: I’d suggest putting a little bit of solder on the wires prior to the actual soldering to the pot, as it makes the connection much easier to solidify cleanly.
Next, move on to your hot wires (usually white in most guitars, though some are yellow). These will be wired directly to the pickup selector switch, so refer to your schematic and get to work wiring each of those in the proper locations on the switch. Then finally, wire all of the necessary hot wires to your output jack. If you’re feeling good about your connections, you can plug your guitar in and then tap on the top of the pickup’s magnets with a screwdriver to check for a signal. Go through each pickup position and see if you are getting proper connections.
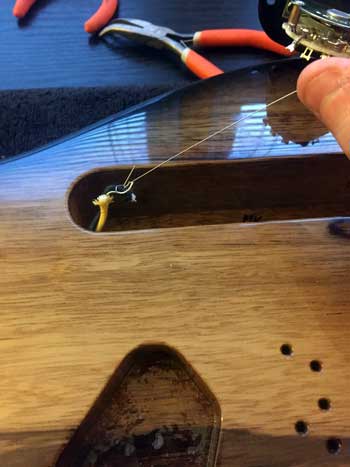
using a guitar string to feed wires through

Feeding wires through the control cavity
Pickup Height
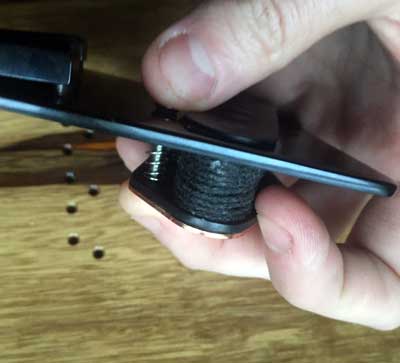
Closer view of mounting spring
If your connections are solid and functioning properly, finish mounting your pickups. I didn’t have a pickguard, so I just had to install one pickup directly to the bridge (pictured), and the other with a mounting ring. Hold on though! There’s one more step, and it’s an important one. You will now need to adjust the height of your pickups. Your tone changes quite dramatically based on pickup height, so you’ll want to make sure this step is done properly or you may think your pickups or wiring job are the problem for your lackluster tone.
Start by pressing down your highest fret. As a general rule, you’ll want about a 1/8″ gap between the top of the pickup’s magnet and the top of the low E string. Be careful not to adjust the pickups too high or else you may lose sustain and fall prey to the dreaded “wolf tones.” If you start hearing strange overtones or more than one note, try lowering your pickups to fix the issue. Adjust all pickups to taste and you’re all set! Time to enjoy your pickups you’ve worked so hard to install. You can check out the photo of my guitar’s body with the cavities all wired up and ready to go at the bottom of my post.
Plug It In
If you were only installing pickups on a functional guitar, then plug it in and get to playing! In my case though, I’m happy to be fully done with the body but there are a few more things I need to do before the guitar is playable. Still, she sure is pretty.
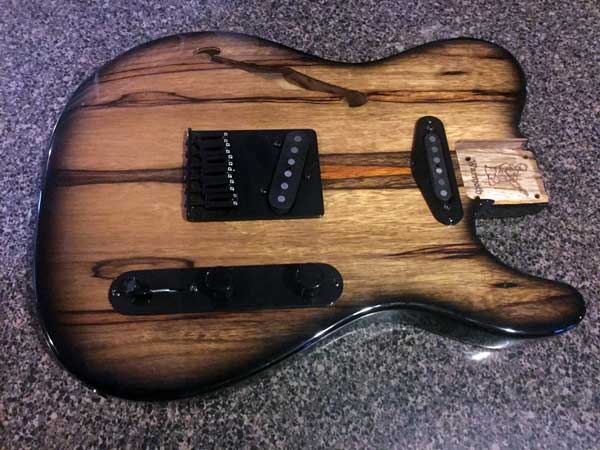
My pickups installed


Leave a Reply