Welcome to Beat Connection, a series dedicated to promoting modern and vintage dance styles the only way we know how…by providing you a musical starting point to help you create that beat. In the main bulk of our posts, we’ve been taking you on a journey to what I’d dub “foundational beats.” These foundational beats are standard rock, pop, funk, R&B, and dance beats that every producer should know the ins and outs of. In our previous post, we took a spiritual trip to the Caribbean and tried to unlock the secret to a great reggae beat. Today, as promised, we’re taking this side trip even further by trying to understand/use specific recording and performance techniques that allow you to create dub music.
Tape your mouth.
- Brian Eno, from Oblique Strategies
What is dub? Dub is a musical genre born out of necessity. Crafted by sheer experimentation, Jamaican record producers like King Tubby, Lee “Scratch” Perry, and Augustus Pablo would try to eek the most out of a hit reggae roots track by reworking it, or reusing parts of it, to create whole other songs they could press and market alongside the hit track. Most of the time, the tweaks were subtle like repeating a popular bit. Other times, the change was more pronounced, when they’d drop vocals from the original altogether and recreate it as an instrumental.
With time, as their technical expertise grew, these same producers would create reworked version of this tracks that became so popular others would prefer the “dub” version to the original. Using the only tools they had at their disposal — a mixing desk with built-in EQ filters, a spring reverb unit, a echo delay unit, and maybe a phaser or flanger — these record producers would splice and loop sections together, then drop in or add in additional parts (on-the-fly) to create dub music. As every reworked track pressed on acetate record would degrade in quality, and every master or duplicated recorded tape would lose its fidelity due to constant use, each new, future dub would attain a certain hiss and sound that’d impress it being of a dub track. With time, reggae bands would employ a dub DJ to dramatically alter their sound live (or in the studio), applying all those effects in real-time as they worried more about playing their parts.
If we go back in time, we can impress on these ideas the thoughts/processes of pioneering composers like John Cage, Terry Riley, and Pierre Schaeffer who would use tape loops and repeating turntable decks as a means to create musique concrete, where pre-recorded music can fold in itself to create new music. Others, like the above-quoted Brian Eno or others like Stockhausen, would find in their music ways to open up the space between notes to linger in those cracks as a means to create “ambient” music, where that space itself had a certain value and intrigue created out of the void. However, what makes dub music special is the thought processes that joined those two ideas in a way that left room for groove-based music to edge itself in. It’s why it made perfect sense that an experimental ambient artist like Kerry Leimer could seamlessly cross the void to soundtrack a documentary about Jamaican reggae music, like “Land Of Look Behind.” With time, as dub techniques spread outside of Jamaica, musicians who dabbled in punk and funk music were able to extend that influence to genres like post-punk, house music, and other genres created in its wake.
NOTE
Just a refresher, in case you haven’t gone back to the Beat Connection archives, what we’re going to use to help you create beats is something called Grid Notation. If you don’t know what Grid Notation is, be sure to check out the first post in this series which you can find by following this link.
By understanding and sequencing the following three drum patterns (A, B, and C) you should be able to expand upon each by adding additional parts, removing hits, or layering other instrumental grooves over them. Straightforward and very musical, you can almost hear the sound of a roaring guitar getting ready to wail over them. As always, the A section will correspond with the main pattern which normally the verses or main melodies play over. The B section will correspond with the groove you’d normally hear playing during the chorus or pre-chorus of a song. Finally, the C section will always correspond with the break in a song. C sections are perfect for building bridges between song sections or to break up the monotony of any other sections.
If you need any refresher on what A, B, and C sections mean (and how songs are built using patterns) be sure to check out this previous Beat Connection post explaining the ins and outs of Song Structure.
DUB – EFFECTS
To understand dub, one must understand its tools. Although these aren’t tools you have to use, together, they combine to sculpt your sound in a way only such effects can. Reverb, echo/delay, EQ filter, and phase/flanger are the effects any dub producer must know their way around.
REVERB + CONVOLUTION REVERB
Reverb is an audio effect that elongates any sound that it affects by reflecting the original sound as long as possible. Rather than stretch a sound out, a reverb unit (typically made out of a spring that’s fed a sound) vibrates the sound around until, inevitably, it slows down its oscillation. In the meantime, what one hears on a speaker is the decay of that sound as it’s resonating across spaces between oscillations. In essence, what it’s doing is trying to replicate placing a sound in a sonically reflective environment — think a cave, a walled-in room, a church hall. In early Jamaican studios that didn’t have the luxury of very competent drummers or the greatest instruments in the world, what began as a tool to “beautify” a track, came to be used more and more to dig into those spaces between reflections. Notably Lee “Scratch” Perry would run everything percussive-sounding through an early Grampian spring reverb.
Most of the reverbs typically used in those days were spring reverb units that sat on some shelf, on a mixing desk. Nowadays, digital effects try to recreate this analog effect by separating out all the qualities into parameters one can tweak: Pre-delay, Decay Time, Density Scale, Reflection Volume, and Lo/Hi Cuts (where we can filter out specific resonating frequencies). Today, though, rather than muck about with such complex algorithms and effects, the Ableton pack dubbed “Creative Extensions” has included a Max-live effect called Convolution Reverb.
A Convolution Reverb is an effect that uses impulses, basically a sonic photograph of an open space (typically created by popping a balloon in an open space), to recreate that sonic space digitally. Imagine hearing a chorale being sung in the Sistine Chapel and wanting to recreate that ambience for your own instruments/voice at home or in the studio, without having to pay an arm and a leg to actually record in that space. You’d accomplish this, in theory, by having someone provide an IR (impulse response) you can load into your convolution reverb. If we’re trying to achieve faithfulness to the original dub sound, nothing fits it as accurately as loading up a spring reverb IR (captured from some analog spring reverb tank) and sending sounds to it, which is what we’ll do today. Convolution reverbs still allow you the most significant control of all: decay.
ECHO + DELAY
Commonly bundled in together, but actually distinct effects, echo and delay are two ways to recreate and duplicate a certain sound. A delay is a copy (or multiple copies) of the original signal, played a couple of milliseconds in time from the original. Controls you’ll find in Ableton Live’s Simple Delay (and common to other units) are feedback, delay time, and dry/wet.
Delay time is exactly what was mentioned a moment ago: the length of time between the original sound and the copy. Setting a short delay time, around 10-40ms, allows you to simulate a chorus effect since it’s tricking your ears to imagine a harmonizing sound. If you separate the left and right audio signals of the original, or split the original sound’s copy to two separate delay times and adjust one of the copies to a delay time around 10ms-40ms that is modulated by some LFO, in doing so, you are creating a flanging effect. In the old days, this effect would be created by syncing two tape decks and feeding the output of those two tape decks to a third unit where some badly paid engineer would press their thumb on the tape to slow down its playback as it tried gradually get in sync with the other. In doing so, everything from a whooshing sound to laser beam effects can be created due to this slowed-down copy combing through the audible frequencies of the “normally” timed and playing original.
Feedback is a very important control for dub music since it controls how much of the copied sound is fed back into the already playing copy. Setting that control to a low setting provides gentle, audible copies that fade away nicely. Tweaking that control to its full extent makes the copies ramp up in volume and (indubitably) multiply in regeneration intensity. All this means is that the delay starts to oscillate with itself until you can’t make out the distance between the copies.
A Dry/Wet knob simply lets you control how much of the original signal you want to cut through the delay mix. If you want barely audible delays, you leave the setting below 50%. The more you increase the Wet signal, the less of the original you hear and the more you hear of the pure, unadulterated delayed signal.
Echo is different. Rather than play time-delayed copies of the original signal, it adds something by subtraction: lower volume copies. By adding decay (or a lower volume) to each copy, echo is trying to simulate the distance and time spacing one would hear, let’s say, yelling “WHOA” at the feet of Bear Canyon. For such reflective surfaces, one can imagine, the initial reflection is dead on — almost the same in volume as its primal “WHOA”. However, as it travels in distance, the sonic strength of the signal loses volume and definition. So “WHOA” now becomes “WH-O-a,” “W-H-o-a,” “W-ho-a,” “w-h-o-a,” “w-h-o” and so on — “WHOA,” indeed. An Echo unit replicates this feeling by giving you control of the exact timing, the musically-timed divisions between repetitions, and adding a Reverb line to simulate the resonating surfaces one would encounter in such circumstances.
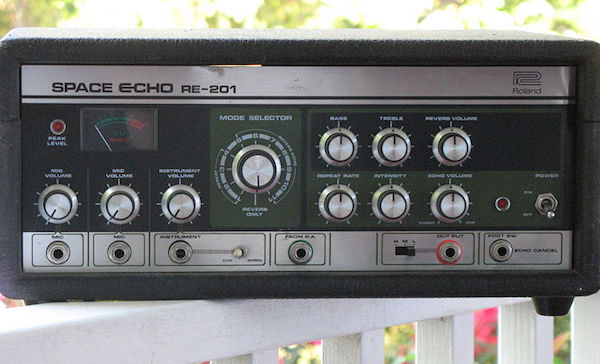
In Jamaica’s most esteemed studios, prized echo units like the Roland Space Echo would never be far from the mixing desk since they offered additional controls allowing one to alter its built-in tape unit’s playback speed. Little things like that allowed producers to take advantage of all the interstitial moments caught between a sound being modified live, rather than setting it at one control and leaving it at that. Today, we’ll use another tool from Ableton Live’s Creative Extensions pack, aptly dubbed Echo, which captures these exact ideas.
PHASER
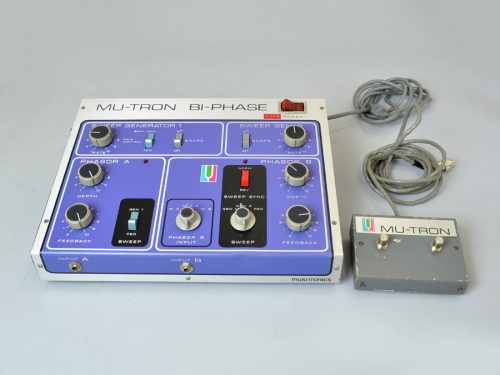
We could stick phaser right in line with flange and call it a day, but that would be missing the mountain beyond the forest. Phaser is an effect that reacts differently to sound since its quietly a distant cousin to delay. Rather than create a copy of an original sound, to play back in some future time, it creates a copy that plays at the same time, but with a very slight change in timing. Normally, the phasing effect is nearly unnoticeable if the original melodic phrase, or the sound being treated, is short. However, if you repeat a sonic phrase for a far longer time, or the sound itself is maybe something like a long pad, you’ll be able to noticeably hear all those copies both blending into each other and away, then slow down and pick up in speed. What we’re hearing is the the subtle differences cycling through in time and space. Lee “Scratch” Perry’s trusty Mu-Tron Bi-Phase was a notable phaser used during dub’s golden years.
On Ableton Live’s Phaser effect you’ll find some important controls that most phaser effects will share. Poles control how many copies you want the effect to create and cycle through. In essence, behind the scenes, the effect is stamping specific equalization filters to man certain territories in the waveform and present a stage where the original has to stop and feed that filter. Feedback is exactly like a delay’s feedback, sending a certain amount of the phased signal back into itself. If you go in positive values, you’ll hear a dramatically more intense phase effect. If you go in the negative, you’ll flip the phase, making everything go backward in sonic motion. Frequency allows you to set the frequency by which the noticeable timing change is noticed.
LFO/S&H controls (Amount, Shape, and Rate) let you send an oscillating signal to the phased effect making it modulate up/down in volume at a certain rate, to fit within a certain oscillating shape. Spin/Phase is selectable control that lets you control the panning motion of the phasing output. If you choose Spin you’ll get something that mimics the whirl of a spinning speaker panning the signal left and right, on your ears. If you set this control to a low spin rate, the phasing effect slowly ramps up to its full whirl almost mimicking a tremolo effect. Such a spin rate gives you that classic “spacey” motion of phase effects. Set it to a fast rate and sounds seem to speed through like a boomerang. Phase does the opposite and keeps the signal in one path. The difference is that this path controls the rate by which the left and right sides respond to the volume changes in the LFO signal. Swooping sounds are perfect to create with this setting.
DUB – TECHNIQUES
Dub is a rare beast that really benefits from real-life mixing. In the days of King Tubby, the way a producer would navigate the mixing board would dictate how they could produce certain effects. Producers would instruct mixing engineers, or do this themselves, to route an aux send not just to the effect itself — normally a reverb and delay — but to route the effect back to an additional aux send. In effect, they understood the brilliant possibilities one can open up by simply letting an effect affect itself, or to extend that idea to another effect. I’ll try to explain how you can get certain effects using Ableton Live, something you can try to apply to other software-based recorders. But first, one must begin their dub journey by unlocking a feature long neglected in Ableton: Enabling All Sends on Return channels. Then, we can discover the other techniques.
NOTE: A lot of these techniques aren’t exactly codified with names or a technical science. These are all but mere guidance. True dub music relishes in all sorts of happy accidents. So, use these ideas as a starting point.
DUB METHODS
- FEEDBACK LOOP — When we enable an Aux Send to receive its own signal, or to receive signals from other sends, we’re allowing ourselves to untether from the set timing found in each effect’s control parameter. This means that you can send a drum loop to receive an echo effect and then send that echo effect back into itself. It’s a technique called a feedback loop which invites both great power and great volume (so careful when you turn the Send back into itself!). You can hear Lee “Scratch” Perry execute this perfectly on the drum section, in “Dread Lion” below:
- REVERB KICK — There is a sound specific to dub music that can only be replicated with a spring reverb. I call it the “reverb kick” because it sounds like the spring in the reverb is knocking around in a can. Sometimes that sound almost mimics the sound of water drops. You can easily attain this sound on any DAW by using a Convolution Reverb that has an impulse response (IR) obtained from a plate or spring-fitted reverb tank/unit and having it affect the side stick drum hit. In effect, you’re virtually whacking that tank. Once dub went digital, that sound was replaced by a disco tom. The original, though, is something you can hear in Horace Andy’s reworked version of “If I:”
- DROP OUT — For those blessed with hardware controllers, nothing gives more satisfaction to see than those without it struggle to zero-out all other instruments but the bass and drums, or simply the vocals. Drop Out is a dub technique where the producer drops out all the instruments except for the rhythm section and/or vocals and lets the groove just dangle out there. It’s a technique you can pull off by immediately soloing everything but the main rhythm section and/or vocals, right after you enter a particularly echo-filled section, by manually muting on/off the parts surrounding the main rhythm section. Quickly introduce the most affecting bits, and voila, you’re dropping out. This is something you can hear around the 30-second mark, in Joe Gibb’s drop-out masterwork “Angolian Chant:”
- PHASE SWEEP — This technique creates a rhythmic movement by letting the guitar skank (reggae’s chopped playing style) ride the phaser effect’s swirling rate. Open up any organ, bright guitar, or staccato-esque sound to the phaser and see if you can achieve this whirling, swooshy, cycling sound best heard on Augustus Pablo’s “Silent Satta:”
- TAPE SWALLOW — This technique simulates a tape recording machine swallowing up a tape. Entirely hard to replicate on a DAW, it is that combination of someone recording a tape recorder coming up to speed or being sync’d to a ridiculous speed which allows a dub producer to get at that sound. The Twinkle Brothers’ “Never Get Burn” perfectly shows what this sound is:
- ROCK STEADY BASS — This is a very subtle effect because it requires this much from you: patience. Dub music is a drum and bass-led music. Whatever you can do to accentuate the bass line, you must do. A good bass line will always carry the brunt of the melodic work in dub music. If you use an equalizer, try to filter out from the non-bass-driven, other tracks all but the mid and higher frequencies. Other than a kick drum, most dub producers know the key to a good pumping rhythm is setting spacing parts in their appropriate frequencies. If you need an idea of what this technique is, check out Sly and Robbie’s laser-like focus on the bass line in this track by Black Uhuru, “Leaving To Zion:”
7. THE KITCHEN SINK — You can tell by the name of this technique that it’s a method calling you to try offbeat ideas. Normally, dub producers sneak in random samples (think animal calls, air horns, etc.) that provide levity and movement to a track that might just be nothing more than one repetitive, heavy groove. The king of this goes back to Lee “Scratch” Perry whose use of a child’s toy to make cow sounds transformed into something of a trademark, as heard here in his production for The Congos’ appropriately titled “Ark of the Covenant:”
DUB SETUPS
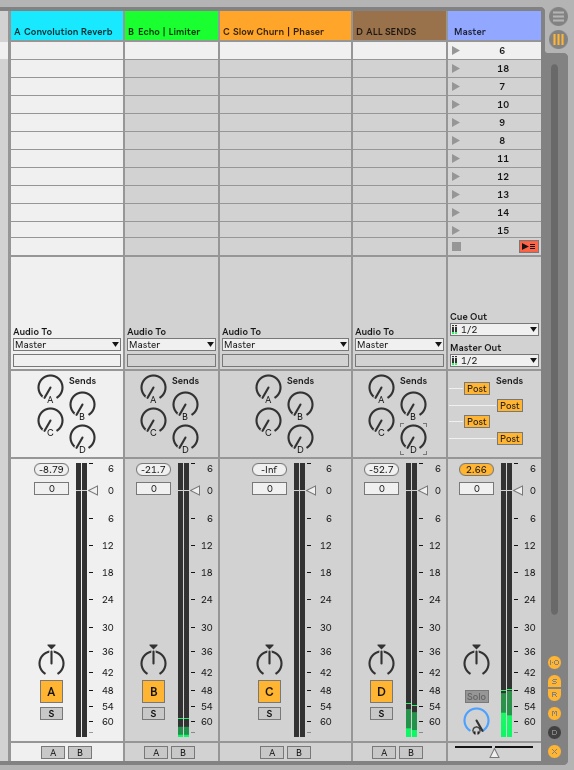
To replicate a typical dub mixer setup we first have to setup Ableton Live appropriately. Below, you can see that rather than place audio effects within each instrument’s board we placed all the four effects we will use — Convolution Reverb, Echo (with Limiter), and Phaser — on separate Auxiliary Sends. We created a fourth Aux Send with all the same effects (and effect settings) grouped together into one complete unit. On a Mac OS computer, you can do so simply by pressing Shift+⌘+T.
Then we will add to each Aux Send these effects.
First a Convolution Reverb with this setting:
Then Ableton Live’s new Echo and an accompanying Limiter to keep those feedback loops’ volume spikes under control:
Afterward, add a Phaser to the third Aux Send: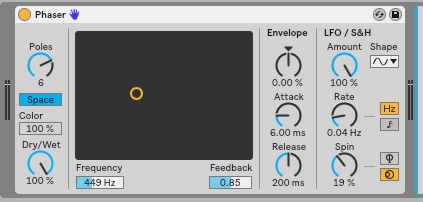
Finish your effects loop by adding these same effects in one channel we’ll dub ALL SENDS:
When you finish you’ll have something that looks like this:
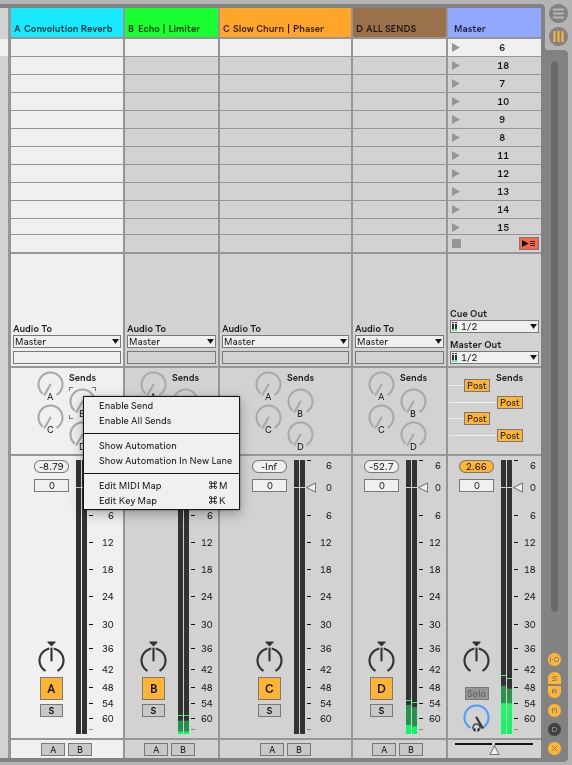
As you can see in the screenshot above, now we have to move on to enable all auxiliary sends to receive audio from their own (or other) effects in Aux Sends channels. You do this by right-clicking any control knob, choosing Enable All Sends, until one by one, you’ve enable each Send control. In doing so, we’re allowing ourselves to create all sorts of sonic mayhem like feedback loops or to re-route effects in ways normally not possible in one channel. The end result should look like this:
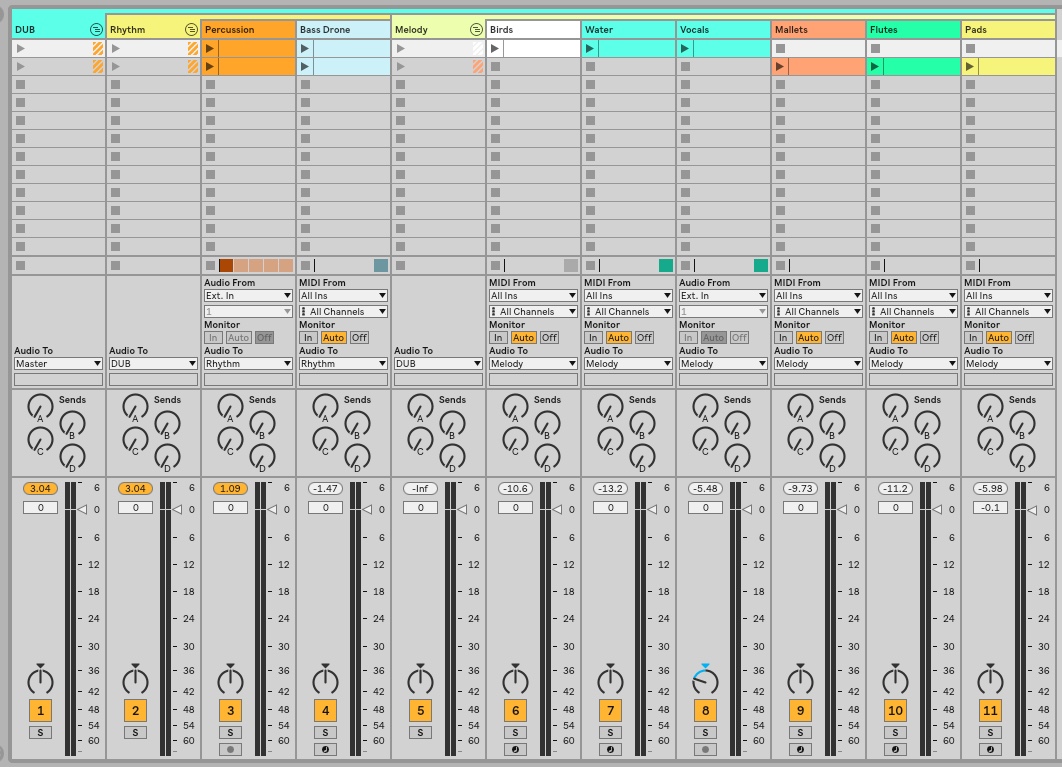
After you take this step, I would argue for creating three groups of tracks. If you remember from any of our previous Beat Connection posts, grouping tracks together allows you to apply specific effects only to the tracks within that group. You can easily do this on Ableton Live by selecting all the tracks you want to group together and then hitting ⌘+G on your keyboard. On this track what I’ve done is created three Groups. The first one will be for rhythm, which is where I’ll place all the drums and bass instruments. Second will be for all melodic and extraneous sounds. Then, finally, I’ll create a macro group which will house all the groups under it. You can view the end result below:
Now, lets begin our first step into applying dub techniques to a track.
FEEDBACK LOOP
First I’ll provide you with a glimpse into what the dry, non-affected, riddim sounds like:
We will achieve this first technique by doing something I like to call: “catch, grab, and hold.” This basically boils down to three steps:
- First, fully open Sends B on the Echo | Limiter channel allowing the audio signal of the delay back to itself.
- Then, slowly start opening the auxiliary Sends B on whatever track you want to get sent in the feedback loop. As you hear, the echo increases in repetition and volume…
- Finally, either hard mute that channel itself or swiftly close that send on the track itself. What you should hear is the original track cycling in a feedback loop until you fully close the Sends B on the Echo | Limiter channel. You can un-mute the original track. (NOTE: Since this introduces a lot of volume, be as dextrous as possible when closing the Aux Send signal back up — things will get LOUD.)
REVERB KICK
To get the sound of a very springy, kicking the can, kind of reverb sound, things won’t get easier than simply loading up an Auxiliary channel with a Convolution Reverb using the settings listed above (or set to a spring reverb IR). To “play” the reverb, all you do is this:
- Open up the Track Sends completely to that Reverb channel, on the part of the that track you want to affect.
- Immediately close up the track send, according to whatever effect you’re trying to affect.
- If you’re dextrous enough, you can affect that channel with a Convolution Reverb and on that same Convolution Reverb’s Auxiliary Send, you can open up its Sends to Sends B, thereby momentarily creating a delay for the reverb signal as well. Close the original track send, and voila! you’ve mastered another dub technique.
DROP OUT
The Drop Out is easier heard than explained. It’s not so much an effect as the lack of hearing certain tracks playing during a piece. Using audio groups, you can mimic assigning mix groups on a large console mixer, and have the ability to mute or solo tracks, depending on what you want to accentuate. Check out this clip below showing that practice in action.
PHASE SWEEP
Phase sweep is that swirling, spacey sound that has deep roots in dub. Since not everyone has access to a Mu-Tron Bi-Phase phase effects unit, we must somehow recreate it with what we do have. To do so in Ableton Live, just follow these steps:
- Right click the Phaser effect in the Sends C return channel and select Group.
- Open up the Chain List and immediately duplicate same phaser into as another effect in the chain by copying and pasting that same effect, once you click on the empty “Drop Audio Effects Here” space.
- Now that you have two phasers in the same effects rack, adjust the Chain Pan so that each effect is panned hard left and hard right.
- The key to getting close to the sound of the Mu-Tron is to adjust (to your own liking), on one phaser only, these three parameters: Rate, Spin, and Shape. Choosing only from a sine or square wave LFO Shape, and something that differs from the other phaser, you can adjust any of those three parameters and get that widescreen, spread-out phasing sound the Bi-Phase is known for.
Another alternate angle to take (since dub affords this quality) is to create another Phaser auxiliary track, and send the Auxiliary Send of the main affecting Phaser into that other, duplicate Phaser. In effect, what you’re doing is mimicking the Mu-Tron Bi-Phase’s Phasor B input which feeds the phase signal of one phaser into another phaser with its own modulation controls. I cycle through both kinds of Phaser affectations and drop out the vocal track, so you can hear the effect a bit clearer:
TAPE SWALLOW
The effect of trying to mimic a tape coming into or out of sync seems something almost impossible to imagine doing in the digital realm…but there is a way to get close to that sound. Here’s how:
- Add a Simple Delay and a Limiter (set to its default settings) to the Master track.
- Right click the Simple Delay menu bar and select Repitch from the contextual menu.
- Group these two effects together.
- Set the Delay Time to 3 and turn on the Link button, rendering just one single delay path.
- Set the Feedback close to a number between 90-98 percent.
- Right-click the Beat Offset Percentage found next to the Sync button (which should be on by default) and in the menu select Map to Macro 1, then rename (Command+R) that macro to Effect.
- Right-click the Dry/Wet knob and then select Map to Macro 2.
Once you’ve done this, a virtual tape spool effect has been created. What the first Macro does is control the “Swing” off each repeated delay sound. When that number is static, the delay humanizes a bit to that number. However, when that number is cycled through, all the delays go through a pitch shift, as they try to keep up with the the signaled delay repetitions. So, as you cycle from its highest to its lowest setting, you’re introducing pitch-shifted delays that one would hear when attempting to spool a tape into sync. The Feedback setting simulates the whirring sound of the audio wrinkling into itself.
Experiment with tweaking the Effect knob quickly or slowly from completely open to closed and turning on/off the Dry/Wet knob for all sorts of tape drops and tape swallows. With the Dry/Wet knob completely off you’ll hear the audio as is, in its correct tempo. Turning off the effect manually lets you kill the feedback trails and completely returns the audio to its regular playback. For maximum effect, record this kind of automation at the beginning of the song, or right at the beginning of a particularly affecting change in the song. Here’s how it sounds in action:
A NOTE ON ROCK STEADY BASS AND THE KITCHEN SINK
Here’s where there really isn’t much technique left to show you but for you to be more aware of how you mix certain tracks in your own dub music. For Rock Steady Bass lines, always begin with a good bass line that features heavy syncopation and plays a bit behind the metronomic time. Try to avoid much, if any, quantization. If your own notes are quantized, try to apply a swing setting from the Ableton Live’s Groove Pool. That’s how you can approximate the “loose” feel of reggae bass lines.
Now, to have a standout bass groove, try to use effects like Chorus, Compressor, and Auto-Wah to accentuate the upper frequencies on a bass track. On other tracks, careful panning left and right, to leave the bass in the middle also does wonders to get the bass out there. Equalization that cuts frequencies that the bass line traffics in will also work better to pump up a bass line, rather than ramping up the volume on that track itself. If you’re into side-chaining, grab some knowledge from these two posts: one and two, that dive into the ins/outs of that technique to accentuate drum and bass.
As for the Kitchen Sink Method, you really don’t need a step-by-step process to get you through that idea. What you should welcome in any dub music is happy accidents, and off-beat sounds that break the monotony of any steady groove. Remember: as powerful as a groove you may have, nothing makes it more powerful than not bludgeoning someone over the head with it. For one final example, here’s my own dub take on the original riddim:







Leave a Reply