As one of the earliest and most natural recording effects, reverb has been a part of our listening experience ever since any one of us first listened to recorded music. As such, it’s also one of the first effects used by budding recording engineers as they start using DAWs. At first, it might seem perfectly logical for each audio track to have its own reverb plugin. Why not? There’s plenty of plugin spots open on any DAW, and you just can’t have everything sounding like it doesn’t have any depth or sense of space.
While applying a reverb effect to each track might not be a problem for sparse arrangements where only a handful of tracks are present, dense arrangements require much more forethought into how to make everything fit. Thankfully, just like a good friend, auxiliary channels are always there for you. Sending your tracks via a bus send to a reverb aux track produces at least three positive results. First, you’ll have much more control over how to use your reverbs. Second, by sending multiple source tracks to a single reverb, you’ll produce a much more cohesive sound over your entire mix. Finally, using reverbs on aux tracks saves precious CPU power since you aren’t putting multiple instances of processor-hungry reverb plugins on a variety of tracks.
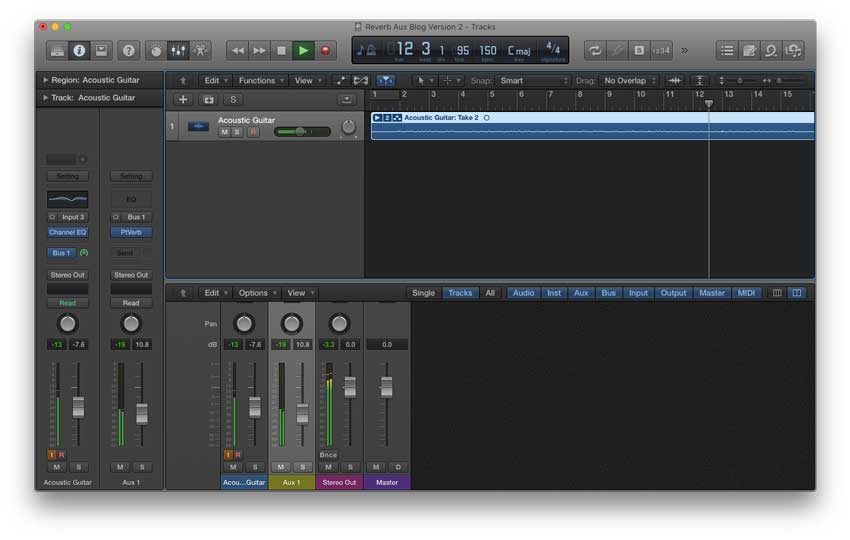
Take Control of Your Reverbs
To set up a reverb on an aux track, all you have to do is open up an aux track, send your original signal to the aux via the appropriate bus, and apply a reverb plugin to the aux track. If you aren’t familiar with this process, I’ve outlined it before when I discussed the ’80s snare drum trick. Of course, instead of applying a noise generator and gate to the aux, you will just simply need to open up a reverb plugin. My own personal preference is to make that reverb plugin 100% wet since you already have a completely dry track fully intact to work with as well.

Using Logic X Pro’s PlatinumVerb plugin, I created a big sounding space.
After creating the track, you can take total control over how your reverbs fit in the overall mix. You can pan the reverb (while keeping the original track wherever you want it on the sound field) to create the sense of different spaces. Try panning the reverb to dead center with a long pre-delay to create the sound of a long room. Or you can pan your source track to one side and the reverb to the opposite side with a short decay to produce the feeling of being in a small room. Perhaps you need to make some sonic room for other instruments that fight for space with your reverb. Try panning your reverb around to see if you can make all components of your mix work.
Take a listen to the sound samples below to hear how I’ve used different panning techniques to create different-sounding spaces using the same reverb and acoustic guitar. Please note, I used some extreme reverb settings to make the effect more apparent. Use a little creativity and explore how you can make this technique work for your mixes.
A More Cohesive Mix
By using a single reverb aux track, you can turn your mix from a jumbled mess of various sounds to a cohesive, professional mix. While using different types of reverbs for different audio tracks involve personal taste, situations do arise where multiple sources should sound like they were recorded in the same space. You don’t want one vocal to sound like it was recorded in the Grand Canyon while another sounds like it was recorded in a dimly lit basement. (On the other hand, if that is an artistic choice you’d like to make, nobody is going to tell you no!)
If you have multiple vocal tracks, sending them all to the same reverb ensures that all the tracks sound like they were recorded in the same space. Use the bus fader to control how much of a particular track’s signal sends to the reverb, giving you much more freedom to create just the right mix. Try sending the drum bus, the guitars, bass, vocals, and really anything to the same reverb on a session and you will hear how it almost acts as a glue that makes for a more cohesive mix.
Save Your CPU
Reverbs are some of the most CPU-intensive plugins on any DAW. The processing power to create washes of decays can put a strain on almost any computer, and this was an especially dreadful problem back in the old days (i.e. about 10 years ago). In order to limit the amount of CPU usage on your computer, just open up a single instance of your preferred reverb plugin on an aux track and bus all your audio tracks over there. Not only will you get the same results, but your computer is only running one reverb plugin and not one on every audio track. When your track counts get more towards the “ridiculous” end of the spectrum, this technique will no doubt save your computer from bogging down.
Get the most out of your mixes (and your CPU power) by using reverb on the aux track. Try eq’ing the reverbs on the aux track, or adding additional effects, like modulation, to go a little crazy. Experimentation and establishing your own tastes are the name of the game. After all, nobody wants to listen to boring mixes.


Leave a Reply