Welcome to Beat Connection, a series dedicated to promoting modern and vintage dance styles the only way we know how…by providing you a musical starting point to help you create that beat. In our previous posts, we took an in-depth look at two of Ableton Live’s most important beat production tools: Simpler and Sampler. Today, we explore another tool, one that ties both Simpler and Sampler into one modern drum machine: Ableton’s Drum Rack. Our goal: to give you the knowledge to understand how this important beat-making tool works. Stay tuned for the next post in the series, where we’ll take you elsewhere, and put those tools into action.
Look at the order in which you do things
- Brian Eno, from Oblique Strategies
Previously I tried to show you how Ableton’s Simpler and Sampler represented two different ideas for one thing: audio sampling. Both took the best of classic sampling workstations and presented you two clear instruments that allowed you to treat samples differently within each instrument. What’s interesting about Drum Rack is that it brings any instrument into the fold. Drum Rack reimagines what a drum machine can actually do, simply by taking what drum machines do best and opening its coffers for these other instruments to exist within it.
Let’s discover what Ableton’s Drum Rack can do.
Understanding Ableton Live’s Drum Rack
To understand Drum Rack, one must remember how drum machines work. Drum machines operate on the principle that for each drum pad you see, one sound will be heard behind it. Press a button that says [COWBELL] and you’ll hear a cowbell sound. Of course, the magic is in the processes happening behind this sound.
On some drum machines, a sampled sound is pulled up and triggered every time a pad is struck. Stored on some memory chip is a recorded waveform of a live drummer hitting a cymbal, tom, etc. On other drum machines, you have a synthesis engine that generates a waveform every time a pad is struck. In this case, the drum machine (with a built-in synthesizer) mixes a combination of noise and some other oscillating tone, to create a drum-like sound. Finally, other drum machines combine both generative ideas. These beat or groove boxes layer samples with synthesized bits to create an even larger sonic exploratory ground for its users. Drum Rack can best be described as this type of a drum machine.
Drum Rack – Sample Drop
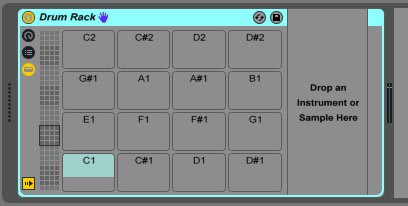
Drum Rack can be forgiven for looking like it doesn’t do much. Load it on an empty MIDI slot and you’ll be treated to this very plain view:
Sixteen cells, each with their own assigned MIDI note and hardly any information, other than an instruction to “Drop an Instrument or Sample Here.” If you scroll up or down with your mouse, you’ll see that you have up to 128 cells to add instruments and samples to. Let’s explore what happens when you drop something in there.
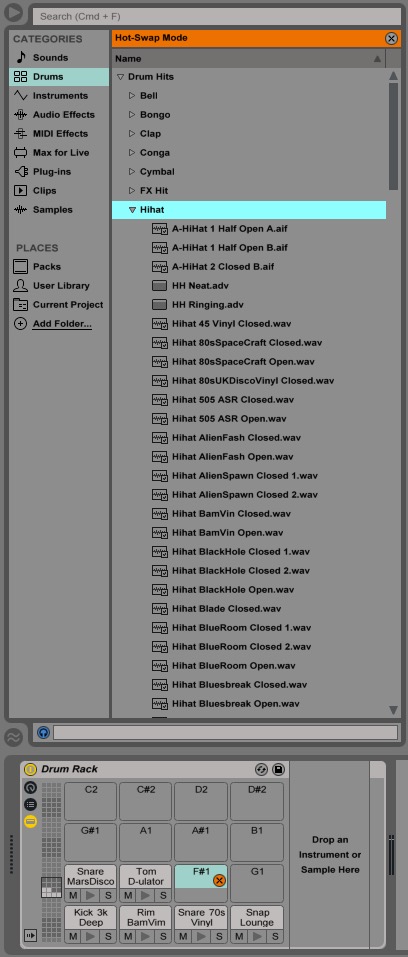
If you drop an audio file into the first cell, C1, you’ll see Drum Rack open up and display an instance of Simpler (with full Simpler controls) for that sample. That cell also now displays Mute, Play, and Solo buttons letting you silence, preview/play, or isolate that sound within this instance of Drum Rack. With this view, now you can easily see the power of this instrument. As you add more and more samples, you’re building up your virtual drum machine. Hover over each cell, and you’ll see the lower display bar suggest what kind of sounds go best in that slot – based on GM (General MIDI). C1, suggests a Kick. C#1 yields a Side Stick suggestion, and so on. Ableton Live has a special browsing mode that you can call up by clicking on the pad you want to add a sound to and pressing [Q] on your keyboard: Hot-Swap Mode.
Hot-Swap Mode lets you directly preview and load any sample you would like to add into that slot. By default, this mode focuses on presets or samples available within the Drums collection. There you see Drum Hits arranged by type: Bell, Bongo, Clap, Cymbal, etc. and so on. The beauty of Hot-Swap Mode, is that you can navigate to your own User Library, found in the PLACES area of the sidebar, and pull up your own samples (if you already Added a Folder... to this section). Double-clicking the sample you navigated to in the Ableton Live directory should then load it into that pad’s spot. Double-click any empty MIDI clip in the Drum Rack channel and you should see your Drum Rack…
…translate itself to Ableton Live’s Piano Roll…
…allowing you to begin sequencing drum patterns as you see fit. But that’s not where Drum Rack’s magic ends.
Drum Rack – Chain List
Within each of Drum Rack’s sampling pads exists the ability to do much more than simply trigger a sample. You can use Drum Rack to trigger, host, and affect virtual or external instruments. As easily as you can drag a sample into Drum Rack, so can you drag an effect directly onto the same pad to allow that effect to apply only to that sample. Now, imagine using Drum Rack to host a whole internal, effects Sends section. Let’s expand our Drum Rack view to show this.
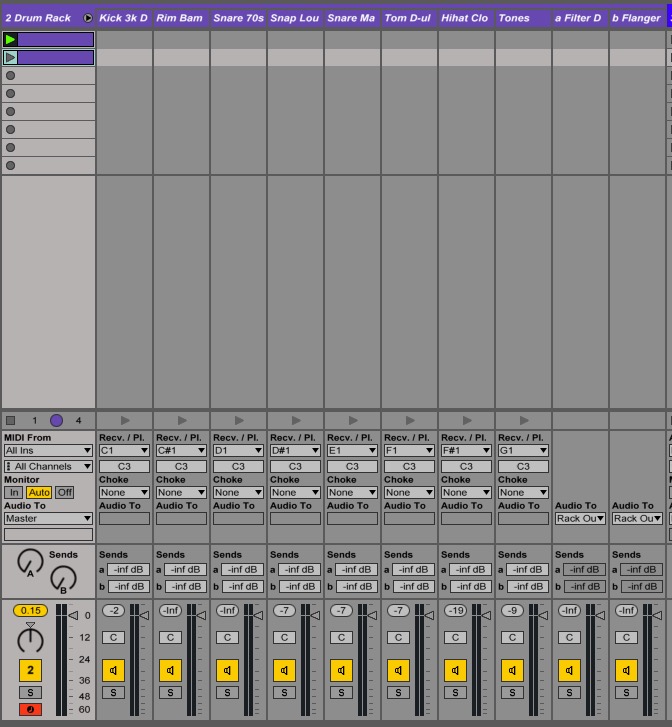
First, click on the small three row icon on the far left to show the Chain List. A Chain List gives you a list of all the current pads being used plus basic volume and pan controls. Then, start clicking on the other three small icons right below it. As you click on the first icon for the Drum Rack Input/Output section, you’ll notice that you’re now able to see what notes those samples are assigned to receive, in order to be triggered by looking at the [Receive] column.
If you look at the [Play] column you’ll be able to see and assign what MIDI note they play. Adjusting the note sent in the Play column allows you to change the pitch of the sample being played. The third column you can see, labelled Choke, allows you to assign (via drop-down menu), what groups of samples can “choke” the sound of others in the same group when they play. This is perfect for stopping the sound of hi-hats from bleeding into each other. The Audio To column would allow you send specific drum channels out to other audio channels.
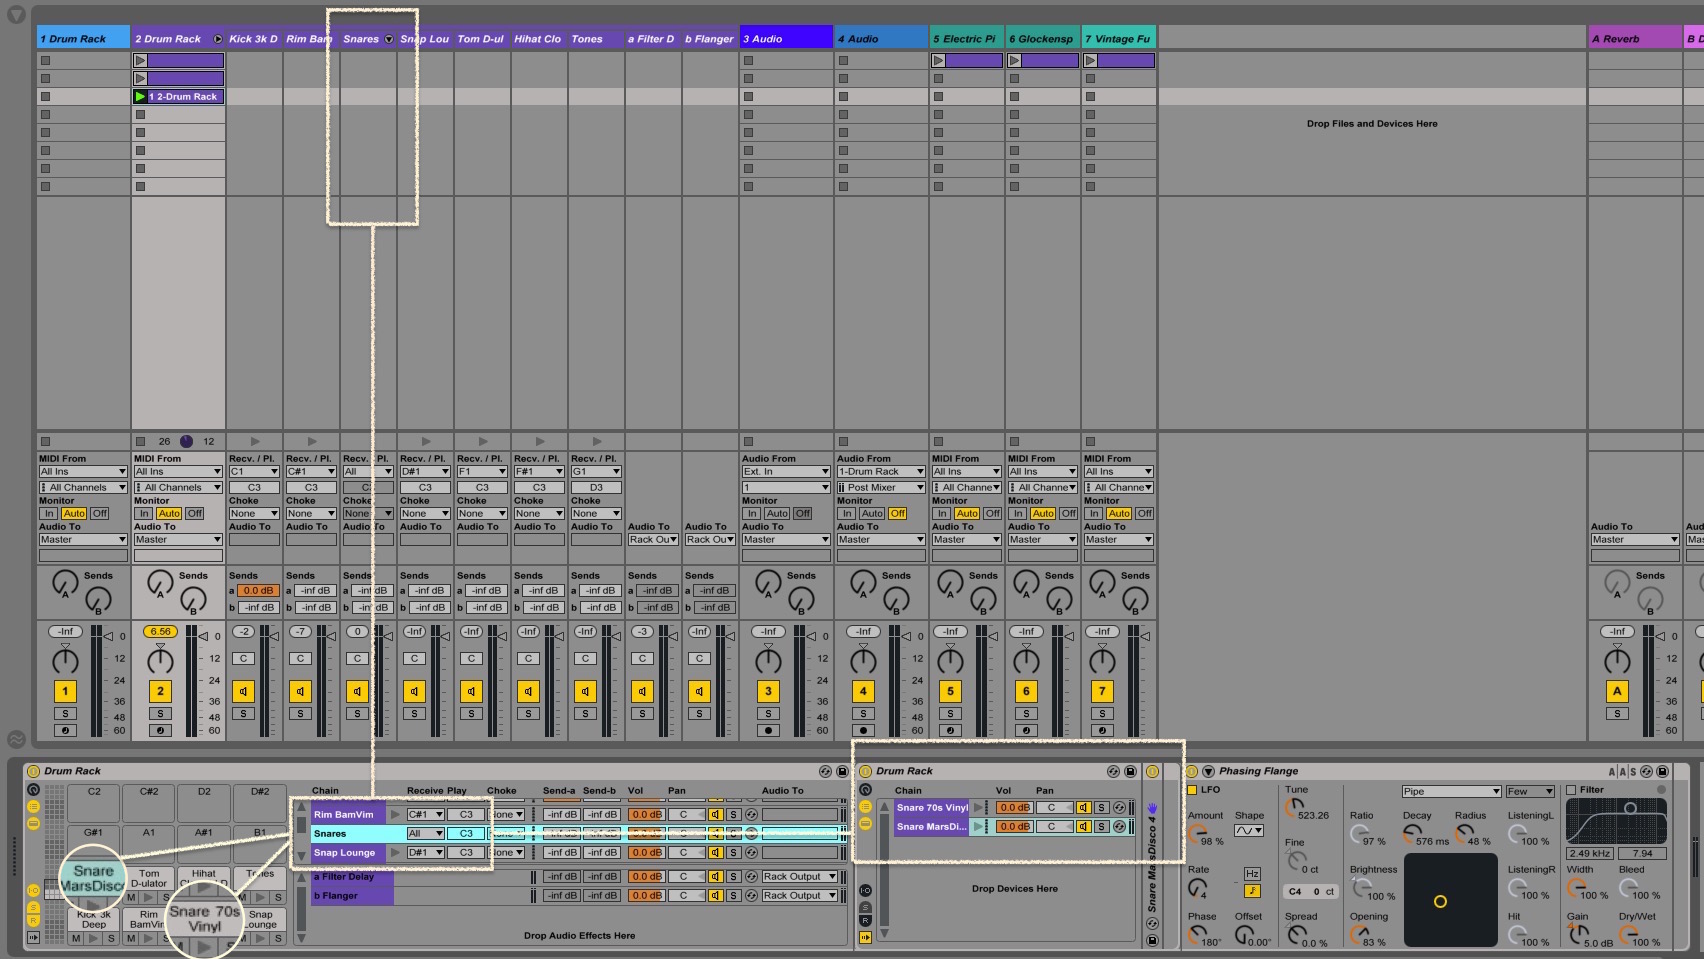
Clicking on the last two icons (S)(R) lets you open up Drum Rack’s internal Sends and Returns effects section. Now you’re able to add and adjust effects like Compression, Delay, Reverb, etc. across (and in a finite quantity) to all the “hits” in the Drum Rack. See the fully expanded Drum Rack view below to understand this connection.
In condensed form, what you’re seeing above, you can appreciate in Ableton Live’s Session view by toggling open the Drum Rack’s column.
Special Feature: the Chain List also allows you group hits together within the same pad. When you select two or more hits in the Chain List, you’re able to bring up a contextual menu letting you Group them together as their own Drum Rack within the Drum Rack, a great tactic to use if you want specific Macro effects for these. Another option in this contextual menu is Create Chain. Create Chain lets you group together any pads you want, so they can share and have exclusive effects, separate from the larger drum rack. If you prefer having separate effects for Hi-Hats, Snares, Kicks, etc., create a chain and go crazy with your sound.
Now, with all of this out of the way, let’s shift our focus on how this view can help us understand how we can work with virtual and external instruments that we drop into a Drum Rack pad.
Drum Rack – Instrument Drop
Dropping a virtual instrument onto a Drum Rack makes for a slightly different bird. When you drop a software instrument you’re able to see the same parameters you would see as if you dropped it into its own, separate MIDI track.
By default every virtual or external instrument you drop in a Drum Rack pad will trigger a C3 note. This is fine, if you’re using a software synthesizer to generate a “drum”-like tone. However, if you want to play melodies or do something a bit different (harmonically-speaking) it’s important you adjust the Play note to be the note you actually want the Drum Rack to trigger.
Setting a specific note for your synth to trigger allows you to drop in MIDI Effects specific to that synthesizer instrument. A good example would be to utilize Chord generators, Arpeggiators, or Scale MIDI effects to run whenever that specific note is triggered. In the following sample you can hear how a triggered synthesizer, sans MIDI effects, sounds when played through this drum sequence.
Now listen to it affected by the following MIDI Effects: Random, Scale, and Chord.
As you can hear, it’s a very interesting way to introduce spontaneous, Generative music to melodic synthesizers, placed in your drum sequences.






Leave a Reply