Welcome to Beat Connection, a series dedicated to promoting modern and vintage dance styles the only way we know how…by providing you a musical starting point to help you create that beat. Last time we showed you the way around grid notation – essential info for understanding your way around drum machines and recording software. Today, we go forward another step, as we dig deep into what constitutes a song. The goal being: giving you a basic structure you can use to arrange beats into songs.
“Don’t be afraid of things because they’re easy to do.”
- Brian Eno, from Oblique Strategies
It may sound counterintuitive to describe how to create a song before you’ve even laid down a single beat, but understanding the following terms and ideas should help you better get through the makings of a song. Dissect most popular songs and you’ll happily discover how simple they are.
the elements of a song
Songs are composed of the following elements: intro, verse, chorus, bridge, and outro. Each element allows you to divide the song into specific sections. We’ll dissect Michael Boothman’s wonderful cover, “Touch” a remix/reimagining of Bobby Caldwell’s blue-eyed soul classic “What You Won’t Do For Love” to hear all those elements in action. Now, let’s get those elements explained:
INTRO
An intro or introduction is the beginning of any song. This section differs from the rest of the song. Normally, you’ll hear a melody or rhythm build up to amplify (in tone, volume, or depth) the following element in a song. An intro is usually mostly instrumental, giving you hints of the upcoming element, a verse, that will make up the bulk of the song.
VERSE
The verse (or verses) in a song make up the vast majority of a song. Verses are the section of a song where lyrics or music introduce a repetitive, underlying melody or groove. This repetition provides support to the next section of the song, the chorus. The repetition itself, when varied in intensity, builds further anticipation for a chorus.
CHORUS
The chorus (or the hook) is a part that repeats a specific melody or lyrical refrain, with much more intensity and emphasis than anywhere else in the song. If you’ve heard a piece of music that sticks in your head, 99% of the time it’s due to the chorus section. Why? Because it’s arguably the most memorable section.
BRIDGE
A bridge is a powerful musical element to any song. A bridge allows you to break up the monotony of a repetitive verse, chorus, or theme. A bridge usually occurs during the middle of a song, serving as a transition point to the end of a song. A sonic centerpiece, it might not bare much resemblance to the rest of the song but it ties the beginning and the end together thematically.
OUTRO
All great songs must end. An outro (or finale) prepares the audience for the end of a song. What you hear are certain parts of the main musical theme or refrain being removed or deemphasized to signal the song winding down. An outro also allows a composer to repeat a notable section and slowly lower the song’s volume until it ends – this is called a fade out. If you’d do the opposite, that’s called a climax. Both techniques serve as great ways to end a song.
A VISUAL LOOK AT SONG CONSTRUCTIOn
Songs can be easily broken up into modules. If you create five patterns (Intro, Verse, Chorus, Bridge, Outro) you have all the components that make up a song. Since our focus is on beats, three main patterns usually form the backbone of your song. Songwriters and composers put to use a musical theory dubbed AABA form. AABA form allows us to assign a value to each section of a song. Once sections have values, then, it’s almost like a mathematician laying out a formula – you plug in quantities and arrange your sections according to your own liking.
These are the values normally used: ‘A‘ equals Verse. ‘B‘ equals Chorus and ‘C‘ equals Bridge. Hearing Michael Boothman’s song, one can surmise that the song was structured this way:
We, as beat makers, can adapt these ideas into a much simpler theory. We need three main beats: A, B, and C.
A will provide us the main rhythm to the sound that plays during the verses. B will be the most memorable beat played during the chorus. C is a bit different for us. C is our breakbeat. Breakbeat, like the name implies, breaks up the monotony of the previous two grooves. You already know that you have to insert an intro and an outro somewhere in your song. All you need to focus on is getting this part right. This is where your composer’s hat comes on (and preferably well-tuned ear).
ARRANGEMENT EXAMPLES
A + A + B + C
A + B + C + A
A + C + B + B
A + A + C + C + B + A
and so on.
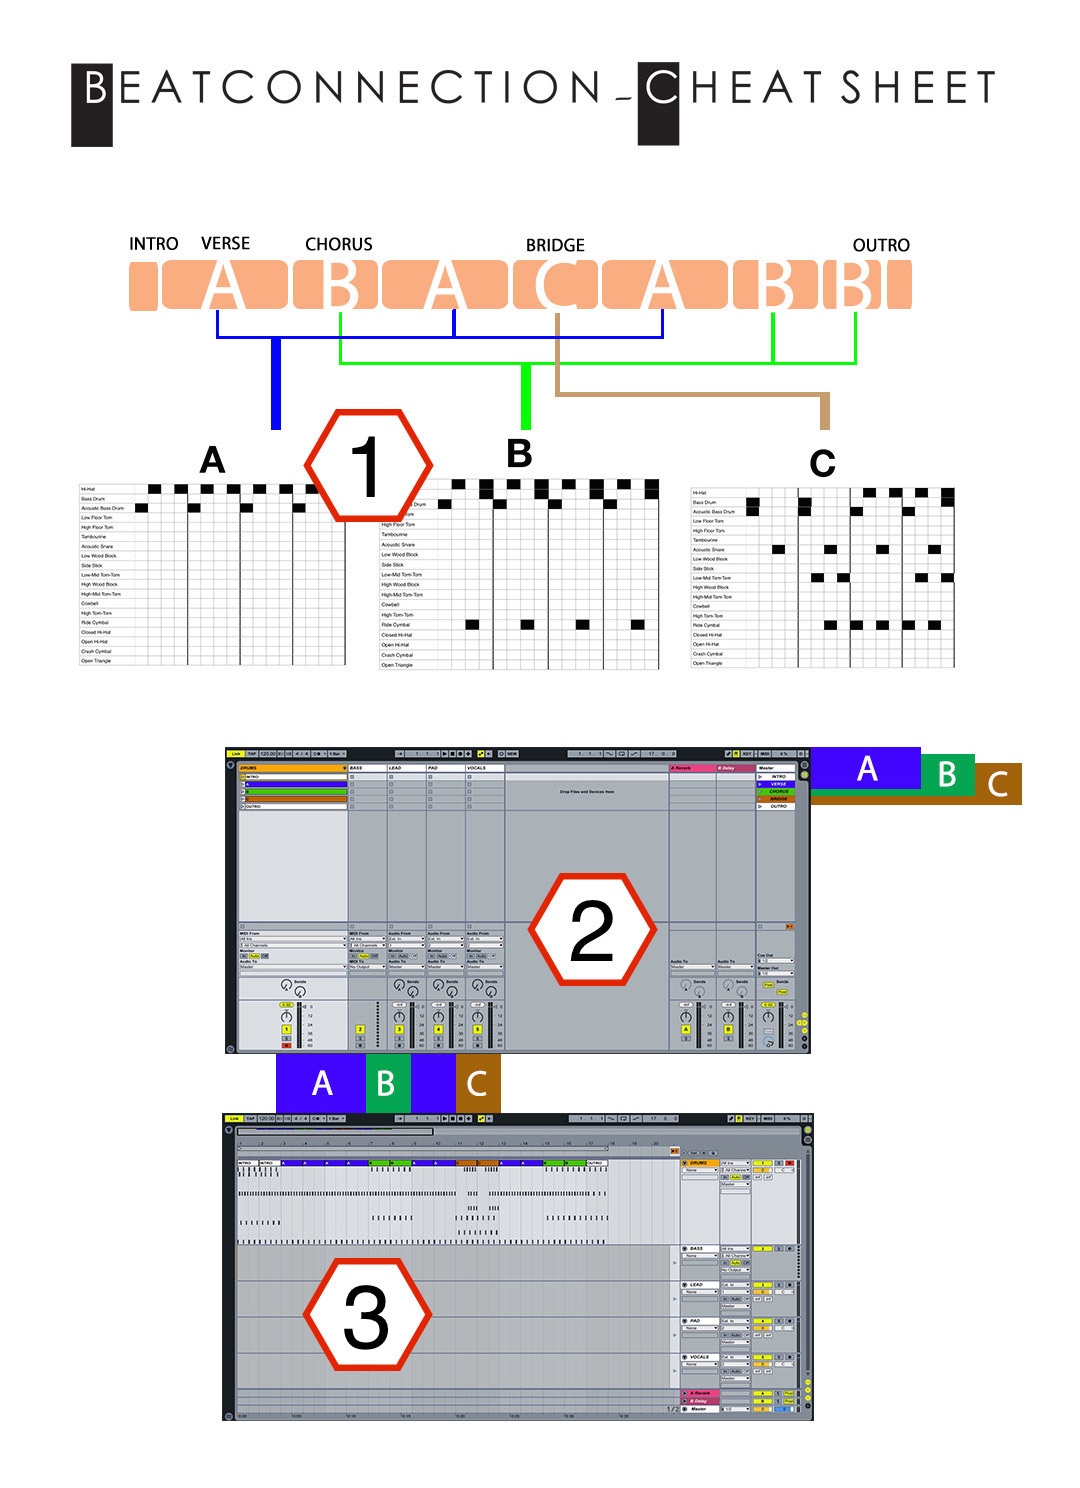
In Ableton Live, what I’ve been referring to as modules or patterns are called clips. Once we get to creating patterns, these clips will be used to arrange whole songs. For now, take a look at the cheatsheet below to find how song structures translate from theory to screen.
- 1. Song Structure Template
- 2. Session View
- 3. Arrangement View
A song structure template lays out in a formula or sequence what elements a song is composed of. Made up of an intro, verse, chorus, bridge, and an outro, all song elements are shown in these structure. Verse, chorus, and bridge are assigned values (A, B, and C) since they’ll make the bulk of a track. As a composer, you translate those three values into three separate rhythms or drum patterns – A, B, and C, as well.
With these three patterns you can create a whole song. Your song becomes its own as you use these three patterns to repeat certain themes, to emphasize memorable sections or to create variations of these same patterns to serve as intros and outros. You can even sub-divide chorus and bridge patterns to create pre-choruses and breakbeats that add more life to any song (at the cost of it becoming more complex). As always, your ear should be the best judge.
Ableton Live’s Session View is the screen view you use to create separate patterns for your song’s arrangement. Laid out like a spreadsheet, every column in Session View corresponds with a specific instrument used in the song. Meanwhile, every row represents a new element of the prospective song. Ableton Live calls each row a scene.
In the Cheat Sheet above, notice how I created five rows, and named each one (⌘ + R) to represent a different song element: intro (white), verse (blue), chorus (green), bridge (brown), outro (white). In the first column, I placed a Drum Rack instrument (orange) with a different clip in each row. A clip is basically an instrument pattern. Each clip I’ve added a name (⌘+R) to – Intro, A, B, C, Outro – corresponds with that instrument’s bit in the larger song element.
As you build elements of a song, ideally, you’d trigger/play a scene to hear all the clips/patterns, of every instrument in that row. Ableton Live gives you the flexibility to trigger different clips/patterns within columns, letting you improvise entirely different elements of a song.
NOTE: To switch from views, simply press Tab on your keyboard.
Ableton Live’s Arrangement View is where you’ll actually record a whole song arrangement. Think of Session View as the prep-work a chef does before he starts cooking. Arrangement View allows you to copy and paste clips from the Session View in the familiar “Song Structure Template” you’ve seen above. A timeline of sorts, the more clips you copy and paste, the more measures/bars of music you’ll create.
Also, in practice, you can hit Record, then proceed to play clips or scenes in Session view to make up your own song as it goes. In no time you can create something as simple as a jingle (as in the cheat sheet above) or create longer arrangements, with much wider bars, for your next tribal house dance masterpiece.
NOTE: To switch from views, simply press Tab on your keyboard.


Leave a Reply